All images in this walkthrough are property of Ubi Soft Entertainment™
All images in this walkthrough are property of Ubi Soft
Entertainment™
Walkthrough by Bert Jamin
© September 2005 Bert Jamin (www.gamesover.com)
This walkthrough may not be sold and may not be used for any commercial
purposes. Neither is it permitted to publish this walkthrough in any way without
the written permission of the author Bert Jamin (www.gamesover.com) and his E-mail address ([email protected]) are mentioned unchanged. For the most up to date walkthroughs always visit www.gamesover.com.
If you have any suggestions
to improve this walkthrough, let me know by sending me an email: [email protected].
Click on one of the images to go to that chapter,
 |
 |
 |
 |
 |
| K'Veer | Taghira | Todelmer | Noloben | Laki'ahn |
or click on the image at the bottom of this page to go to the next chapter.
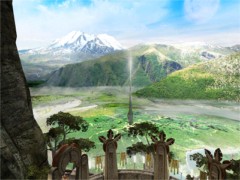
Laki'ahn
Turn around and exit the linking bubble. Cross the wooden bridge in front of you. Enter the linking bubble. Press the left symbol on the pedestal. Take the Slate from the pedestal. Turn around and exit the linking bubble. Turn to the right and walk to the house. Climb up the stairs to meet our trusted friend Esher. Turn around and go down the stairs. Turn to the right and walk to the beach. Turn to the right. Keep on walking forward until some boulders block the path. Turn to the right and go forward three times.
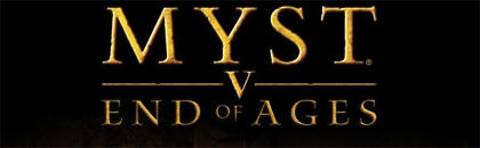
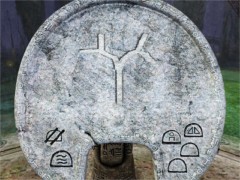
Turn to the left twice to discover a Bahro sign on the rock. Walk toward that rock to get a good view of that sign. Make a note of the sign. Turn to the right. Notice the space between the two huge rocks at the opposite side. Walk forward and go past those two rocks. Now you are standing in front of a little water stream and a building on the left side.
Cross the water and enter the building. Walk all the way to the end stop in front of a closed gate. Notice something sticking out of the water. Turn around and go forward twice. Turn to the right to see a broken part in the banisters. Cross that broken part. Go forward three times to see a windmill. Walk to the backside of the mill. What use is a windmill without wind? So... let's make some wind! Use the Slate and make a drawing of the Bahro sign you just saw on the rock. Drop the Slate on the ground and go forward twice. A Bahro will pick up the Slate and start a severe storm.
The wind sign
Climb up the backside of the windmill. Look at the controls. Notice that you can see into the building at the opposite side. Pull the left lever to activate the windmill. Pull the center lever once to pull up something inside the building. Press the red button at the right side of the lever. Pull the right lever once to turn around that something inside the building and press the red button at the left side of the lever.
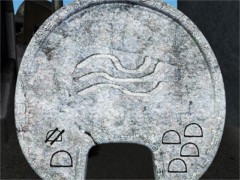
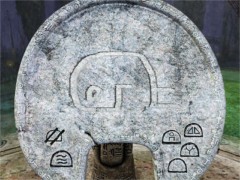
Turn around and exit the windmill. Turn around and walk toward the building. Turn to the right and walk straight forward to the broken part in the banisters. Step through the broken part. Turn to the left and walk to the closed gate. Now you can see what you just pulled up by using the windmill. Make a note of this new Bahro sign on the pedestal.
Turn around and exit the building through the entrance. Cross the little water stream to end up at the spot where you discovered the Bahro sign on the rock. Turn to the left. Walk up the sandy path and walk to the shore. Turn to the left and keep walking straight until you reach the spot with the linking bubble. Enter the linking bubble. Use the Slate. Make a drawing of the Bahro sign you just saw behind the closed gate.
The sign from behind the closed gate
Drop the Slate on the ground and exit the bubble. Go forward, turn around and re-enter the linking bubble. Press the newly appeared sign on the pedestal to end up behind the closed gate. Great... when you look around you notice that you can't go anywhere from here! Take the Slate from the pedestal and press the bottom sign on the pedestal.
Turn around and exit the bubble. Now you have to go back all the way to the windmill. To do so, walk onto the shore. Turn to the right and keep on walking straight ahead until your path is blocked. Turn to the right and go forward. Now you are back at the spot with the Bahro sign on the rock. Keep on going forward past the huge rocks. Cross the water and enter the building on the left side. Step through the broken part of the banisters.
Walk behind the windmill. Use the Slate and click on the left bottom image to get some wind again. Drop the Slate on the ground and step forward. Turn around and climb up the backside of the windmill. Pull the left lever to activate the windmill. Pull the right lever once to turn the cage inside the building. Press the red button at the left side of the lever. Exit the windmill and walk all the way back to the linking bubble.
Enter the linking bubble and press the bottom sign on the pedestal. Turn to the right and go forward to exit the cage. Walk straight forward through the water. Walk to the center of the Arena. Look around to see three other shafts. A fence closes the ones on the left side and on the right side. Another shaft on the right side leads to a dead end near the spot that has the Bahro sign on the rock.
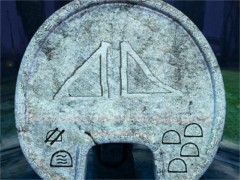
Climb up the slope wall at the center part of the Arena. Look around to notice four columns with yellow caps. Some of these are closed and some are open, showing a red color. Close all caps by clicking on the button beneath the caps. Press the big yellow button on the wall between the columns. Turn around to see a pedestal with another Bahro sign. Walk to the pedestal. Press the bottom sign on the pedestal. Use the Slate and make a drawing of the Bahro sign you just discovered.
The sign from the Arena
Drop the Slate on the ground. Exit the linking bubble and go forward. Re-enter the linking bubble. Press the newly appeared sign on the pedestal. Take the Slate from the pedestal. Turn around and walk toward the two columns on the left side. Press the button of the left column one time. Press the button on the right side two times.
Turn to the right and walk toward the two columns at the right side. Press both buttons two times. Press the big yellow button on the wall between the columns. Turn to the left, go forward and step into the water. Enter the shaft leading to the cage with the pedestal. Press the bottom sign to get linked to the linking bubble. Press the right most sign on the pedestal.
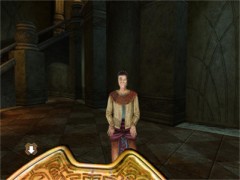
Turn around and step onto the outer rim. Turn to the left and walk all the way to the end. Press the red button on the little balcony. Turn around and go forward. Turn to the right and walk all the way to the end. Press the red button on this little balcony also. Turn around, go to the left and walk forward twice. Turn around and walk toward the closed door of the house. Have another meeting with Esher. Examine the door to see a strange shaped lock on the door.
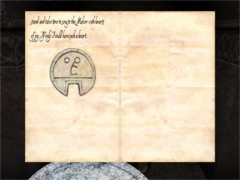
Turn around, go forward and step down into the water. Enter the shaft leading to the cage with the pedestal. Press the bottom sign on the pedestal. Exit the linking bubble, turn to the right and go up the stairs of the house. Turn to the left and go forward one step. Turn to the right and look through the window. Notice the piece of paper that is lying on the floor. Having the lock of the house in mind, those symbols look familiar! Make a note of the symbols on that piece of paper.
Enter the linking bubble and press the right most sign. Turn around and step on the outer rim. Turn to the right and go forward four times. Walk to the closed door of the house. Number the signs of the lock 1, 2, 3 4, and 5 from the left to the right. Press the signs in the order 5, 4, 2, 1 and 3. Enter the house.
Turn to the right and enter the next room. Look at the table and pick up the piece of paper with four painted lines, two red lines, a green line and a blue line. Exit the room and walk to the closed front door at your right side. Open this front door. Step outside and enter the linking bubble. Press the right most sign on the pedestal.
Take the Slate from the pedestal. Turn around and turn to the right on the outer rim. Go forward four times and turn to the right. Walk down the stairs into the water. Walk into the shaft on your right side. Walk to the first intersection. Turn to the right and go forward one time. Turn to the left and enter the next corridor. Go forward one time to end up on some sort of circular platform. You'll see a door with some kind of red doormat at the end of the corridor and a device at the left wall. Save your game here!
Walk to the door to find out that what looked like a doormat actually is a pressure plate. Turn around and go one step forward. Drop the Slate on the ground. Turn to the right and pull up the device at the wall. Turn around, pick up the Slate and step on the pressure plate once more. Notice that the circular platform at the crossing of the path has gone up and stays up as long as you are standing on the pressure plate. As soon as you step from the pressure plate the circular platform comes down. Now you have to find a way to get something or someone on the pressure plate in order to send yourself up with the circular platform... Save your game!!! Move your cursor to the right top of your screen and select Yeesha's Journals. Select the seventh Journal and page through the Journal to find a Bahro sign that you haven't used yet.
Did you see this one before?
Turn to the right and step on the pressure plate. Use the Slate to make a drawing of the Bahro sign you just saw in the Journal. Drop the Slate on the floor.

The sign to keep the Bahro long enough on the pressure plate
Turn around and walk to the device on the right wall. Pull up the device and quickly step onto the circular platform. As soon as you arrive on the upper floor, quickly step from the platform. Keep in mind that the platform will only stay up for a very short time! If the platform goes down immediate giving you no change to get off the platform you didn't make the drawing correctly on the Slate. In that case restore your saved game and try again!
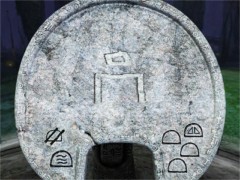
If you made it to the upper level it would be a good idea to save your game! Turn to the right twice. Enter the left corridor. At the end of the corridor you see a red button. Walk to that red button and press it. Turn to the right and walk to the next red button and press it. Turn to the right, walk to the green button and press it. Turn to the left, walk to the door with the blue button and... press this one too. Quickly step outside because this door only remains opened for a few seconds!!! If you made it, it would be a good idea to save your game! Turn to the right to see a pedestal with another Bahro sign. Make a note of this sign. Press the bottom sign on the pedestal. Take the Slate from the pedestal. Use the Slate to make a drawing of the Bahro sign you just saw.
The one but last sign
Drop the Slate on the ground. Exit the linking bubble and go forward. Re-enter the linking bubble. Press the newly appeared sign on the pedestal. Take the Slate from the pedestal. Turn to the left and walk forward to the boat on the beach for another meeting with our friend Esher. Turn to the right and walk toward the rocks. Walk to the beach. Turn to the right and go forward twice. Turn to the right and walk to the wooden structure. Notice some rocks hanging down on ropes in front of the wooden structure. Pull down the levers 1, 2, 3 and 6.
Turn to the right and go forward one time. Turn to the left and go forward. Turn to the left and go forward. Enter the opening in the rock. Walk to the other end of the cave. Turn to the right and have a look through the window. You'll see a distant island. Close to the window you'll see a pole with a flag. Because there is no wind, you can't see what is written on the flag.
Turn around and go through the hole in the rock you just came through. While standing on the beach again, use the Slate. Click on the wind image at the bottom of the left side on the Slate. Drop the Slate on the beach. Go forward twice and a Bahro will provide you with some wing again. Re-enter the cave and have another look through the window. Because of the wind you now can see a Bahro sign on the flag. Turn around and enter the cave once more.
When you set foot on the beach, turn to the left twice. Go forward and go to the left through the wooden structure. Turn to the right and walk toward the huge rocks in the distance. Turn to the left at the little water pool. Walk to the pedestal near the closed door. Press the bottom sign on the pedestal. Take the Slate from the pedestal. Use the Slate to make a drawing of the Bahro sign you just saw on the flag. Drop the Slate on the ground. Exit the linking bubble and go forward.
The final sign
Re-enter the linking bubble. Press the newly appeared sign on the pedestal. Have another meeting with our dear friend and companion Esher. Save your game because you are very near to the end of your adventure! Enter The Keep. Walk along the pedestal and press the blue-lit Slate. On arrival on K'Veer you will be standing in front of the linking bubble. Save your game once more!!! Why??? Because you are playing three wrong endings and finally the only good ending!!!
First wrong ending:
Turn around empty-handed and walk to the left back corner of the room past the
stairs. Walk straight on through the corridor. At the first intersection, turn
to the right. Climb up the stairs and keep on walking and climbing stairs until
you reach the end of the corridor. Turn to the right and enter the room. Turn to
the right and walk to the table with the Myst Book. Pick up the Myst Book and
open it. Click on the image in the book to get linked to the Island of Myst. Go forward and climb up the stairs twice. Turn to the left
twice. Go forward and climb up the stairs in front of you to meet a very
angry and disappointed Esher.
Second wrong ending:
Restore your last saved game. Enter the linking bubble. Take the Golden Tablet
from the top of the pedestal. Turn around and see how Yeesha is waiting for you.
Exit the linking bubble. Walk to Yeesha and give her the Golden Tablet. Enjoy
the music! However she doesn't seem that satisfied! Enter the back corner at
the left side of the room again. Walk all the way to the room with the Myst Book
again. Pick up the Myst Book and click on the image in the book to get linked to
the Island of Myst once more. I'm curious how Esher feels about you having given
the Golden Tablet to Yeesha... Go forward and climb up the
stairs twice. Turn to the left twice. Go forward and climb up the stairs in
front of you to meet an angry and disappointed Esher again.
Third wrong ending:
Restore your last saved game. Enter the linking bubble. Take the Golden Tablet
from the top of the pedestal. Turn around and see how Yeesha is waiting for you.
Exit the linking bubble. Walk past Yeesha and DO NOT give her the Golden Tablet.
Enter the back corner at the left side of the room again. Walk all the way to
the room with the Myst Book again. Pick up the Myst Book and click on the image
in the book to get linked to Esher once more. Go forward and
climb up the stairs twice. Turn to the left twice.
Go forward and climb up the stairs in front of you. Turn to the left and go
forward. Turn to
the right and enter the temple. Go forward and place the Golden Tablet on the
iron pedestal. This time it appears that our friend and companion is pleased! In fact he is very
pleased!! Or maybe... he is far too pleased!
Only good ending:
Restore your saved game. Enter the linking bubble and take the Golden Tablet
from the pedestal. Walk toward Yeesha but DO NOT give her the Golden Tablet! Instead, drop the Golden Tablet on the floor. Turn to the right and go
forward...
How to drop the Golden Tablet
And they lived happily ever after....