You are Claire Redfield and you are on a mission to find your missing brother, Chris. After getting captured in the Umbrella Facility in Paris you have been flown to a remote island that serves as Umbrella's own private prison. As you sit in your cell the island is attacked by unknown forces. The facility rocks with each blast and then the lights go out...
The first thing you need to do is go into your inventory and "equip" your Lighter so you can see your surroundings. The man on the other side of your cell will set you free then go sit down leaving you free to explore. Head back into your cell and search the dark corner to get your first Green Herb.
Now search the outer area and get the bullets to the right as you exit the cell. You can also look at the empty medicine bottle to get a valuable clue for later in the game. Now go get the Combat Knife from the table and exit the room.
On the other side of the door is your first save location (typewriter) complete with some Ribbons. Since you haven't done that much yet there is no need to waste a ribbon so early. Move on down the hall and head around the corner and up the stairs.
It's raining outside and a bombed transport burns at the top of the stairs. Don't get too close or you will get burned. As you head deeper into the graveyard an explosion rocks the area. Note the briefcase that tumbles out of the wreckage then get ready for some Zombie combat. There will be at least four Zombies and one of them will even be on fire. This would be a good time to practice with your knife, as the Zombies are spaced out pretty well.
 Head through the door into the next area and dive for cover behind the transport as you find yourself under heavy fire from a sentry tower. After you shoot out the spotlight with your new Beretta M92F you are introduced to Steve. He takes off for now, but you will meet up with him later in the adventure. For now, go get the bullets on the other side of the burning wreck and look at the large double doors for a clue on what you need to open them. Head through the door near the rubble opposite of where you entered.
The gate to your right is locked for now so continue forward then go up the steps to the porch. Head to the far end and pick up the Green Herb then return to the door and enter. The Zombies inside are spaced out so try to use your knife if you feel comfortable with it, otherwise blast them with your gun. Expect to use 5-7 shots per Zombie.
The upper area has a table with another Green Herb and there is some bullets on the main table. The small kitchen in the back corner has a map that you can take. Head through the only other door in this room to enter the bunk area.
Get the Blue Book from the middle bunk then investigate that banging noise. As you round the corner you can see a Zombie banking on the window. Get the bullets from the shelf and the Zombie will crash through. Don't let him distract you from the second Zombie crawling around the corner behind you. Kill them both then search the body to get the Twin Calico 100-P's. Check out the back shower stall for some more bullets then go back outside.
Head down the steps and follow the path around this building until you arrive at the door just on the other side of that locked gate. Go through the door into the next area filled with more Zombies. Ignore the ones inside the fenced area for now and kill the ones that are attacking you. Head toward the large metal door and turn right then go in the door at the end.
The security system in this area is a real pain. You need to dump ALL your metallic items into the drawer. This includes your lighter and any ribbons. Now you may proceed through the hall into the machine shop. Search the area and get the BOW Rounds and Flame Rounds for the Grenade Launcher (that you don't have yet) and get the First Aid Spray from the other table. You can play with the machine in the corner but you don't have the necessary objects to do anything yet.
Go through the door into the next area and read the Fax that provides a subtle clue to a non-metallic substance that won't trip metal detectors. Go around the corner to find Steve typing away on the computer and after you talk to him you can get the ribbons and open the drawer to get the Gold Emblem. You will probably want to save our game now.
Press the button on the wall by the door (where Steve was messing around) to activate the power outside then return to the machine shop and use the Gold Emblem in the scanning machine in the corner. With the design loaded into memory you now need to find that special material mentioned in the fax. Dump all your new items into the drawer on this side of the hall and go to the other side. Claim your items from that drawer and head back outside.
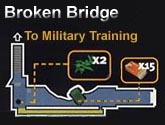
Head to the large metal garage door and press the button on the left to open the door. More Zombies attack and you can take out several by shooting the explosive barrel inside the garage. When the area is clear you can go to the back of the garage and get the Fire Extinguisher. Search the fenced area and the bloody guillotine for the Gate Key. Make a note of the shield indentation on the door then being the trip back to the graveyard.
As you make your way back around the bunkhouse you will be attacked by a pair of dogs. Kill them then continue around to the other side. Use the Gate Key to unlock the gate and toss the key. This will shorten your trip on return visits. Head through the next compound and kill (or dodge) any Zombies lurking there and return to the graveyard. More Zombies are waiting. Kill them as you make your way to the burning wreckage. Use the fire extinguisher to put out the flames and get the Briefcase.
Check this item in your inventory and rotate until you see the button then you can open it and get the Material inside. Now make your way back to the machine shop and use the material on the machine so it can create a replica of the emblem. Take this item back through the security hall which is not infested with 3 Zombies. You will have to dodge them since you have no weapons. Get your gear from the drawer then head back to the compound with the double doors.
 Use the emblem on the doors to unlock them then enter the next area. You are now on a long metal bridge that has a huge chunk blown out of the middle with a jeep stuck in it. A side catwalk allows you to cross over (tap the action key to go up and down the steps). Collect the pair of Green Herbs at the other end of the catwalk then double-back across the bridge to get some bullets from the front seat of the jeep.
 Locate the silver metal box that is out of place and push it toward the other two creating a safe path across the flames. Climb up onto the box and cross over then climb up the steps. A pair of Zombies greet you at the top. Dispose of them then head to the large doors to the right. They are locked but you can go through the single door just to the left and enter the Military Training compound.
Kill the pair of dogs that attack when you enter then make your way to the doors at the building to your left. You are now in the lobby of the training facility. Make a right and go up the stairs. Follow the hall and enter the lab office where you can collect the Crossbow and read the Memo that gives you a clue to the access code.
Now go back downstairs and get the Red Herb from the bench and the Bow Ammo from the phone booth. Ignore the door behind you for now and go to the far door opposite where you entered the lobby. Enter the locker room and kill the Zombies that are stumbling around inside. Search the locker that is ajar and get the First Aid Kit and search the body next to the other door for some arrows.
Enter the pool area and kill the Zombie who stumbles out of the sauna. Another one waits down by the pool. Climb in the water and examine the switch next to the fountainhead. Now move to the opposite corner and turn the red valve to shut off the water. Note the sparkle under the fountain. Return and get the Locker Key. Now return to the main lobby and go through that door across from the phones.
Kill the Zombies that lurk in this room then go to the copy machine and press the button to print out a map. Make sure to get the Green Herb from the body near the door. You can combine this with the Red Herb you got in the hall to make a full health potion and free up an inventory slot. Make a note of the locked drawer. This can be opened later after you have gotten the lockpick. Head to the back office and use the locker key on the cabinet in the back corner to get the Explosive Bolts. Actually this is a mixture that you must combine with your normal arrows to create 10 exploding tip darts. These are very powerful so save them for the big monsters.
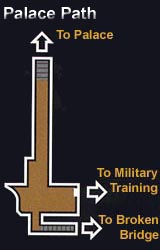
Leave the building and exit the compound through the same door you entered. Follow the Palace Path around to the right and kill more Zombies. Climb the steps at the end and go through the gate to enter the Palace Area. Three dogs attack as you move along the sidewalk. Kill them all then go up the main steps and get the Green Herb by the railing before entering the Palace.
The Palace is a big place with lots of places to go, many of which are locked right now. Head to the main reception desk and get the bullets. Check out the computer to learn you need a password then head up the main stairs and turn right. Climb some more steps and enter the study. This is one of the most important "save rooms" in this part of the game. Get the ribbons from the desk and the Green Herb
from the table the use the storage box to unload some of your inventory. Use the typewriter to save your game then search the back part of this room. Note the indentation of the twin guns on the door. Also note the sparkle under the cabinet. Push the cabinet aside and get the ID Card. Spin it around in your inventory to get the passcode, N T C 0 3 9 4.
Go back downstairs and use the computer. Enter the passcode to unlock the door in the corner behind you then toss the access card. Make a quick detour to the gray door and go inside. Equip your lighter and the bats will leave you alone as you get the First Aid Spray from the sink and the briefcase from the small alcove. You cannot open the briefcase until you have the lockpick so put it in the storage box on your next trip upstairs.
Now go to the door you just unlocked with the computer and enter the hall filled with Zombies. Kill them all and don't get ambushed by the one hiding around the far corner. Get the Red Herb then head to the door at the end and enter the study. Get the bullets from the table then press the button under the Ant. This starts a movie and when it's over a display case moves forward revealing a secret room.
Enter this narrow room and get the Ship Wheel. DO NOT take the Gold Lugars no matter how bad you want them. Trust me! Make your way back to the main foyer of the palace and head toward the exit. As you start to leave you will hear Steve scream from somewhere in the mansion. Run back to the room you were just in and you will find that he tried to take the Gold Lugars and is now trapped in the room. Examine the puzzle on the wall and choose options C and E to disarm the trap and free Steve. After a brief conversation he takes off with the Gold Lugars.
Leave the palace and get the Green Crest, which is lying on the ground opposite the stairs. Head down the path to the right and go through the gate at the other end. Go down the stairs to the dock area. Make a U-turn at the bottom of the stairs and search under the stairs for some bullets and a map. Head to the other corner of the dock and get the arrows then approach the pedestal and use the Ship Wheel. Give it a spin to raise the mini-sub and extend the platform so you can board the sub.
Inside the sub you will want to search behind you to get the Side Pack that allows you to carry two more items. Now press the lever to submerge the sub. Follow the passage around and down the stairs to enter the dark office area. Kill all the Zombies and get the bullets from the chair and some ribbons from the shelf. Go to the door by the aquarium and enter. Equip your lighter to keep the bats off of you and approach the console at the far end. Activate the console then insert the Green Crest into the socket. Only two more to go.
Return to the previous room and go through the other large door. Cross over the bridge and enter the next area. Find the lift in the corner and ride it to the control room where you can use the controls to move the overhead arm UP then LEFT until the circular shadow is over the large crate. The arm will pick-up the crate giving you access to the blue control panel. Ride the lift back down and activate the console to raise the large lift in the center of the room.
Have a good weapon ready when the lift arrives as it is full of Zombies. When they are dead you can search the crate in the corner to get the Umbrella Key Card and some arrows. Exit the lift and get the pair of Green Herbs near the control panel then make your way back to the palace. Your next objective is back at the Military Training area but you may want to stop by the palace to save your game and adjust your inventory. Make sure to keep your new key card before proceeding.
When you enter the courtyard of the Military Training area a giant worm bursts from the ground. Dodge the monster and make your way back to the doors leading to the lobby. Once inside, head toward the card reader next to the door leading to the locker room. This opens the shutters and gives you access to a new passage. Go down the passage and the door shuts behind you. Exit out the other side into an open courtyard. Alfred is waiting for you on the upper landing. Quickly dodge his sniper laser and run up the stairs forcing him to run away.
Ignore the locked door on the left and make a note of the shield impression on the central pedestal (identical to the one by the guillotine) before going through the door on the right. Head down the long hall and you will find yourself trapped by Alfred. Get the two boxes of bullets then go through the door on the right to enter a room with a storage box and a typewriter as well as a Green Herb, ribbons, and some Hemostatic Medicine. Organize your inventory making sure you have the Bow Gun, some explosive arrows, and a few empty slots before leaving this room and going through the only other door.
 Head to the corner of the landing and get the Twin MAC-11 Ingrams that are just lying there. This triggers a movie where the Bandersnatch if released. He's not as bad as he looks, and you can kill him with exploding tip arrows. Pause between your shots to allow him to recover from the blast or you may have to shoot additional darts to finish him off. Go down the stairs and through the door that opens for you.
After the exciting movie Claire is now in possession of the Gold Lugars and you are now in control of Steve who is armed with some deadly machine guns. This is your only opportunity to play as Steve so let the bullets fly freely as you go on a multi-room Zombie rampage. Kill the Zombies in the first room including the one behind the bars then go through the door on the back wall and clean out that room. Ignore the items inside - Claire will be back for them later. Leave the small room and go through the other door. Go down the stairs and shoot the barrels that will blow-up killing several Zombies. When this room is cleansed you can go up the steps and through the next door. Claire will now join you.
Now that you are in control of Claire again you can follow Steve to the garage area. After an emotional movie you can search the garage and get the bullets from the top of the barrel. You will need to climb up on a crate to get them. Exit the garage through the double doors and you will be in an area with a large tank and a pair of nasty dogs. When they are dead you can pick up two loads of arrows then unlock the door and return to the main compound with the giant worm. As you make your way across the shaking compound make a quick stop by the barrels to pick up two more loads of arrows then sprint for the exit.
SPECIAL NOTE: Now that you have the medicine you can return to the guard who let you out of your cell at any time. In exchange for your lighter and the medicine he will give you a Lockpick, which is very useful in opening the briefcase you currently have in storage and some locked cabinets and drawers. The only downside to this is that there are some upcoming areas with bats, and you will not have to fight them if you part with your lighter. The choice is yours, but I recommend going for the lockpick at this point in the game.
 With or without the lockpick your next objective is that door where you need to use the Gold Lugars. Return to the palace and be prepared for a swarm of Zombies all over the foyer and the landing upstairs. Kill them or avoid them and make your way to the upstairs study where you can use the Lugars to unlock the door. You will probably want to save your game and adjust your inventory before proceeding. If you have the lockpick you can open that briefcase you got earlier and get 10 more exploding darts. Make sure you have the Bow Gun and exploding tip darts with you before proceeding.
In the next room you can get some bullets from the table then approach the large desk and use the computer to view a movie. When prompted for a password, enter 1971 and the musical clock slides away to reveal a hidden passage. Of course the Bandersnatch that just jumped through the window is probably more important. Unload a pair of exploding tip arrows and he won't bother you anymore.
Enter the secret passage and get the Green Herb in the corner just as you enter. Follow the bridge that leads to the classic haunted mansion high on the hill. At the top of the stairs a Bandersnatch drops in behind you and another climbs over the wall. Kill them both quickly with a pair of explosive shots each then continue up the steps and enter the mansion. The foyer is full of bats. You can use your lighter (if you still have it) or kill them with your pistol.
Now head to the door to the left of the stairs and enter the dark room. Another Bandersnatch is lurking in the shadows. Two more exploding darts will take him down. If you have the lighter you can light the fireplace and shed some light on the area. Search the room and get the bullets and ribbons from the far corner and the two sets of bow darts from the mantle.
 Return to the foyer and go up the stairs. Get the bullets and First Aid Spray from the upper landing then enter the red padded door. After the movie, go to the right and enter the bedroom around the corner. Look at the music box and the bed will move allowing you to get the Ashford Key. Now return to the palace.
Back at the palace you need to exit the study and go across the upper landing to the locked door on the left. Use your new key to enter the bar and collect the bullets, grenades, and a pair of Green Herbs. Make a note of the piano then leave the room and go downstairs to the main foyer. Go to the door in the corner that you unlocked with the computer and enter the hall. Use the key on the door directly across from you then toss it.
Enter the new room and kill another pair of Bandersnatch monsters. Get the bullets from the chair and the Shield lying on the carpet and search the area around the TV screen to get the HUNK file. You now need to make the long trip back to the prison area and use the Shield in the socket by the guillotine. If you haven't already gotten the lockpick this will be your last good opportunity to do so.
Fresh Zombies guard the area around the guillotine. Kill them all then use the shield in the door to open it. Kill the Zombies on the other side and enter. Quickly shoot the exploding barrel to kill even more Zombies that attack as you enter the new area. Go down the longer of the two paths and through the door. Get some bullets by the barrel then push the crate so you can open the door. Make a note of the storage box - you may need it.
Go through the door and you will find yourself in the computer room from the first part of the game. You can now access the security drawer in the machine shop and get the items you placed there earlier including lots of grenade rounds. Collect your items (especially the Fire Extinguisher) and put them in the storage box back outside. Head back through the door to the corner where you shot the exploding barrel and go down the shorter path. Search near the barrel for a Green Herb then enter the door to the infirmary.
Get the bullets and search the cabinet for some First Aid Spray then enter the office where you can get the Red File. Make a note of the human model with the missing eye then return to the main room and go to the door in the far corner. Kill the Zombies in this room and collect the bullets, briefcase, and a Red Herb. Inside the case are parts to modify your handgun for rapid fire and will increase the ammo capacity.
Return to the previous room and you will find a doctor eating a patient. The doctor is fast and strong. Blast him with your new modified weapon and kill the patient who also gets up and attacks. Search the doctor's body and get the Glass Eye. Return to the office and insert the eye to open a secret door. Go down the stairs and fight off the bats (or use the lighter if you still have it). Get the Green Herb as you head for the other door and enter the torture chamber.
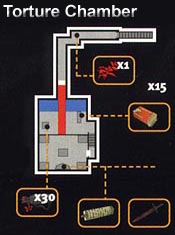 Kill some more Zombies and get the arrows and bullets then go downstairs to the dungeon. Take the sword from the statue and the room fills with gas. Quickly turn the central statue counter-clockwise to disarm the trap. An iron maiden spins into view. Insert the sword into the slot and the door open. Put a few bullets into the Zombie then collect the Music from inside the iron maiden.
The music fits in the player piano back in the palace bar. That is your next objective so go there now.
When you insert the music the piano plays and the slot machine opens up revealing a Blue Ant. Return to the study and save your game. Adjust your inventory. Leave the ant in the box and make sure you have the Biohazard Key Card before leaving the palace and heading back to the Military Training area.
Dodge the giant worm as you run across the compound and enter the area with the tank. Go in the garage and unlock the door leading to the dark hall. Kill the Zombies in the hall and get the bullets in the corner. Go down the hall and through the door into the next room. Get the ribbons from the typewriter stand and take the Shield from the wall. Return to the compound with the worm and duck into the main lobby.
If you have the lockpick now would be a good time to stop in the office and unlock that drawer and get the bullets. Use the key card back out in the lobby to open the security door by the locker room and go down the long hall to return to the courtyard where Alfred was shooting at you earlier. A pair of dogs will attack as you make your way to the stairs. At the top you can insert the shield and the lid opens allowing you to take the Blue Key Card.
Go back down the stairs and move toward the burning barrels until the camera angle changes allowing you to see the fenced area with the ladder leading down. Climb down and use the key card to open the gate. You are now down inside the boiler room where you got to play as Steve earlier. Take the stairs to the right and use the key card again to open the cage and get the Grenade Launcher. The door inside the cage leads to a room with a pair of Bandersnatch monsters. The only thing inside is some arrows, so you can decide if it's worth the risk.
Along the back wall of the main room there are some grenades on the shelf. Enter the other door and use the lockpick on the cabinet to get the acid grenades inside. Go around the corner to the work area and get the bullets. Everything else in this area is for later in the game when you are playing as Chris. Go back through the door leading to the boiler room and up the other stairs. Get the bullets from the gargoyle head then get in the elevator and ride it up to 2F.
Use the key card one final time to open the door then toss it. Go up the steps to the right and get the grenades near the command chair. A pair of Green Herbs are down on the lower area along the left wall near the computers. Get the Red Crest near the lit monitor then use the security camera to view the lab and zoom in on the picture to get the access code, 1126.
A pair of Zombies attack when you try to leave. Kill them then unlock the door on the left wall and exit back out to the upper balcony overlooking the courtyard. Go down the stairs and back down the long hall to the main lobby. You can use your other access card to open the other closed door then toss the card. Go up the stairs and reenter the lab office. Enter the code and go into the lab. Get the acid rounds from the table then take the picture off the wall.
Shoot or dodge the creatures as you make your way out of the lab and back down to the lobby. You have to reach the lobby before the timer expires. Head back outside to the area with the giant worm and run back to the area with the tank. Go in the garage and through the door leading to the dark passage. Go back to the room where you got the blue shield earlier and put the painting on the wall. The back wall moves revealing a model of the complex and a Gold Key. Use the lockpick on the small cabinet to the right and get the First Aid Spray. Finally, read the document on the pedestal and remember the numbers 12 and 8.
Return to the mansion and go through the corner door in the main foyer. Head down the hall and turn right where you can use the gold key on the large double doors. Toss the key and enter the art gallery. There are many paintings in this room and a button under each. Go up the stairs and read the clue to figure out the family tree then go press the buttons under each painting in the proper order. If you don't want to figure it out here is the answer:
1. Lady Ashford
2. Man holding 2 babies
3. Man with teacup
4. Man with red hair
5. Old man next to the man with teacup
6. Man next to Lady Ashford
7. Alfred Ashbury (picture at top of steps)
Get the Vase that pivots into view and examine it in your inventory to look inside and get the Red Ant. Return to the foyer and go upstairs to the study. Get both ants and load up on ammo then head back to the mansion. The covered bridge is swarming with Zombies and another pair of Bandersnatch monsters are waiting at the top of the stairs. Continue into the mansion, which is now overrun with Zombies. Kill or dodge the Zombies and make your way upstairs where even more Zombies are waiting in the hall.
Head to the bedroom on the right and use the Red Ant to open the music box so you can take the music disc. Exit the room and go around to the other bedroom killing any Zombies along the way. Use the Blue Ant to open this music box and insert the disc to play the music. The bed lowers allowing you access to the ladder leading to the third floor.
Get the Green Herb and the Dragonfly from the chair. Examine the dragonfly and pick off the wings resulting in a key that you can use in the ant mural on the opposite wall. This rotates the carousel giving you access to a new ladder leading to a loft. Climb this ladder and get the ribbons by the typewriter. There are also some bullets by the chair and a newspaper article on the steps to the left. Now push the box to the right and climb up to get the Green Book and the final Blue Crest that was under it.
 Make your way back down to the bedroom to trigger a movie. When you are in control examine the blonde wig and watch another movie where Alfred initiates a self-destruct sequence. Time to get off this island! There's no real time limit at first although the annoying klaxon will get on your nerves. Head back to the palace and save your game in the study. Adjust your inventory as needed and make sure you have both the red and blue crests before heading to the submarine.
Kill or avoid everything that gets in your way as you make your way through the underwater complex. Go through the door by the aquarium and insert the remaining two crests into the console giving you access to the cargo plane. Grab the Control Lever from inside the plane and head back to the main office. Go through the other large door and run across the bridge to the warehouse where you used the mechanical claw earlier. Ride the lift up to the control room and go out the other door. Use the control lever on the console and raise the bridge. Run across the raised bridge and enter the new area.
Search the locker and get the First Aid Kit then search the dead body in the other corner and get the Key. Run back across the bridge and ride the lift down. Approach the red K-402 door and use the key to unlock and open the door and enter. Collect the bullets and grenades from the crate and get the pair of Green Herbs. Use the storage box to adjust your inventory. Get a powerful weapon and save your game then push the two boxes into the lift. The first box goes straight in. The other box needs to be pushed to the back wall then pushed into the lift. This starts a 5:00 countdown.
You exit the lift in the area with the giant worm. Make a quick U-turn and exit to the palace path. Head toward the palace and you will have your first encounter with the Tyrant. Keep your distance and unload some powerful weapons. He will fall to his knees several times but do not try to pass until he is lying flat on the ground. Quickly make your way to the sub and through the underwater complex until you are back on the plane. The movie will take over and you escape the island.
 Looks like you have a stowaway onboard. Get the ribbons by the typewriter and adjust your inventory using the storage box to the right of the rear door. Load up on healing and explosive weapons like grenades and any remaining arrows. Save your game then enter the hatch...
The strategy for beating Tyrant is simple to explain but very hard to do. Tyrant moves very slowly until he gets close then he attacks with lightning speed and is very deadly. You need to constantly check your health and keep it in the yellow or green range. Try to stay along either wall and as he gets close switch sides and run past him. Turn and fire 1-3 shots from your most powerful weapons then wait and repeat.
Stay away from the rear of the plane or he can toss you out the back. As he takes damage he will start to slow down and when he starts to bleed you can make your move. Go to the hatch and press the switch to eject the cargo container. It will smash into Tyrant and send him flying out the back of the plane. If you do this too early he will shove the crate back into the plane and you have to wait up to a minute for the eject button to reset.
Return to the cockpit and enjoy the movie then save your game before proceeding to Part #2 of the adventure.