
After you have caught your breath from that amazing opening movie you will find yourself back in your home village, or rather what's left of it. The nearby door leads to your home, but that haunting voice needs your immediate attention. You may want to visit the Magic Mirror to the right before heading down the stairs.
As you move down the street a survivor staggers into the village quickly followed by several demon soldiers. These guys are pretty easy so practice some of your advanced combat tactics. When they are all dead you can continue down the path and out the city gate.
Continue down the path and cross the bridge where more soldiers are waiting for you. In addition to the normal soldiers there will be a few Samurai (dressed in red armor). These are tougher foes so make sure to prioritize your attacks. You will fight several waves of these demons before things get quiet and if you leave the area and return they demons will respawn. Don't overlook the item box containing the Imasho Town Map. It's just past the bridge to the left. Continue along the path and up the stairs hitting  to open the door and enter the next area.
As you near the lake three large stones rise out of the water and the cave entrance opens. To your right is a box with an Herb partially hidden behind the trees. As you move around the lack in the other direction you will see a Frog hopping across the path. Pick him up then jump across the stones and enter the cave.
Your first trip through these narrow passages is uneventful so enjoy the mystical lighting and steam jets. Go through the door at the other end to trigger the first major cutscene where you meet Takajo. When the movie is over you will have acquired the Charity Orb and the Play Instructions. There is also another Herb to the side of the door.
Several demon soldiers are now waiting for you back in the caves. Defeat them and don't forget that you can now collect all that soul energy floating around. You can also drain the energy from the Soul Shrine before you make your way back across the stepping-stones. Make a mental note of the location of the shrine along the left shore of the lake. This is where you will get the Buraitou, your first magical sword. DO NOT use the shrine just yet or you will leave the area before you have a chance to collect some valuable GIFT items.
Make your way back to the village fighting through multiple waves of soldiers. You can now go through that door next to your starting location and enter your former home. Enter the foyer and slash the screens to reveal a closet with a Abacus inside. Head left and prepare to fight the small army of demons that are scattered throughout the house.
At the end of the long hall is your first Trick Treasure box. This particular box gives you two moves to align the circular pattern in the center. Use the top-right arrow and the right-bottom arrow to solve the puzzle and collect the Power Jewel inside. Use these jewels as soon as you get them to increase your maximum stats.
Continue into the large room and get the Kaleidoscope to the right of the entrance then move into the back room to the left and get Artwork #10. This is one of 18 "trading cards" that you can collect throughout the game. If you get them all you will unlock a special mini-game. In the opposite corner you will find the Four Guardians (right), another item that goes into your picture inventory and will help solve a puzzle much later in the game.
Take the narrow hall to the other side of the house and get the Fork in the kitchen then go into the next short hall and through the door. This next room has an interesting bureau along one wall but you won't be solving this puzzle until much later. Head out the back door and make your way around the back of the house killing the soldiers that ambush you around every turn. The first room has an item box containing the Oolong Tea. You can either smash the screens leading to the next room or go outside and around. The Four Guardians (left) is in this final room giving you both pieces and half the solution to the bureau puzzle.
You should now have collected all the important stuff from inside the house. Don't forget to click on various objects to get interesting history and story info. Check the back corner of the backyard to get some Wasabi then make your way through the house, through the town and all the way back to the lake where you can now use the shrine and get your Buraitou. It's off to Imasho Town.
Imasho Town
Welcome to Imasho Town situated at the base of a lucrative gold mine. After the opening movie you can start talking to the various people on the street starting with the man on your left wearing the hat who will give you some Confetti. You can explore the town as you see fit or follow along with me. Head north to the entrance of the blacksmith shop. Look to your right to spot an item box with the Imasho Town Map then enter the large building.
Make your way around the perimeter of the giant fiery forges smashing all the barrels blocking your way. Open the item box around the other side and get the Cloth then return to the entrance and flip the lever to lower the lift. This is on a short timer so run quickly around the room again and get on the lift to ride up to the loft. Collect the Bow and Arrows then leave this place and head back south.
Go all the way through town passing the store and the bar and go up the steps leading to the marketplace. In the first tent on the right is a box with a Globe. Continue to the next screen and talk with the man next to the stables to get the Ancient Documents. Continue past the stables and you can just make out the corner of an item box that contains the Tengu Mask. There will be more items to get in this area later but for now let's get a drink.
Return to the main street and enter the bar. The people here aren't too friendly and won't talk much. You can head out the back door and use the Magic Mirror and the Magic Fountain and get the Pipe from the item box. Go back inside and upstairs to find an item box near the door leading out to the balcony. Get the Folding Fan inside then head back downstairs.
The rest of the items you are going to need are at the shop next door. You currently have 1000 Gold and it's going to cost 2200 Gold to buy everything in the store. For now, stop in and buy the Egg since this item actually starts to evolve as soon as you add it to your inventory. Exit the store and head back north turning left at the blacksmith shop and go up the steps leading to the mountain path.
Get used to the next six screens as you are going to be spending a lot of time here. This path is crawling with demon warriors and is a great place to stock up on Gold and enough soul energy to power-up your Buraitou blade. Grab the Unique Mushroom on the first section of the path then move on around the turn and get the Telescope
from the item box. Kill all the soldiers as you make your way along the rest of the path and up the stairs.
The guard at the mine will not let you pass without a permit that you can now buy back at the bar. Before you go all the way back into town you can keep clearing the mountain path over and over until you have enough gold to empty the story and get your permit. Even after you have the necessary gold you may want to keep killing demons until you have at least 7000 red souls enabling you to power-up your Buraitou to level 2. As you are moving up and down the mountain path killing demons keep an eye out for a Black Beetle crawling up a tree. This beetle appears at random and is on the left tree two screens past the item box as you head up the mountain.
Return to town, enter the story and buy everything he has to offer. You now have a good stock of items and are ready to explore the Gift Exchange portion of Onimusha 2. Enter the bar to start the next sequence of events. After you break up a fight between Ekei and Magoichi you will receive the Gift Exchange Instructions. These are just two of three possible characters you can start to develop a relationship with.
The third person is the elusive Kotaro, a very skilled Ninja. Just meeting Kotaro takes a bit of effort and you will only have three chances to do so in the entire game. If you are interesting in meeting Kotaro at this time then return to the entrance of the blacksmith shop and talk to the two men standing outside. Return to the bar and go upstairs and you will find Kataro in the previously empty loft. Talk to the man sitting with Kotaro to get a Fur Skin and the large man resting on the balcony will give you History Book #9 if you bother him enough.
You now have three people to exchange gifts with and I will leave that decision entirely up to you. Each character has their own pro's and con's and will trigger various unique cutscenes later in the game. You will have to play the game multiple times to fully explore everything, so pick the character you like the best. Personally, I went with Kotaro simply because he is so elusive. You will have other opportunities to make friends with the other guys later in the game.
Remember that there are complex relations going on with all of these characters so if you make friends with one person you may lose favor with another. Ekei and Magoichi are rivals so you can never have both of them as allies at the same time, and Kotaro doesn't like either of them so if you want to be his friend you can't be giving gifts to them. This makes things a bit complex, as most of Kotaro's best gifts are items you must get from Ekei or Magoichi.
The trading system is quite complex so make sure to use my Gift Exchange Guide to make the best deals. Also make note of any items that generate a better response when they are combined with another item first. There are also some items that generate a unique response or even a cutscene if you give that item as the first gift. I highly recommend saving your game before you start any major gift exchange just in case you don't like the way things turn out.
Making friends at this time is still optional. When you are ready to get back to the adventure go to the back of the bar and buy a Permit for 100 Gold from the man near the bar. Head back out of town and up the mountain path killing all those demon warriors that just keep coming. Give the man your new mining permit and he will let you pass. Grab the History Book #4 from the box next to the entrance of the mines then watch the short movie as you enter the gold mine.
Gold Mines
The mines are a source of great wealth and great danger. The passages are narrow and demons will often surround you affecting your ability to fight. It will be crucial to take out the most powerful demons quickly and go for critical hits and knockdown attacks whenever possible. Keep your eye out for gold deposits scattered about the mines. These may be as obvious as piles of gold nuggets lying in the dirt to concealed deposits inside wooden buckets. These buckets are of particular importance, as they will continue to generate new gold each time you visit the mine. Take care not to accidentally destroy these during combat and make sure the demons don't smash them either. To get gold from a bucket simply move behind each bucket and any gold will be added to your inventory.
The mine splits into two paths at the Magic Mirror. Take the shorter path to the left that quickly turns into a dead end. Take the Demon Wall Scroll from the item box and search the back of the room for a trick treasure box. You have two moves to open this box so press the right-bottom arrow and the bottom-left to complete the pattern. Inside is the Buraitou Secret Technique. You can now do this special move (see Combat Tactics).
Return to the entry chamber and head down the right passage where you can get the Gold Mine Map from the item box. Continue through the tunnels fighting any demons you encounter. You will reach a T-intersection where demons attack from all directions. These Jaido demons are tougher than the soldiers and come in two flavors with the dark green demons being the tougher of the two. Make sure to pick up any gold these guys drop after they vanish.
Head south and you will meet up with Ekei and Magoichi after you kill a few more demons. Depending on who you have traded with and who is your strongest ally, one of these characters will help you finish off the next wave of demons. If you haven't traded with anybody then Ekei will help out and if you are buddies with Kotaro then he will suddenly appear and do some cool ninja moves.
Continue following the passage until you arrive at the dead end. Along the south wall is an item box with the Five Oni Orbs document. Use the shrine at the end of the passage to acquire the powerful Hyoujin-Yari, a deadly ice spear with incredible range and freezing magic. As tempted as you might be to equip this new item, keep in mind that your sword should be at level 2 right now and will do more damage until you can power-up your new spear.
Retrace your steps back to the T-junction fighting more demons along the way. Head north from the intersection and temporarily equip your spear to remove the demon lock on the door. Continue into the next area and get the Medicine from the item box and use the Magic Mirror to save and enhance your Hyoujin-Yari. If you don't have enough soul energy simply return to the T-junction and fight more demons until you do.
You are about engage in your first boss battle so it's a good idea to be fully prepped with full magical power on both weapons and if possibly, have your purple soul energy at level 4 so you are only one soul away from entering Onimusha mode during the boss fight. And finally, if you haven't made at least one ally by now it would be a good idea to pick someone and give them some really good gifts. They may just save your life in the upcoming battle.
When you are ready to proceed return to the sealed door just past the save location and use your Charity Orb to remove the stone blocks. Enter the large cavern filled with supernatural mining equipment and prepare to face off against Ginghamphatts. This guy is big and powerful and blocking his attacks is very ineffective. You will need to use plenty of charged attacks and magical attacks for both of your weapons. When you are reduced to weapon combat use the spear as it provides a longer reach and you will be able to dodge any attacks on you. One particularly good strategy is to lock-on with the R1 button then sidestep as Ginghamphatts prepares to strike. If you do it right you will circle around and execute a critical hit.
Lots of soul energy will be floating around during this battle but don't risk collecting it unless you are out of range for an immediate attack. Purple and yellow energy is the only stuff really worth the risk. If you can enter Onimusha state you can really start delivering some damage. Another great tactic is to power-up your Buraitou (Hold R1) and execute your new special technique for a very powerful hit.
Watch for exploding machinery and other monsters that will do collateral damage during this encounter. If you drop to less than half your health your best ally will rush into the room and help out. Use this time to absorb souls or even better, move around behind Ginghamphatts and get in some powerful strikes from the rear. When this arachnid finally falls be prepared to collect all the soul energy at one time for a super +40 soul bonus. There should be a substantial amount of gold lying around as well.
Continue on into the next passage collecting any loose gold along the way. Do NOT talk to the miner lying on the ground just yet or you will be sent back to town before you are ready. Instead, continue around the turn climbing over a mysterious looking hatch until you reach a dead end. Get the Mirror from the item box and smash the wooden crates to reveal a trick box. You have four moves to open this box and claim the Hyoujin-Yari Secret Technique scroll. Start with the bottom-right arrow then the right-top followed by the bottom-left then the right-bottom to complete the puzzle.
Now you can return to the fallen miner and talk to him to trigger the cutscene that leads you back to the loft above the bar. You will receive the Red Ring that can be used to open that stone hatch you saw back in the mine. Before you go rushing off you will want to do some shopping and explore the city a bit more. Things have changed in the short time you've been gone.
Start by going to the shop, which has now been fully restocked and will cost you 5100 Gold to empty a second time. You should now have an impressive collection of items including a chick, which has hatched from that egg you bought earlier in the game. Keep your eye on him from time to time. A lot of the new items you just bought are armor that is specific to certain sub-characters. Giving the appropriate armor to the proper character will generally get you a good exchange item and some ally points. Remember not to give everybody everything all at once or you could easily generate a negative response with rival characters.
IMASHO TOWN Mini-Quest #1
There are new characters and opportunities all over the city right now and many of them are only available at this one point in the game. Let's start by heading to the back of the shop and talking to the man who tells you about his sick father who needs a healing melon. He will give you some Chalk in hopes that you can exchange it for a melon. This isn't as hard as you might think and can be done back in the bar. Return to the bar through the newly opened connecting door and talk to Ekei sitting at a booth. Give him the Chalk in a gift exchange and he will give you the Tale of the Heike. Note that this exchange causes a loss of ally points. If you are trying to build relations with this character you may need to offer a good item to repair the damage.
Now find Magoichi sitting at his usual table. If you have talked to him at all you know his love for history and rare books, so give him the Tale of the Heike and he will give you an Emblem in exchange. Take this Emblem upstairs to Kotaro and he will give you a Melon that you can take back to the man in the shop. Note: This is your second of three possible encounters with Kotaro. If you didn't meet him the first time you will need to watch a short cutscene before you can approach him in the loft.
All of this trading will pay off later in the game when you return to the shop and meet the man's father who ultimately received the melon. He will give Jubei an Orange Necklace that you can equip to reveal hidden clusters of soul energy. Check out the Secrets and Hidden Items section for detailed information on these locations.
IMASHO TOWN Mini-Quest #2 (Allied with Magoichi)
You now have a one-time opportunity to undertake a short quest back in the mines provided you are better friends with Magoichi than Ekei. Look for a man standing near the back door of the bar. If he is not there give Magoichi a few good items, leave the bar and return and the man should now be there. Talk to the man who will sell you the
Potassium Nitrate Map for 50 Gold. Even though I've marked the locations on my map you must purchase this item to trigger these pick-ups back in the mine.
The demons have increased in number and power back in the mines so you may want to save out back behind the bar before leaving town. Return to the mine and visit the three locations marked on the map to collect the three Potassium Nitrate deposits. Return to the mine entrance and give all of them to Magoichi who will convert them to Burst Bullets (x5). These will come in handy when you get the gun later in the game.
IMASHO TOWN Mini-Quest #3 (Allied with Ekei)
This quest is only available if Ekei was the ally who assisted you in the previous boss battle. You will want to do this mission right after getting the Red Ring from the miner. Come downstairs and talk to Ekei who tells you that he was robbed. Leave the bar and head to the stables to the south and locate the woman hiding in the shadows. Talk to her and she will run away back into town. Follow her to the balcony off the loft of the bar where she will once again run away when you talk to her.
She is now hiding inside the blacksmith shop. Talk to her again and she runs off one more time. Complete the chase by tracking her back to the stables where she finally gives up and gives you Ekei's Broken Bell. Return the bell to Ekei who will give you a Technique Manual that allows you to charge up your weapon to deliver 3x normal damage.
IMASHO TOWN Mini-Quest #4 (Random Goodies)
Before returning to the mines you can wander the town and talk to a few key individuals to get some useful items. Go up the steps to the marketplace and talk to the women by the door. She is upset about a man that seems to be following her. Talk to the lovesick man three times and he will give you a Bouquet of flowers. Talk to the woman in yellow by the stables until she finally gives you History Book #2 and talk to the man sitting hear the stalls until he gives you a Magic Jewel.
Head back toward the bar and talk to the sexy lady in black who comments that you are "exactly her type". Talk to her three times and she will give you a Secret Medicine. You can also go up to the loft and talk to the man seated next to Kataro until he gives you the Pick.
When you have done everything you need to do in the town you can finally head back to the mines. If you didn't go on the Potassium Nitrate mission then you will have your first encounter with the new Masked Ninjas. These guys are fast and tough but no match for your level 2 weapons. Make sure to grab all the gold and anything else they drop.
Upon entering the mind talk to the man pacing around and he will give you some Dice. There are now miners working in the tunnels and gold is lying around everywhere. Pick it all up and don't forget to search behind those buckets for the big stashes. All three sub-characters are positioned in the mine if you want to do any final trading. Magoichi is near the entrance guarding the miners and Ekei is in the southern area where you found the spear. Kotaro is near the boss chamber.
When you reenter the boss chamber you will find it populated with fresh new demons. Magoichi should already be fighting them so give him some help and give him a present or two if you want to solidify your relationship. Continue into the last section of the mine past the stone hatch and into the final room where there is a lot of gold lying around. When you have filled your pockets return to the stone hatch and use the Red Ring to open the gate. Enter the shaft of light and descend to Castle Gifu.
Castle Gifu
At the bottom the shaft of light you find yourself in an ominous cavern. As you approach the door several demons warp into the room wielding large logs. Charge your weapon or use some magic attacks to eliminate these enemies. When everyone is dead the doors will unlock and you can enter. There are two boxes along the bottom of the sinister spiral ramp leading up. The red box contains the Crystal Ball and the black box cannot be opened until you play this area as Ekei. (See section on Side Quests)
Head up the ramp to arrive inside the courtyard of a very familiar location - at least if you played the first Onimusha game. This area has now been converted into Castle Gifu, the headquarters of Nobunaga. Go through the large doors opposite where you exit from the ramp and equip your bow. You need to quickly target (L3) the demon archers on the balcony. They will be off-camera so wait until Jubei is aiming up then fire. Do this quickly before the new demons warp in on the ground level, then switch to your most powerful weapon and finish off the rest of the demons. Search the box near the entrance for a Gifu Keep Tower Map and get the Incense from the other item box in this room. Enter the small door under the balcony to continue.
Inside this small room you can use the Magic Fountain to refill your magic and solve the puzzle in the back of the room. This puzzle is fairly simple. You only have to place four numbered tiles in the corner sections of the grid and the only rule is that all rows and columns must equal 15. Top Row: 6 - 1 - 8 Middle Row: 7 - 5 - 3 Bottom Row: 2 - 9 - 4 Your math skills are rewarded with the Bronze Mask (right). Return to the previous room and fight a new batch of demons and archers then head through the large double doors when ready.
Ekei will assist in the next battle and you will have a chance to trade with him if you want to solidify your relationship at this point. Grab the Herb from the box in the corner then go through the double doors opposite of where you entered. In this next small room is a trick box with a Power Jewel inside. To open use the right-bottom, top-right, and left-top arrows to complete the pattern. Go through the next door.
Use the right half of the Bronze Mask in the large door then kill the demons that appear. Use the Magic Mirror further down the hall and go through the door hidden in the darkness beyond. Follow the narrow hall killing any demons along the way and you will come to a staircase. Under the stairs is an item box containing History Book #1. Enter the door that is also under these stairs and talk with the spirit hovering of his former body. Get the Demons' History from the back of the room then exit and go up the stairs.
On the second floor you will face a small army of demons. Depending on your alliance level with either Ekei or Magoichi an emotional cutscene may take place here involving Ekei and a baby. Go through the double doors to find yourself on the balcony that previously held the archers. Go around and enter the door to enter the next room where you can collect the Purify Charm from the table and the Herb from the item box. Ignore the sealed door for now and return to the balcony. If you are friends with Magoichi then you can assist him in a battle in this large room by sniping demons from your position on the balcony.
Once you give the Purify Charm to the spirit he will give you the Bronze Mask (left). You know where to use this, so insert the remaining half and enter to watch a revealing cutscene involving Oyu. You rescue Oyu but must face two giant demons. Use charged or magic attacks to dispel them quickly then get the Medicine from the box near the door. Continue through the next door behind the old Phantom Realm gate and face Gogandantess, your next boss battle. You cannot win this fight, but you do need to maintain a constant offense. The trick is to hit Gogandantess in fast succession for a predetermined amount of hits before Oyu rescues you. If you guard for too long or fail to keep up a constant level of attack the hit counter is reset and Gogandantess becomes more fierce in his attacks. Your goal is to lock swords with this powerful foe two or three times and Oyu will come to your aid.
Once you are safely outside you will talk with Oyu and get a formal introduction. At this time you will receive her Faith Orb, which in turn unlocks a giant metal sphere that turns into an Iron Horse. Ride the horse back to Imasho Town. After you put the horse in the stable you are free to explore the town one last time. I highly recommend saving your game at the bar just in case you don't like the way things turn out. There are also some events that are sensitive to the order that other events transpire. It's easy to mess this up and miss a key event or useful item.
This is also your last chance to meet Kotaro. Whether you have traded with him previously or if this is your first encounter you will meet Kotaro hanging from the east end of the stable. This is also your last chance to buy gift items from the store, which has recently been restocked. It will cost you 9600 Gold to buy out the shopkeeper for the third and final time. You should have that much already in your purse but if not you can always visit the mine and the mountain path to increase your wealth. After you buy all of the remaining items talk to the owner one last time to receive the White Necklace. This is a most useful item as it allows Jubei to slowly heal simply by standing still. While you are in the shop you will also want to talk to the man in the back. Assuming you previously did the Melon Quest the father will now be with his son and will give you the Orange Necklace capable of locating secret stashes of red soul energy.
Head outside and look for the drunken man staggering around the marketplace. Talk to him three times to get the Taizo Mandala. Note: You can only get this item when the drunk is in the marketplace. If you talk to any of the sub-characters first you will trigger an event that forces this man to the main street area and he will not offer this item. Talk to the people who are extremely interested in your new horse. The man with the backpack will give you a Glass to earn your favor.
Return to the bar and buy a bottle of Black Beer from the bartender for 200 Gold. If you are running short on cash you can visit the mine. Be very careful as the mine is now filled with some of the deadliest demons yet to be seen. Even if you don't want to get any gold or kill endless amounts of demons you should at least visit the entrance to the mine and get the Loaded Dice from the man who is still looking around. You can also get some Medicine from the miner dressed in brown.
PREPARING TO LEAVE IMASHO TOWN
You are almost ready to leave Imasho Town for the final time. Before you do you may want to save your game one last time in case you don't like the way the upcoming gift exchange unfolds. You now have four characters to trade with, Ekei, Kotaro, and Magoichi are in their normal spots in the bar and Oyu is standing on the second floor balcony of the bar. The first time you speak with any of these characters they will mention a mysterious woman in the marketplace. As soon as you visit this woman you will leave town so make sure to have all of your affairs settled before doing so.
Browse your inventory and note the new items you recently purchased that are specific to certain characters. Go to each character and give them all of these exclusive items. Most of these are powerful weapons and armor that will help you out when you hopefully play some of these characters in their upcoming side quests. You will also receive valuable items in exchange for these gifts. Don't worry about messing up previously relationships, as you will be giving everyone items and everything should equal out.
You now need to make some tough decisions about who you want to ally yourself with. Each character certainly has their own benefits and while this won't be the last time you can exchange gifts, your decision here will affect several upcoming events. Again, the idea is to replay Onimusha 2 making new friends each time so I won't tell you who to pick, but I will tell you that I allied with Magiochi my first time through as he offered the most immediate benefits. Kotaro is also a major player in upcoming events so you may want to ally with him. You decide. Give at least eight favorable items to any character to establish a secure bond and guarantee this character will be your upcoming ally. Hang onto a few good items for future trading.
Once you are sure of your relationships with the various characters you can head to the marketplace and talk to the mysterious woman with the creepy parasol (fancy word for umbrella). After a lengthy conversation with Jujudormah you will find yourself back in the Yagyu Village.
Secrets of Yagyu House
Yes, I'm reusing the first map so don't expect to find all these items a second time. Follow the path all the way back to the lake where you met Takajo and received the Charity Orb. When you reach the bridge over the stream you will engage in a large battle where your ally will join you and help defeat the demons. You are given an opportunity to trade further after this encounter.
Continue across the stepping-stones and through the caves to arrive at the lake in time to witness the murder of your "mother". Pick up the Ring of Takajo and head back through the caves. You will encounter a new demon as you return through the caves. These demons can only be damaged and killed when they are exposing their glowing interior. The best tactic is to kick the demon to make it open up then attack with a weapon to damage the glowing center section.
If you are on good terms with Magoichi he will be waiting for you after you cross back over the lake. Talk to him and get the Saiga Bomb then follow the lake back around to those loose rocks next to the shrine where you got the Buraitou. Use the bomb to blast the rocks and reveal a box with the Green Necklace. This necklace reveals the location of hidden Demon Treasure Boxes. There are 15 of these in the game and the first one is right at your feet. Put on the necklace to reveal its location and collect the Secret Medicine.
Return to the village and enter Jubei's house. If for some reason you didn't get all of the items the first time you played this level you can get them now. There will be plenty of soldiers scattered about the house you will need to kill as you make your way to the back room behind the kitchen. Look at the bureau along the wall and use the Ring of Takajo to open the panel and reveal a puzzle. The solution to this puzzle is contained in the two halves of the Four Guardians picture you should have already collected by now. Starting at the 12 o'clock position and going around clockwise you want to have the images in these colors. Black (12) - Blue (3) - Red (6) - White (9). The fire pit opens up as well as a drawer with a retractable ladder.
NOTE: If you are strongly allied with Oyu you will have an encounter with her prior to solving the Four Guardians puzzle. While this is a cutscene encounter it does factor in to Oyu's Scenario Route completion score.
You can now descend the ladder and follow the narrow corridor. After you narrowly miss falling into the pit jump over the gap and press Up to climb up. Cut the ropes blocking your path then retreat as the whirling blade trap starts chasing your down the passage. Jump the pit and hang there as the blades pass overhead then climb up and jump back across to continue to the exit.
Fog Valley
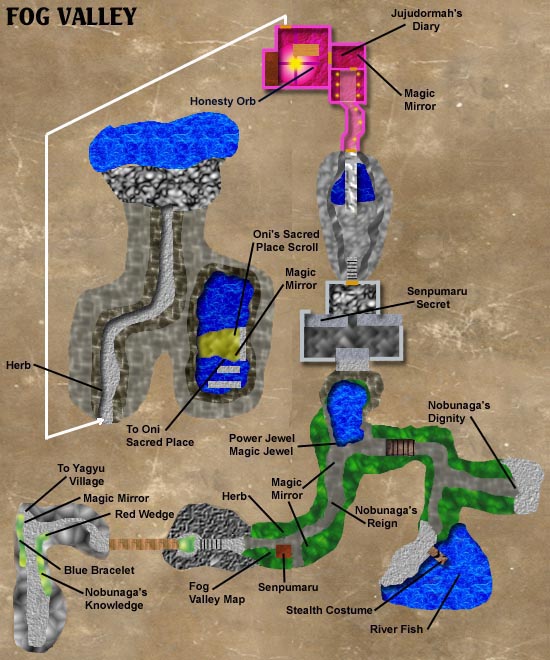
When you arrive on the narrow cliff path use the Magic Mirror to enhance your items and save your game then continue down the path and climb the ladder as quickly as possible. The demons will spawn infinitely in this area, so you have a great opportunity to rake in the red soul energy and power-up your weapons as high as you want. A boss battle is near so I recommend having weapons and your main armor up to level 2 at this point. A great tactic is to stand on the middle ledge and knock demons off. They will fall to their death and you can absorb their energy.
Ignore the green seal for now and continue climbing and follow the path to the narrow wooden bridge guarded by some giant Gozaresu demons. Kotaro, Magoichi or Ekei may appear at this point based on your current alliance level and help you with this fight. You can exchange gifts after the fight. If Kotaro is the person who shows up you may want to give him some good items to secure his alliance for an upcoming side quest.
On the other side of the bridge you can get the Herb from one item box and the Fog Valley Map from the other. Use the Wind Dragon Shrine to get your third weapon, the Senpumaru, a deadly dual blade staff weapon with the power to create a small tornado. It's only at level one so you won't want to use it in combat right away but you will want to backtrack back to the cliffs and use it on the green seal you passed earlier. Get the tiny statue, also known as Nobunaga's Knowledge, then return to the shrine and use the Magic Mirror to save your game and enhance any weapons including your Senpumaru. When you cross the bridge a second time Oyu may drop in and help you out. Talk to her to get an Herb then do any gift exchanges that you want.
Enter the sinister forest and start killing demons as you make your way north. You may notice that your location marker does not appear on the in-game map so it is easy to get confused and lost in this area. Depending on your alliance with Kotaro at this point one of two things can happen. You may continue to keep going north until you realize you are lost at which point Kotaro will become playable in his first side quest adventure. (See section on Side Quests). Otherwise, you will come to a Y-junction with an odd-looking creature floating around.
This is a Kechacha demon and is creating the illusion that will keep you lost in the forest until you destroy it. You cannot lock onto this demon so simply follow it the best you can while slashing at it. Once you destroy this demon the illusion is dispelled and you can continue, otherwise you are doomed to cycle through the same few screens and kill an infinite amount of demons. Continue north and kill the floating Gyaran - you may remember these from the first game as those spheres that steal any soul energy floating around. Kill all the attacking ninja and continue to the next Y-junction with a new Kechacha.
Killing this demon is a bit tougher since more ninja and skull knights are also joining the fight. The trick is to kill the Kechacha as quickly as possible and the rest of the demons will vanish. If you spend too much time killing the ground forces the Kechacha can get scared off and you have to repeat the sequence of encounters leading back to this point. If possible, going into an Onimusah state will end this battle in mere seconds. When the illusionary path is dispelled you can continue north again and keep fighting demons until you meet up with Jujudormah yet again. Your reunion is cut short when Ginghamphatts makes his triumphant return, and he's not very happy about that ass-whooping you gave him in the mine.
As I previously recommended, you should have your first two weapons powered-up to level two and if your armor and Senpumaru are at level two then you will have an even easier time. Otherwise, this is a very tough battle and marked the first time in the game where I was forced to actually use a healing item. Unless you played the Kotaro side quest and obtained the Senpumar Secret Technique you won't even want to use that weapon during this battle. Stick with your two primary weapons and make sure to use double and triple-charged attacks combined with the secret techniques. Ginghamphatts doesn't stand still for long making magical attacks a rare luxury.
The trick to this battle is avoidance and patience. Ginghamphatts charges back and forth across the trail disappearing into the trees on either side. If you get caught in his stampede you will take major damage. Hold R1 to lock onto his concealed position in the trees and try to dart out of the way when he charges. Eventually he will smack into a tree and get stunned for a very brief moment. Now is your chance - move in and unleash your best charged attack and combo moves. Repeat this tactic until he eventually falls. If Jubei takes substantial damage during the battle your best ally will show up and assist. Collect the Nobunaga's Reign statue then exit this screen in the same direction you are facing after the battle.
When you arrive at the pond area your encounter will vary with your closest bonded character.
Training with Oyu (Allied with Oyu)
If you are allied with Oyu she will be in this area and will allow you to spar with her. The training sessions that follow requires you to block all of her normal attacks and dodge her charged attacks. Wait for her to block then strike her shield to knock her down. Wait for her to get up and repeat until the training is complete. If you were successful and never let Oyu strike you then you can talk to her and receive the Senpumaru Tech 2.
Kotaro's Missing Pigeon (Allied with Kotaro)
If allied with Kotaro you will find him in the area with the blue demon seal. Speak to him and learn about his missing carrier pigeon then continue to the stream where you can defeat the Oowashya who is eating Kotaro's pet. Collect the Tube for Pigeon Leg and give it to Kotaro as a gift to receive the Senpumaru Tech 2.
Breaking Up Another Fight (Allied with Ekei or Magoichi)
If allied with either of the other two sub-characters you will find the pair of warriors fighting near the pond. After the cutscene you will need to fight some demon fish. Your best weapon for this encounter is the flaming arrows, but if you wish to conserve these then use the Hyoujin-Yari to stab them. You may want to save your game before continuing.
Follow the path to the blue seal killing all sorts of nasty demons along the way. Ekei may show up at this point and help you out if he is your strongest ally. If he does, you can speak to him and get an extra Medicine. Use your Buraitou to break the seal and get Nobunaga's Dignity, the third and final statue.
Follow the path to the south to arrive at a lake and small stream. There is a black box here that can only be opened by Kotaro (see Side Quest section). The only thing for Jubei to do in this area is to enter the water and try to stab a fish. If you are lucky or skillful enough you will add a River Fish to your inventory. Return to the marsh area with your three statues.
Cannon Test (Allied with Magoichi)
If you are allied with Magoichi at this point he will appear at the marsh and ask you to defend him from the attacking Battooyako while he preps a new cannon for testing. Do your best to keep these enemies from hitting Magoichi. This encounter is on a timer and if Magoichi ever has to ask for additional help more time will be added making this encounter last longer. Once Magoichi fires the cannon you will be able to get the Magic Jewel and Power Jewel from the Battooyako nest. If Magoichi wasn't hit during the entire battle you can talk to him and receive the Senpumaru Tech 2.
Head through the large double doors and move around to the west end of the compound to find the trick treasure box. Click the bottom-left arrow followed by the right-middle arrow to open this box and claim the Senpumaru Secret. Head inside the building and you will find yourself between two very dangerous looking walls full of spikes. This is the Nobunaga Statue Puzzle and while it's not terribly difficult it is random so I can't give you the exact solutions. What you need to do is pull the lever and memorize the order of the three statues that are displayed on the monitor. You then need to place your three statues on the pedestals in that same order. The trick here is to simply memorize the position of Nobunaga's arms as they are the only thing that really change. You have four chances before the walls close in and ventilate Jubei.
After you enter the next room you will likely be aided by your best ally at the time. They will help you fight the monsters in this area which actually vary based on the character who is helping you fight. You can exchange gifts after the battle if you wish then enter the next area and unleash a couple of magic lightning or ice attacks on the Gerohone. This giant creature will release poisonous spores if you don't kill it quickly. Once this creature is gone you can use a whirlwind to eliminate the rest of the enemies in this room. Grab Jujudormah's Diary from the table in the alcove and save your game and enhance your weapons at the Magic Mirror.
Equip your Hyoujin-Yari and go through the large doors to face Jujudormah for the final time. All three of your weapons should be at Level 2 by this point. If not, you may want to backtrack and kill some more demons and collect more red souls to get them powered up. Jujudormah isn't the hardest boss you will face but she does put up a good fight. When the battle begins she will run away so unleash an ice attack then save your magic for later. Keep your finger over the L1 button and be prepared to block a lot of incoming fire that she shoots from her umbrella. Use the center island to keep circling around and get inside her umbrella shield defense using your lunge attacks.
Jujudormah will often teleport leaving behind soul energy that you can quickly absorb. If you take more than 75% damage your best ally will appear and help with the battle. Use this distraction to attack Jujudormah's from her blind side, but be warned that once you double-team her she will go berserk. Block her enraged attacks with the L1 and hit her from behind with magic attacks. Stick to ice and wind attacks as Jujudormah can block lightning with her umbrella. When she finally falls you will collect the Honesty Orb and plenty of soul energy.
Flip the switch that was revealed as Jujudormah died and enter the secret passage. Open the red box on the left and get the Herb then dash through the rest of the passage as it fills with poisonous gas. A movie takes over as Jubei makes a daring dive into the water below and swims into a cave. Inside the cave you will find another box with the Oni's Sacred Place Scroll. Use the Magic Mirror to save your game, as you are about to face another tough boss battle. Examine the golden waverider to the south to trigger an awesome movie that ends with you on the beach outside of the Oni Sacred Place.
Oni Sacred Place
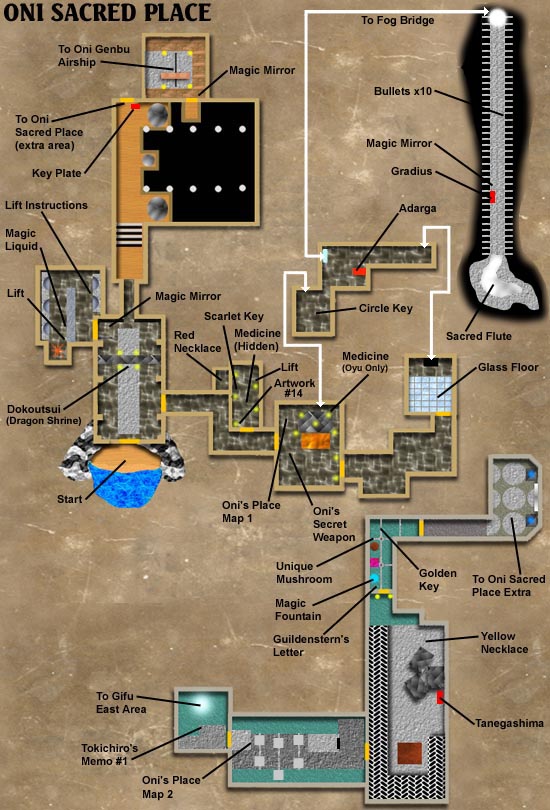
Once you've arrived at the beach you won't have much time to admire the amazing water effects. Gogandantess comes riding up on his 16th century Waverunner and challenges you to a second fight that you cannot win. Simply stay alive for about one minute of if you are feeling lucky you can attack with magic and critical strikes. If you deliver enough damage you can actually end the encounter. Either way, you are once again rescued by Oyu and while you lick your wounds Oyu takes over as a playable character.
Enter the fortress and meet the ghost of Takajo who gives Oyu a Red Bracelet. This essentially allows Oyu to absorb souls just like Jubei then transfer that energy into Jubei's soul meter. Go around the Dragon Shrine and use the Magic Mirror to save the game so you don't have to deal with Gogandantess again. Your only possible exit at this time is the ramp leading down to the north so use it.
Head past the giant statues and fight a pair of Gozaresu. Keep your distance and defeat them with triple-charged lunge attacks using your Phirangi. Get the Key Plate from the box at the north end of this area then return to the main hall killing all the demons along the way. Use the Key Plate on the Dragon Shrine and the two doors in this chamber will unlock. Exit through the east door into the hall with the sinister murals. Follow the passage until you reach the room with the bubbling acid pit.
Defeat the Oda Bodyguards with double or triple-charged uppercut attacks then get the Oni's Place Map #1 from the box and the Oni's Secret Weapon Scroll. Head to the back corner of the room and get the Medicine (only available to Oyu) then exit this room via the east door.
Defeat the Joda ninjas who attack in unison with the giant Gaidorozu. Lure the ninja away from the larger demon and defeat them before tackling the big guy. Enter the next room with the glass floor and keep the L1 held down to block the spit attacks from the Battooyako that break through the floor. You can't defeat these creatures so just block their attacks until the barrier blocking the ladder is removed.
Climb down into the next area and rush toward the Gerohone and unleash your magic attacks to quickly eliminate this threat. The Bajaido will keep coming so wait for a break in the action and grab the Adarga shield from the item box and head through the portal leading to the Fog Bridge.
Head down the ramp killing all the demons as you make your way to the Magic Mirror and the item box containing the Gradius. Equip this weapon, as it is the most powerful weapon Oyu can wield. Make sure to save your game before going into the icy chamber at the bottom of the slope.
Head to the left as you enter and get behind the icicles. Triple-charge your weapon as the Oowashya drops from the ceiling and strike quickly following with a combo attack to finish it off. Quickly collect the souls and prepare to face the Barawashya that drops from above. Strike with triple-charged lunge attacks then retreat to recharge before repeating with another triple-charge attack. Keep this up until the demon is defeated and you can collect your prize, the Sacred Flute.
Retrace your path back to the beach killing all the demons along the way. Remember, all soul energy you collect can be transferred to Jubei and you are going to need a lot of it shortly. Once you get back to the shore you can give Jubei the Sacred Flute and transfer the energy from the Red Bracelet. Now that you are in control of Jubei you can enter the fortress.
Run toward the Dragon Shrine and unleash a whirlwind attack to eliminate the snipers on the catwalk above. Take care of any remaining ground enemies with your favorite weapon then identify yourself to the Earth Dragon Shrine to obtain the Dokoutsui, a giant hammer that will quickly become your new best friend. You should have enough souls from Oyu to charge this new weapon up to Level 2. If not, you may want to beat down some more demons and collect their souls before going too much further into this level.
Take the east door and head to the room with the acid pit. Depending on your alliance with either Oyu or Kataro they may assist you in the battle in this room, otherwise unleash your new earthquake magic to slay the demons in this room. Make a note of the pulsating plant-like creatures in this room. You can freeze them with your ice magic and when they shatter they release yellow souls to replenish your health. Use them now or save them for when you need them.
Return to the room with the glass floor and run across to the ladder. Go down and join Oyu who helps in the battle with Gerohone and a group of Bajaido demons. Oyu only appears if you gave her all the specific weapons and armor from the Imasho store. Use your hammer to dispel the Mozun seal and kill the final Gerohone hiding in the back corner. Get the Circle Key and speak to Oyu to get an Herb. Climb the ladder for a shortcut back to the acid room then return to the main hall where you obtained the Dokoutsui.
As you make your way through the passage with the murals there are a couple of encounters that can take place depending on your current alliance. Magoichi will likely join in your fight against the Armored Swordsmen but there are two other possible scenarious.
Red Necklace (Allied with Oyu)
You will encounter Oyu in the passage and a movie will begin, but it is cut short by a demon ambush. Help Oyu defeat the demons to finish watching the movie. Oyu will leave and a Oowashya breaks through the wall. Defeat this demon and search the chamber on the other side of the new hole to find the Red Necklace.
Ekei's Biggest Fear (Allied with Ekei)
Team up with Ekei to defeat the Gozaresu then promise him you will not reveal his secret fear. The grateful Ekei will give you the Senpumaru Tech 2.
Once you are back in the Dragon Shrine room you may witness a cutscene involving Magoichi, Tokichiro, and Ekei. This movie casts a dark shadow on the intentions of Magoichi but don't let this sway you from maintaining a solid friendship. Magoichi is a valuable ally in the final chapter if you keep him close. Go through the west door by the Magic Mirror, saving your game and enhancing weapons as needed. Defeat the Zedan and Bajaido demons and get the Lift Instructions on the shelf near the door.
As you make your way around this room you can collect some Magic Liquid then stand under the ceiling fan and unleash a whirlwind to spin the fan and power the lift. Step onto the lift to descend to the lower level. Get the Oni's Place Map #2 from the box near the lift. Head past the ladder and go through the door leading to the robot factory. A Dorogando drops from the ceiling and ignores Jubei until you hit it. Another Dorogando is also hiding in this room and it will attack. Use your hammer to quickly eliminate these deadly robots. Make sure to run away from fallen robots to avoid the blast damage as they "die".
Yellow Necklace (Allied with Ekei)
If you are allied with Ekei at this point there will be no robots in the factory. Instead, you will find Ekei trying to get through a door. Magoichi opens the door for him and inside you can obtain the Yellow Necklace.
Check out the trick treasure box near the ladder. Use the left-top then the top-middle, and finally the right-bottom arrows to solve the puzzle and get the Tanegashima + 10 Bullets. This rifle will come in useful later in the game. Use the Magic Fountain to fill your magic meter and take Guildenstern's Letter. Smash the steam pipe and get the Unique Mushroom then solve the tile puzzle to get the Golden Key.
The puzzle is a more complicated version of the 15 Puzzle from earlier in the game. You now have a 4x4 grid and you have to place the numbered tiles at the bottom in the open slots to make all rows (including diagonal) add up to 34. It's not that hard but just in case here is the final pattern: Row 1: 1 - 15 - 14 - 4 Row 2: 12 - 6 - 7 - 9 Row 3: 8 - 10 - 11 - 5 Row 4: 13 - 3 - 2 - 16
Return to the robot room killing any demons along the way. Climb the ladder your ignored earlier and use the Golden Key to stop the crates moving along the conveyor. Jump across the top of these crates to reach the next door and use the Circle Key to enter. Get Tokichiro's Memo #1 near the green idol then examine the next puzzle.
This one isn't very hard at all. Just match up the tiles with the key shown above. You can move any tile into any open slot so just leapfrog the tiles until you swap them to opposite sides. Once the puzzle is solved a Light Path opens and you can leave the Oni Sacred Place.
Castle Gifu - East Area
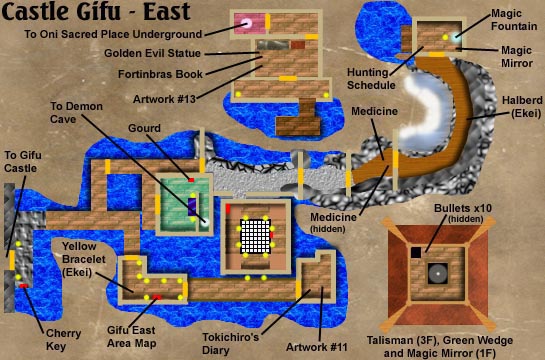
We now find Jubei on the roof of a tall tower in the east area of Gifu Castle. Find the opening in the fence to get inside and climb down the ladder. There is a hidden chest near the fence opening with some Bullets if you have the necklace to see it. Climb down the ladder and locate the trick treasure box with the life-giving Talisman inside. To solve this puzzle in six moves you need to push the arrows in this order: top-right, right-bottom, bottom-left, left-top, top-left, and the left-bottom. This is the only Talisman you get in the entire game so don't waste it.
Head down the ramps killing the three archers and the ninja on the ground floor then raid the box for a Green Wedge and use the Magic Mirror in the corner to save and charge your weapons. Note: If you are allied with Ekei at this point then the tower will not have any enemies and you will find yourself locked inside. Ekei will show up and laugh at you then embark on a side-quest to find the key. This is described in detail in the Side Quests section.
Exit the tower and head east to the Mozun seal blocking the next door. Use the Buraitou to destroy the lock and enter the tearoom. Get Artwork #11 from the shelf and Tokichiro's Diary lying on the floor. Step into the glowing green circle and use your Green Wedge to enter the Green Phantom Realm.
Those of you that played the original Onimusha and fought in the Dark Realm Arena will know exactly what to expect. The Green Phantom Realm is a ten-level arena challenge with new and more difficult monsters on each level. You can go deeper or return to the surface after any level but if you exit early you will have to do all the previous levels over again.
Your prize for completing all ten levels is the Purple Necklace, a useful little charm that decreases your magic use as long as you wear it. Here is a description of each level, the demons you will encounter, any items you might find, and any special tactics I found useful. Note: Demons may drop additional items. Keep your eyes open.
GREEN PHANTOM REALM
| Level # |
Enemies |
Items and Tactics |
| 1 |
Jaido |
Buraitou |
| 2 |
Musaido, Joda |
Buraitou or Dokotsui |
| 3 |
Gaidorozu |
Dokotsui works nice |
| 4 |
Jaido, Archers |
Use whirlwinds against archers, Buraitou on the rest |
| 5 |
Gyaran, Joda |
Buraitou or Dokotsui works nice |
| 6 |
Bajaido |
Use Senpumaru/whirlwinds against multiple demons |
| 7 |
Gyaran, Bazu |
Hyoujin-Yari |
| 8 |
Bazu, Oowashya |
Use Ice Attacks and get the Medicine |
| 9 |
Black Musaido, Gaidorozu |
Stun with Duokoutsui and finish with Buraitou |
| 10 |
Gaidorozu, Raigozaresu |
Purple Necklace and Perfect Medicine |
After you have returned to the tearoom exit back outside and make your way back past the tower and into the next door. There is a box inside that contains the Gifu East Area Map. Exit through the other door and follow the bridge making a left at the next intersection and continuing to the west shore. You will face several demons along the way and Kotaro or Ekei may show up to lend assistance if they are closely allied with you at the time.
If you are good friends with Magoichi you will encounter him in this area fighting off a bunch of Battooyako. He gives you the Tri-Barrel Gun + 10 Burst Bullets so you can join in. Feel free to use any of your weapons to assist Magoichi if you wish to save those Burst Bullets for later. Open the box near the exit and get the Cherry Key then enter the courtyard leading back to the Keep.
You can fight or ignore the Bazu and Oowashya demons that fill the courtyard outside the Keep. Head to the large doors and get inside where you will face off against several Oda Bodyguards in the main hall. Fight through these and go through the doors to the north and defeat the Baigozaresu and Bajaido demons. Use the Cherry Key to unlock the east door and enter.
The black box near the door is for a sub-character so keep going and get the Crescent Key from the red box and pick Artwork #12 and the book, Human as Food. Solve the 3-move trick box by pressing left-middle, top-left, and right-top to get the Magic Jewel.
Return to the previous room and head through the north door and make your way around to the stairs. Kill demons along the way and use the Magic Mirror if you wish. Head upstairs and exit onto the balcony and go to the SW door. Enter and use the Dokoutsui to break the Mozun seal on the north door. Enter and get the Medicine from the red box and solve the trick treasure box to get the Dokoutsui Secret. Here are the six moves you need: right-bottom, bottom-right, bottom-left, right-middle, bottom-middle, and right-top.
Make your way out of the Keep and back through the courtyard killing all demons who block your path. You are headed back to the east area. As you start back across the bridge make the first left (Jubei's left) and use the Crescent Key to unlock the door. Dash along the bridge avoiding as much Battooyako fire as you can and make a right and use the Hyoujin-Yari to unlock the door. Enter this new building and get the Gourd from the box and look behind the wall for a narrow passage leading to a Light Path. Step in and warp to the Demon Cave.
Demon Cave
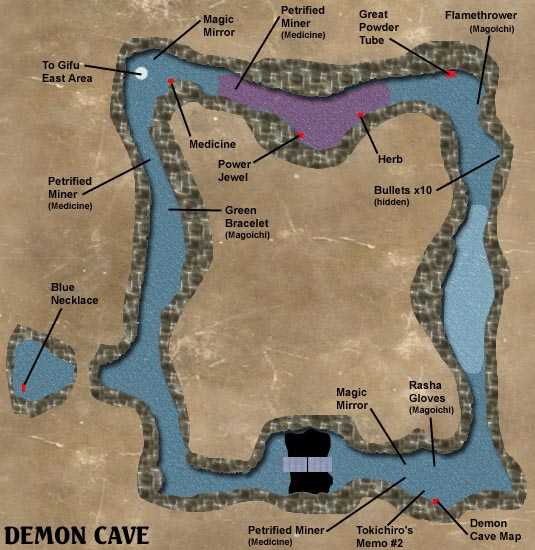
You arrive in the sinister Demon Cave next to a convenient Magic Mirror and a box with some Medicine. The passage narrows to the east and is blocked by one of many miners who have been turned to stone, so explore the south branch and trigger one of many possible encounters. If you are allied with Magoichi then Jubei is shot and turned to stone allowing you to play Magoichi's side quest. Otherwise, head south and start killing demons. Ekei may join the battle if he is your best friend at the time.
Follow the Leader (Allied with Kotaro)
If you are allied with Kotaro then you will witness an encounter between the ninja and Oyu as you head south. She will escape and Kotaro will reveal a secret passage in the wall allowing you to obtain the Blue Necklace. Continue on to the next corner section of the cave and meet up with Kotaro yet again. He will offer to lead you through a section of cave that is trapped. This is a tricky sequence so you may want to run back and save your game at the mirror near the Light Path. Kotaro will wait.
Once Kotaro starts moving forward you need to carefully follow in his exact footsteps. If you trigger a mine the blast will damage you and possibly send you flying into another trap for even more damage. If you make it through the area without setting off a single trap you can talk to Kotaro and he will give you Dokoutsui Tech 2. If you trip a mine you can reload and try again. Kotaro takes a unique path each time you try this puzzle.
When you reach the chasm you must fight a Gerogone and several Bajaido demons before you can use the switch to lower the drawbridge. The Dokoutsui works nicely on these guys. Once you cross the bridge you will find another Magic Mirror and a red box containing the Demon Cave Map. Grab the Tokichiro's Memo #2 for an important clue on the stoned miners.
Continue following the passage around until you arrive in the large machine room. Keep your distance as these will explode and cause much damage during the combat with the Oowashya and Barawashya demons. A few earthquakes and triple-charged Dokoutsui attacks will end this battle before it starts. Continue deeper into the passage and fight the Zedan and the Bajaido Archers. These guys are close together and a couple of twisters will rip them to shreds and give you plenty of soul energy. Collect the Great Powder Tube from the red box and approach the Green Mozun blocking your path.
Oda Bodyguards will start spawning all around you. Wind attacks work great if you have any magic left from the previous battle otherwise use your favorite weapon and tactics to clear the room. Use the Senpumaru to shatter the seal and enter the final chamber. Get the Herb from the first red box and solve the trick box for a Power Jewel. The 5-move code is as follows: bottom-left, left-bottom, bottom-right, right-bottom, and top-left.
Use the powder on the petrified man to get some Medicine then return to the Light Path. If you wish you can return to the other locations shown on the map where the other petrified miners are located. Each will reward you with some Medicine, so you decide if it's worth the effort. When you are ready step into the light and return to Lake Gifu.
East Lake Area
Exit the building and circle around to the right. A Gaidorozu will block your path. Defeat or avoid him and enter the east door alongside the building. You should now be on the path along the beach and if Magoichi is your friend he will appear and start shooting the Battooyako. If Kotaro is your friend then he will appear in this area fighting Musaido and Giramusaido ninja demons. Regardless of the encounter, kill all demons and proceed through the next door.
In this next section you will be attacked by a Gaidorozu followed by several Giramusaido ninja that leap over the wall. Use a magic or triple-charge attack to bring down the skull knight then deal with the assassins using a whirlwind to kill them all at once and get a large soul bonus. Make sure to absorb the soul energy from the nearby shrine before proceeding through the next gate and up the mountain path.
Smash the unlit stone lantern and claim the Medicine and put on your Green Necklace (if you have it) and get another Medicine from the secret chest. Continue to the waterfall and depending on your alliance with Oyu you may have to help her out with a major battle. Use your bow or rifle to kill the snipers on the other side of the falls then use your Dokoutsui to bash on the Baigozaresu.
Enter the boathouse and use the Magic Mirror and the Magic Fountain then grab the Hunting Schedule. Head down the stairs and use the boat to ride out to the house in the middle of the lake. Several Bajaido will be waiting for you on the front porch. When they are defeated you can use the Hyoujin-Yari to fight the Gerohone guarding the door.
Inside the lakehouse you can fight a pair of Raigozaresu. These are some of the deadliest demons in the game so make sure to triple-charge your weapons or use magic attacks to avoid taking excessive damage. Earthquake attacks prove very effective against these two demons. With the seals gone from the doors you can explore the rest of the residence collecting Artwork #13 from the floor and the Fortinbras Book from the desk. You can also pick up the Golden Evil Statue book for some additional light reading then head to the back room and use some powder to cure the petrified men. The man on the left will give you a Medicine if you speak to him twice.
Enter the next room and solve another symbol puzzle. This time there are three symbols on each side but the pattern is still the same. Just leapfrog the tiles until you have swapped sides and the Light Path will be revealed. Step in to teleport to the Underground.
Oni Sacred Place Underground
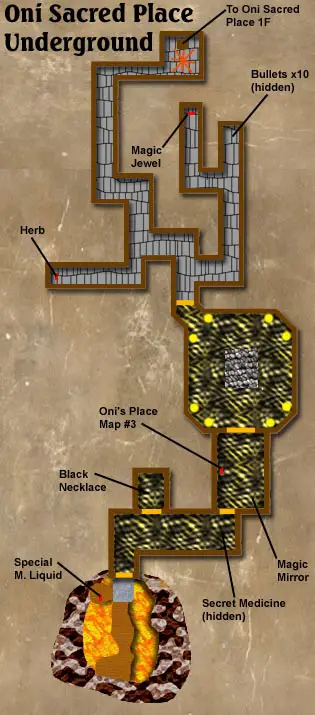 Make your way across the lake of blood and get the Special M. Liquid from the red box near the door. Enter the hall and start fighting demons. Depending on your current alliance Kotaro or Ekei may assist you in defeating the Gaidorozu and the Zedan demons.
Now comes the moment of truth. If you made some skillful trades earlier in the game and acquired the three Fossilized Bones you can now use them in the door in this hall. Behind this door is the coveted Black Necklace that makes every hit a critical one for as long as you wear it.
Head into the next chamber and use the Magic Mirror as needed then grab the Oni's Place Map #3 from the item box. Magoichi might be in this room depending on your alliance. If so, you are about to be challenged to a difficult competition so you definitely want to save your game. When you talk to Magoichi he will ask you a question. You need to respond with the word, "SWORD" and he will then challenge you to a quick demon-slaying competition.
He will use his gun while you will be limited to your regular sword. The first person to slay 20 demons wins. If you have the Black Necklace this competition is practically over before it begins. Otherwise, you will need to make quick work of your enemies. I recommend kicking them down and doing finishing moves on them. Once you beat Magoichi speak to him one more time to get the Dokoutsui Tech 2.
If you do not get the Magoichi encounter you will have to fight several Oowahya and Bazu demons in the giant octogon arena all by yourself. Magical attacks and triple-charged attacks work nicely to clean up this room in record time. Exit to the NW door and enter a small maze of corridors. Make the first right to enter the passages shaped like the number four. A hidden chest contains Bullets x10 while the other fork contains a trick box with a Magic Jewel. Push right-bottom, right-top, top-left, and left-bottom to get your prize.
Return back to the initial junction and explore the SW passage where you can find an Herb in an item box. It's heavily guarded by a Baigozaresu demon but he falls under your mighty hammer. Take the remaining passage up to the north room and use your wind magic to spin the fan then step on the lift to return to the main floor.
When you reach the top step off the lift and collect the Scarlet Key and Artwork #14 and don't forget the Medicine in the hidden chest (green necklace required). Unlock the door and exit into the hall with the murals. A few things can happen at this point.
Saving Oyu (Allied with Oyu)
If Oyu is your best ally you will hear her scream about now. Run to the room with the acid pool and into the room beyond. You will find Oyu caught in a trap. Quickly grab the glowing lever and hold it to rescue Oyu. The lever will damage Jubei as long as he holds it so heal as necessary. After you rescue Oyu you can speak to her and receive the Dokoutsui Tech 2.
Ekei's Missing Drink (Allied with Ekei)
Head back to the lift room on the west end of this level and you will find Ekei muttering about some missing Stamina Drink. If your goal is to complete all of Ekei's quests and see all his events you are going to have to give him the drink before you can exchange any more gifts. You can find this drink in the lower level in the torture room with the operating table. Return the Stamina Drink
to Ekei and lock down the rest of his scenario.
If none of these encounters are meant to be you can simply navigate Jubei to the west lift room and descend to the lower level. Defeat the Bajaido Archers that will snipe at you from the two ends of the large room with the containers moving overhead. Defeat the King Dorogando and go into the room with the Magic Fountain. Use the Scarlet Key to enter the next area and descend lower into this evil place.
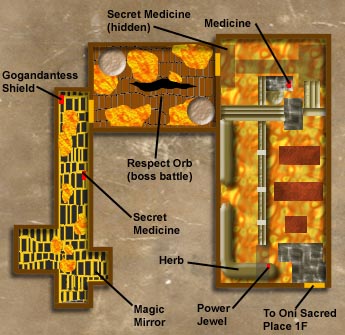 Oyu and Jubei are now in the lowest depths of the Oni Sacred Place. Use the Magic Mirror, as a difficult boss battle is about to begin. Head down the passage and get the Secret Medicine on the right and the scroll about the Gogandantess Shield from the box in the corner. Enter the large double doors to face Gogandantess for the third and final time.
This battle isn't as bad as you might think. Start off by using the Sacred Flute to remove his magical shield then whip out the Hyoujin-Yari and position yourself on the opposite side of the crevice. You can use this crevice to avoid a few of Gogandantess' attacks but you need to keep up a steady stream of strikes otherwise he gets mad and starts fighting dirty. Strike with magical ice attacks when possible and wear your purple necklace to reduce the magic drain. Poke him from across the crevice and when you finally run out of wind magic switch off to Earth and Wind magic. It's nearly impossible to hit him with lightning so don't even try.
After you defeat Gogandantess and watch the touching cutscene you can collect the Respect Orb and 900 souls for a +350 bonus. Head through the next door to the east and walk out onto the catwalk. Look for the hidden chest if you have the green necklace then cross over and climb the ladder. Cross the large pipes and strike at the vertical steam pipes. Quickly retreat before they explode then search the platform behind them for an item box with a Medicine.
Head to the west wall and follow the broken pipe. Jump the gap and collect the Herb then return to the area where you found the medicine. Follow the smaller pipes leading south and climb the ladder leading to the trick treasure box. Click right-bottom, bottom-right, top-left, and left-top and get your Power Jewel. Hop the platforms leading to the door in the SE and exit this room.
You are now back on the main floor in that huge room with the statues. Insert the Respect Orb into the center statue for an amazing cutscene that reveals the Oni Genbu, a huge airship. After the movie Jubei and Oyu will find themselves in the small room to the north. You will definitely want to make use of the Magic Mirror and do any last-minute gift exchanges with Oyu.
Examine the glider in the center of the room then prepare to solve a puzzle that relies on dexterity more than logic. You need to open the hanger doors by rotating two dials at the same speed. Each dial is controlled by one of the sticks on your controller so you have to swirl the sticks around simultaneously and at the same speed. If one side of the door gets higher than the other it will get stuck and you will have to lower it back down before you can continue. The stopwatch in the top-left is counting down to the total destruction of the island so NO PRESSURE!
When you finally get the shutter raised you and Oyu will climb aboard the glider and escape the island in the nick of time. After another spectacular cutscene you will find yourself onboard the Oni Genbu.
Oni Genbu
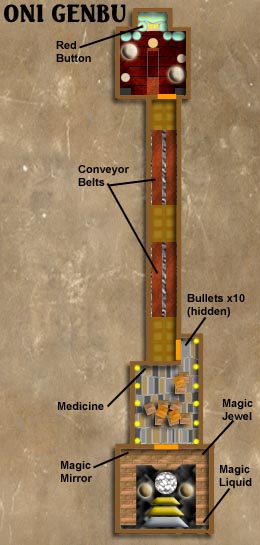 You start in the engine room of the giant airship. Follow the walkway to the trick treasure box and enter these six moves to get the Magic Jewel: right-middle, top-middle, right-bottom, bottom-middle, left-middle, and top-right. Continue around to the far end of the walkway and get the Magic Liquid then return to the Magic Mirror and save your game before heading through the large doors.
Head to the left and deal with the Oda Archer near the barrels. If the barrels were destroyed during the combat you can find an item box with some Medicine. Defeat the Oda Bodyguard then move on toward the exit where two more Archers will attack. Another Oda Bodyguard will try to flank you from behind as you near the exit. Watch out for him. Whirlwind attacks work nicely in a crowd or stick with your Buraitou for quicker strikes.
Go through the door into the lengthy passage that ramps upward leading toward the control room of the ship. There are two sets of two conveyor belts that will bring down infinite amounts of robot enemies. The King Dorogando units are very deadly so use earthquake attacks to stun them then dash up the ramp and enter the door. If you do decide to fight them make sure to avoid their explosions when they finally die.
After you have confronted Tokichiro for the final time he will bail from the airship leaving you in charge. Search the control panel for the flashing red button and press it to make the ship turn around and return to Castle Gifu. After the giant ship crashes into the tower you will witness the apparent and tragic demise of Oyu then you are left to explore the Castle Gifu Tower.
Castle Gifu Tower
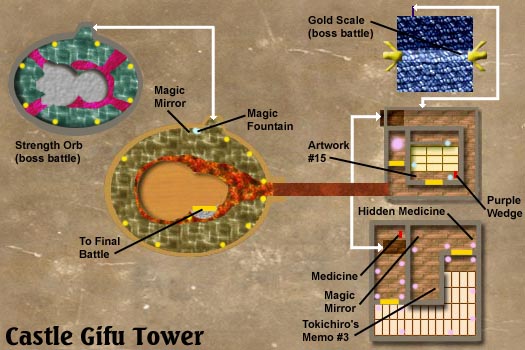
Locate the Magic Mirror and save then get Tokichiro's Memo #3 lying next to the broken stairs. You are about to face off against several large boss creatures as you near the end of the game. Make sure you start working on getting all weapons and armor upgraded to level 3 (MAX) at this point.
Ekei's Final Encounter (Allied or Strongly Opposed with Ekei)
This encounter can unfold in two different ways. If Ekei is your ally then he will want to find some demons. Join him against a few Red Zedans and Girajoda and bid our chubby warrior farewell as he leaves the castle. If you have ignored Ekei or given him bad gifts throughout the game you may have to fight him. If this happens you will only be able to use your normal sword. Even so, Ekei is not too difficult. Simply maintain a constant stream of attacks to keep Ekei off-balance and circle around for back-attacks. When you win the battle you can claim Ekei's Keepsake. This item will allow you to restore your health.
Head into the next room and kill the Raigozaresu at the bottom of the stairs with some magic or triple-charged attacks. Find the red box behind the stairs and get the Medicine then head up to the fifth floor and move around the balcony killing the Girajoda that come from all directions. Another Raigozaresu guards the bridge to the Demon Base. You can kill him now but the bridge is still blocked by a sinister force field.
Go through the large double doors and kill the two Gyaran floating around this room. Use a whirlwind to take care of them both quickly and grab their souls along with the ones stored in the nearby shrine. Get them all at once and earn a +1650 bonus. Make sure to grab the Purple Wedge from the red box and get Artwork #15 from the bench. This is the final piece of art that can be collected in the scripted story.
Take the narrow passage to the stairs and climb to the roof where you will face the Gyaran Queen. Your best attack for this boss is the Senpumaru and wind attacks. Wear your purple necklace to minimize magic drain and use the twisters to damage the Queen and her offspring. Make sure to collect any loose soul energy floating around during the battle. When you have defeated all of the smaller Gyaran the Queen will try to roll over you. Maintain your constant attacks using the wind magic to finish off the Queen and collect the Gold Scale.
Use the Gold Scale on the glowing fish statue on the roof and the force field blocking the bridge will vanish. Before heading to the Demon Base you have one last challenge, the Purple Phantom Realm. Return to the fifth floor and enter the small room with the purple glowing light and use the Purple Wedge.
The Purple Phantom Realm is 20 levels deep and there are no healing items. If you survive you will easily have enough soul energy to fully charge all your weapons and armor plus you will receive the Rekka-Ken, the most powerful weapon in the game. Conserve your magic, as the purple necklace does not work in the Phantom Realm. You should also save your game at the magic mirror one floor below.
PURPLE PHANTOM REALM
| Level # |
Enemies |
Recommended Weapons |
| 1 |
Bajaido |
Use Senpumaru/whirlwinds against multiple demons |
| 2 |
Gaidorozu, Bajaido |
Senpumaru or Dokotsui |
| 3 |
Joda |
Buraitou |
| 4 |
Zedan |
Senpumaru or Buraitou |
| 5 |
Zedan, Joda |
Senpumaru or Buraitou |
| 6 |
Hyukan |
Use Senpumaru/whirlwinds against multiple demons |
| 7 |
Bazu |
Dokoutsui |
| 8 |
Bazu, Gyaran |
Dokoutsui |
| 9 |
Oowashya, Bazu |
Buraitou and Dokoutsui |
| 10 |
Oowashya, Barawashya |
Buraitou and Dokoutsui |
| 11 |
Dorahyukan |
Whirlwind attacks or Buraitou |
| 12 |
Baigozaresu |
Dokoutsui |
| 13 |
Baigozaresu, Derahyukan |
Switch between Dokoutsui and Senpumaru magic |
| 14 |
Gerogone, Bajaido |
Buraitou and lightning attacks |
| 15 |
King Dorogandos, Bajaido |
Dokoutsui and earthquakes |
| 16 |
Giramusaido |
Hyoujin-Yari |
| 17 |
Gaidorozu, Giramusaido |
Hyoujin-Yari or any triple-charged weapon |
| 18 |
Red Zedan, Raigozaresu |
Dokoutsui and earthquakes |
| 19 |
Red Zedan, Girajoda |
Dokoutsui or Buraitou |
| 20 |
Raigozaresu, Derahyukan |
Dokoutsui and whirlwind attacks. |
After you claim the Rekka-Ken you will want to check the glowing crack in the floor where you pulled out the sword. This will cause Jubei to smash through to the secret 21st level of the Phantom Realm. Not only does finding this level add to your overall ranking at the end of the game, you will also obtain the Fashionable Goods from the item box. This item combined with an "Onimusha" Ranking at the end of the game will earn you Jubei's Extra Costume that you can wear during future games.
Once you return to the "real world" with your shiny new weapon you can cross the bridge leading to the Demon Base and prepare for the final two battles.
Demon Base
You will definitely want to pay a visit to the Magic Mirror and Magic Fountain located near the exit of the first level of the Demon Base. The last Phantom Realm should have given you more than enough soul energy to power everything up but if all of your weapons and armor are not at Level 3 (MAX) at this time then you need to return to the tower and kick some demon butt until you have everything powered up.
Climb the ladder leading up to the next level and prepare to face Ginghamphatts for the final time. Assuming you have the Rekka-Ken and the Purple Necklace you should have no problem with this guy. Simply triple-charge your attacks and do lunge attacks and repeat until you do enough damage that Ginghamphatts will change his strategy.
It Pays to Have Friends with Big Guns (Allied with Magiochi)
If you are allied with Magiochi then all those gift exchanges are about to pay off in a big way. Magiochi will arrive after you hit Ginghamphatts a few times and request to test his new ROCKET LAUNCHER. Step aside and watch the show as Magiochi takes care of this boss entirely and with only one shot. What a pal!
If Magiochi doesn't arrive to save the day Ginghamphatts will eventually split into two sections, one that flies and a larger section that skitters across the floor. Both sections share the same hit point meter but you need to concentrate your attacks on the lower half until it flips over and kicks its legs. If you don't disable this part of the boss it will curl up and roll around the room doing massive amounts of damage in unblockable attacks.
Another good tactic is to use Senpumaru magic to attack both sections at once with a whirlwind. Use any magic fluid if you need to restore your magical energy and keep up the attacks on both sections until Ginghamphatts falls. You can then collect 1300 souls and a +600 bonus from the pit and the Strength Orb. If Oyu or Kotaro showed up during this fight you can talk to them before climbing back down the ladder.
Use the Magic Mirror and Magic Fountain and make sure you are at full health and magic before proceeding. Have your Rekka-Ken and Purple Necklace equipped and head for the strange panel next to the door in the center of the chamber. Insert the Strengh Orb into the panel and witness the touching scene between Jubei and Oyu. This scene will unfold differently based on the strength of your alliance.
FINAL BATTLE WITH NOBUNAGA
Step into the demonic elevator and ride it to your final confrontation with Nobunaga. This is a multi-stage battle that will take several minutes, even with your new sword. Start the show by unleashing some fire attacks that will damage Nobunaga twice with each blast. Keep up the fire attacks until he rises into the air.
Switch off to your Senpumaru and start hitting him with whirlwinds as Nobunaga starts fighting back with an impressive array of magical attacks. He will switch tactics each time you hit and damage him and all of his attacks are preceded by a unique color change in his sword and orbs. If you know what attack he is about to use you can possibly avoid it.
Red - Fire Attack
Green - Wind Attack
Blue - Ice Attack
Yellow - Earth Attack
White - Lightning Attack
The Wind and Lightning attacks are pretty easy to avoid as you have a good visual clue of where they are going to strike. The whirlwind attack will travel around the room so you just have to avoid getting hit by it. The lightning is prefaced with a series of glowing spots on the floor showing where the lighting will strike. Just make sure you aren't in these glowing areas when it does.
The ice attack is a bit more deadly. If you get hit you will be frozen stiff. Quickly press all the buttons on your controller to break free (as if you had locked swords) before Nobunaga can follow up with a more damaging sword strike. It is possible to avoid his ice attack by sidestepping at just the right moment. Watch him closely when he's glowing blue.
His earth and fire attacks are the hardest to avoid. Simple run around the room when he is glowing yellow and try to avoid the rocks that come raining down. If Nobunaga is glowing red then prepare to eat pain. He will strike down with his flaming sword sending a wave of fire across the floor. If you are hit you will be thrown to the ground. DO NOT MOVE! He will follow with two more fire strikes that will do less damage if you aren't moving.
Your best tactic is to wait for Nobunaga to strike and leave himself open to a counterstrike from your Rekka-Ken. When you have done enough damage he will have to land on a pedestal to recharge. This is your golden opportunity to rush him and swing that mighty sword. Even though it looks like you are missing you are in fact doing a great deal of damage that is evident by the souls he releases when he leaves the pedestal. Absorb them and continue the battle. If you are lucky you can get a few purple souls and go into Onimusha mode.
During this first stage of the fight you will want to keep an eye on your health and magic. Now is the time to use all the magic at your disposal including any potions to fill your magic meter. The second stage of this battle does not permit magic use so what you don't use here will be wasted. Keep up the attacks and after Nobunaga recharges three or four times he will finally fall. In his dying breath he transfers his essence into the giant 4000-ton Gold Statue and stage two begins.
Not to worry - Jubei doesn't have to face this terrifying mechanical beast in his current state. Using the power of the five Oni Orbs you have been collected since the beginning of the game you can now change into Super Onimusha. While you are still much smaller than Nobunaga's Statue you have a much more powerful attack. Simply press the  to fire projectiles that will automatically lock on to this giant robot.
Now you have a whole new set of attacks to learn and avoid. Nobunaga will fire meteors that will track you. Destroy them with your missiles or sidestep them at the last minute. Also watch for red spots on the ground that indicate stalagmites that will burst through the ground in those locations. When the statue opens its bottom mouth a jet of flame will shoot out and sweep back and forth. Did I forget to mention the eye-lasers? These deadly energy beams will shoot out and sweeps to either side or narrow in the middle. Jubei can avoid these by quickly sidestepping or sticking to the middle of the screen near the bottom.
The best tactic is to simply stay out of the robot's range by moving backwards during this entire encounter. Maintain a constant fire until you have destroyed both the statue's arms at which point Nobunaga starts sending out stone masks that will circle and protect his head. He also shoots out masks that will surround Jubei and spin around shooting poison gas. These can all be easily destroyed by rapidly hitting the fire button.
Keep up the attack and dodge anything Nobunaga throws at you and always keep moving backwards to stay out of range. Make sure to heal as needed and you should defeat Nobunaga's final form in a few minutes.
CONGRATULATIONS!!
You have defeated Nobunaga (or have you?) Watch the closing credits for another touching movie with Oyu and Jubei then check out your stats and scenario completion chart. Several new things will now be unlocked in the Special Features menu section.
Thanks for playing and thanks for using my strategy guide. I've included all the information necessary to get a 100% Scenario completion score, so start a new game and get to work on filling in those missing story elements.
See you again for ONIMUSHA 3 where we will complete the trilogy.