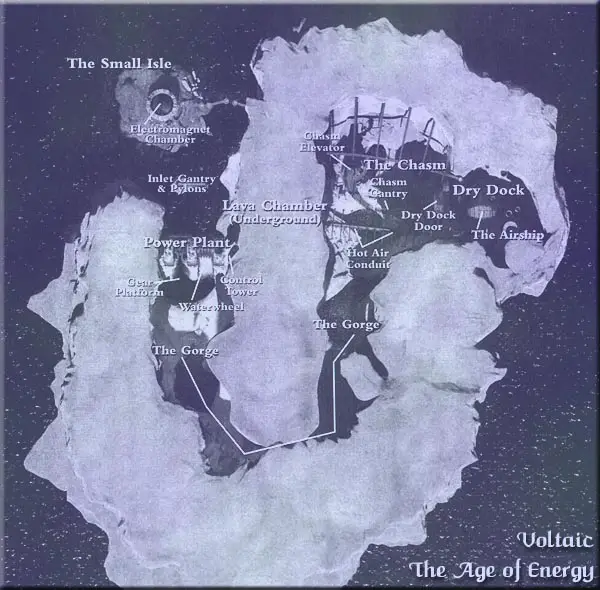
Voltaic - The Age of Energy

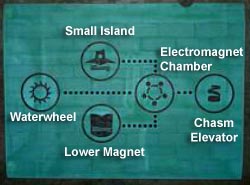
 Welcome to the Age of Energy. Your ultimate goal in Voltaic is the very island on which you stand, but unlocking the secrets of this island is going to take a lot of exploration and puzzle solving.
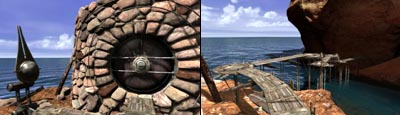
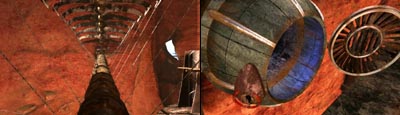
You start the level on the circular wooden platform shown in the right image. If you circle around to the left you will arrive at a large circular door, which is locked and cannot be unlocked until you restore power to the island. The sphere to the left of the door contains a J'nanin linking book you can use to return to J'nanin if you so desire. You can check out the immediate scenery and when you are ready to get started head across the walkway shown in the right image.
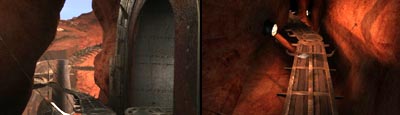 Continue along the path and through the opening in the cliff until you reach a passage leading to the right. Make a mental note of the catwalk that continues into the chasm, as you will return here shortly. For now head down the red-tinted hall and collect the missing journal pages lying on the walkway shown in right image.
 Continue until you reach a junction. The door to the left leads to the lava control room and is sealed from the inside - you will open it later. For now, turn right and head down the blue passage leading toward the hydroelectric power plant.
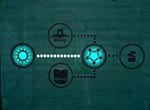
 When you step down into the small room turn right and examine the indicator panel on the wall. This panel shows the status of several devices on the island. Currently everything is OFF since there is no power being generated by the power plant. Turn around and locate the ladder leading up to the tower overlooking the sluice gates and climb up.
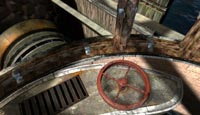 The left control wheel is missing but you can still spin the right wheel to open the sluice gate and redirect the water under the waterwheel. Now you can climb back down the ladder and turn left to go down the blue-tinted tunnel that leads through the center hub of the giant waterwheel.
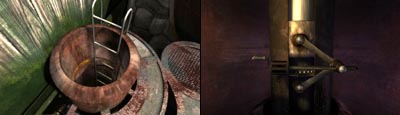 In the next room is another locked door much like the first one you encountered on the small island. Ignore it for now and turn right to locate the ladder leading down into a vertical shaft. Climb down and press the red button on the wall to access a gold mechanism. Turn the crank on the left to raise the large gear up into the floor. Note: If you've gotten ahead of me and already started the waterwheel spinning then you cannot raise this gear. You will need to return to the top of the ladder and spin the red wheel to turn the waterwheel off temporarily until you raise this gear.
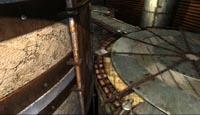
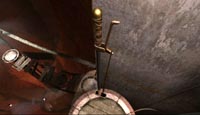
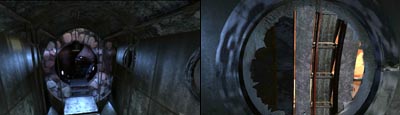 Climb back up the ladder and return down the blue tunnel. Just before you drop down into the room with the indicator panel turn right and look through the broken portal shown in the left image. From here you can reach through and manually open the waterwheel vanes, which starts the wheel spinning and power flowing to certain systems.
 Step down and check out the indicator panel. If you have done everything correctly up to this point it should look like this. Now turn and go back down through the wheel hub to the previously locked door which is now glowing green. Click on the handle and it will open allowing you access to a ladder leading down to a small room.
 In this small room is an imager that you can approach and press the button to play a message from Saavedro. This is the first of three imagers you will find (one in each Age). Each imager will play a new message until you have heard all three. These messages play in the same order regardless of the order in which you visit the Ages or access the imagers.
 Turn and follow the very long passage leading to the Electromagnet Chamber (this requires many clicks). Go down the ladder and approach the first station shown in the right image. Click on the small opening to examine the circuit controls and get ready for your next puzzle.
 Circuit Strip Puzzle - Difficulty: Easy
Your objective here is to create a continuous connection for all gold circuit strips leading from the top to the bottom. The top and the bottom strips are fixed, but you can rotate the middle three strips by pressing the buttons to either side to move the strip in the desired direction. The tricky part is that there are multiple viewing stations and the circuit strips must be aligned in each one.
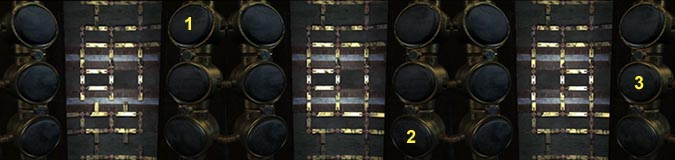
Begin by pressing the top-right button (1) until the contacts are lined up as shown in the left image. Now press the lower-right button (2) until the bottom contacts are lined up as shown. Finally press the middle button (3) until the middle contacts line up with the previous two contact strips. When the circuit pattern looks like the one in the right image the station should automatically shut and electricity should start flowing.
 If the cylinder does not shut and power-on then you will need to circle the device and check all the other view ports to make sure the strips are lined up in ALL the windows. Make sure you also pick up the missing journal pages from the landing three clicks to the right from station 1 shown in this image.
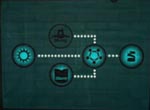 Head back up the ladder and return down the very long hall. Climb up the ladder in the imager room and return through the waterwheel hub to the room with the indicator. Check the panel and make sure it looks like the one in this image. You have now done everything there is to do in this area so return back through the blue passage to the intersection then head left through the red passage until you are back outside.
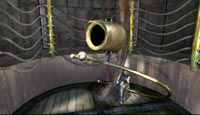
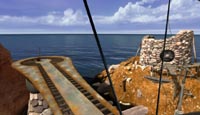
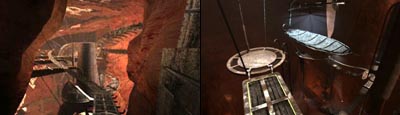 Turn right and begin the long walk up the twisting catwalk into the chasm. A few clicks into your journey and you will pass an intersection with a path leading off to the right. Ignore it for now but remember it for later. Continue forward until you reach a very high platform with a ladder that leads to another catwalk far below. You also get your first look at the magnificent airship.
 Climb down the ladder and cross the walkway. You will arrive at a pneumatic (air powered) lift with a control lever. Currently there is no air pressure so the lift is not working. You can look to the right and check out the four pressure valves and the pressure gauge. There are two additional sets of matching valves and gauges on the two levels above you, but you cannot access these right now. Exit to the path opposite the valves and curve around to the right where you can climb another ladder that turns into steps and leads to a platform high above. Step up onto the next ledge and get another missing journal page.
 Turn and open the circular door and pass through to the other side. Angle to the left and climb out onto the steam pipe that crosses the chasm below. Make your way across the suspended pipe that resembles some huge dinosaur bone. When you get to the other side click on the hatch down and to the right to open it and enter the vent shaft.
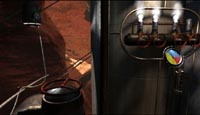
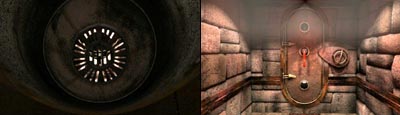 As soon as you enter the hatch slams shut behind you leaving you in total darkness. Start to move forward until you see some light ahead. When you reach the shaft of light look down to find a grate and click on it to open. Drop down into the lava control room and locate the door in the right image. Click on the locking latch on the right then the red handle to open the door. This is the locked door from earlier back at the blue-red tunnel intersection by the hydroelectric power plant. You now have quick access to the first part of the island if you need it.
Lava Control Room Puzzle - Difficulty: Hard
Your objective here is to get the fan operating in the lava room to vent the heat through the pipes to fill the airship on the other side of the island. Naturally there are several things that are going to make this difficult. The controls for the fan are on the other side of a lava-filled room and to make matters worse the control switch in this room has been sabotaged. Here's what to do.
 Click and hold on the red knob and drag it around counterclockwise until it clicks twice then release. The knob will spin around on its own and the lava will drain from the room. Now climb down the ladder behind you and open the containment door to enter the room beyond. If you came down here earlier you would have seen lava through the window in the door.
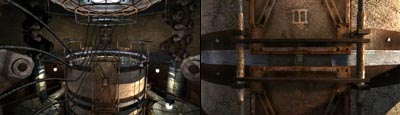
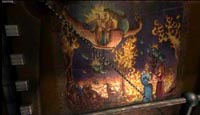 Turn left and walk onto the catwalk to find a duplicate control device that is fully functional. First move the knob clockwise and release to raise the catwalk and lower the gate to the right. Now slide the knob through the center groove to the left and watch as the huge gear mechanism moves to the opposite side and engages. With the gear out of the way you can examine the painting on the wall, which ties into the journal entry you found back near the airship.
 Now rotate the red knob counterclockwise to raise the catwalk even higher and flood the room with lava. The catwalk is now high enough to allow you access to the fan controls via the small hole at the opposite end of the catwalk. Flip the switch and you should hear the fan start-up. Now rotate the control knob clockwise to lower the catwalk and close the lava gate. Now slide the red knob through the middle slot toward the right to switch the gears then move the knob counterclockwise to drain the lava and lower the catwalk to the floor.
Slide the knob back through the middle slot to the left to switch the gear one final time but do not move this knob anymore. Exit the catwalk and return to the other control room via the ladder on the other side of the containment door. Now you can rotate the red knob in this room counterclockwise to refill the room with lava. The fan should now be working and heat should now be venting to the other side of the island.
You now need to return to the pneumatic lift and the four red valves back near the airship. You can either climb back up through the vent and crawl across the pipe, or exit out the door you unlocked earlier and go that way.
Airship Valve Puzzle - Difficulty: Hard
This is a difficult puzzle because it takes a lot of trial and error to just figure out the rules. I'll make it easier by telling you the rules first in case you would like to solve this puzzle for yourself and finally the total solution if you just want to get through it.
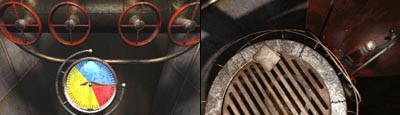
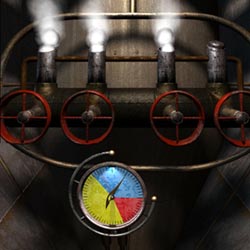 The image on the right is what you see when you first arrive at the first set of valves. By making some observations and doing some experiments you can learn several things. There are three sets of valves on three different levels. The steaming vents indicate which valves are open (negative pressure). All valves are open at the beginning except for the one that is stuck closed giving you a starting pressure of 10.
The valves on level 1 each add 10 units of pressure when closed. The valves on level 2 add 4 units and the valves on the top level each add 1 unit. Note the mark on the gauge at the 19 level - this is the target pressure you need to achieve to fill the airship.
Note the color zones on the pressure gauge. The lift you are standing on is powered by the same hot air you are venting, and for the lift to carry you to the next higher level you need to get the pressure into the next color zone. Pressure must be in the yellow to ride to the middle level and in the red zone to reach the top level. Now you have the rules if you want to solve this yourself otherwise keep on reading.
 Shut all the valves on the lower level giving you 40 units of pressure - enough to reach the middle level. Click and hold the lift lever and pull to the right to ride the lift to the middle level. Close three valves on this level adding 12 for a total of 52, which will get you to the top level. Ride to the top and close only one valve for a total of 53.
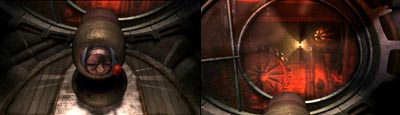
 Now pull the handle to the left to ride down to the middle and open one of the valves to make the pressure 49. Return to the bottom level and open the left three valves to reduce the pressure by 30 for a final total of 19 - just the amount you need. Now go around the corner and turn the red wheel shown in the image to fill the airship. Watch as the ship fills and then moves forward to stop at the dry dock doors.
Now you need to make your way back to the suspended catwalk that winds through the chasm. Head back past the red valve wheels and across the catwalk. Climb the ladder and turn left to follow the walkway until you reach the intersection shown in the left image. Turn left and follow the curving walkway around to the lift. Flip the lever and ride the lift down to the bottom then turn around to spot the missing journal pages shown in the middle image. Finally, walk out on the new catwalk to the very end where you will find a lever in the center of the platform. Pull the lever to open the huge doors and release the airship.

As the dirigible floats into the chasm it catches on the gantry and spins it around so you can easily board the craft. Flip the lever in the cockpit and enjoy the breathtaking ride through the gorge and over the falls past the power plant.
 You will finally come to rest at a new gantry near the small island where you began this part of your adventure. Exit the craft and walk out to the lever and flip it to trigger an amazing sequence of events. Now get back on the airship and ride out to the island. Remember that door at the very beginning of the game that needed power. Well now you have it, so click on the door to open it and enter. Inside is a circular chute with a ladder leading down. Climb down several clicks until you reach a closed hatch with a wheel.
Turn the wheel to open the hatch and reveal an awesome site. You are now looking directly down on the floating debris that is suspended in a magnetic field in a helix formation. This is the Energy Symbol you need to take back to J'nanin. The symbol is automatically logged in your book. Now you can look up and pivot until you locate the small doors. Open them to reveal a linking book that will take you back to the Observatory on J'nanin.
Back in the Observatory you can go to the imaging table and place the symbol on it to cause the cage to rise from the pit and trigger a message from Saavedro. When the message is over you can exit to the upper catwalk outside and prepare to get your next linking book.
Return to Chapter 2: J'nanin: The Lesson Age, and jump to the section for the next book you intend to get.