
THE DUNGEON KEEPER 2 MISSION GUIDE
By Jarrod Hampton
Welcome to my Dungeon Keeper 2 Mission Guide. This guide will help you through the levels of Dungeon Keeper 2, show you how to access the Secret Level and become an all out bad guy!
Now onwards on the guide and onto conquering the realm of the Heroes!
- Please do not copy this Guide to another site without my permission
-Feel free to link to this Guide
- Comments and Suggestions can be E-Mailed to me here
- Do not
reproduce this Guide for any Commercial Value without my permission
“Warcry”-
Smilesville
Assault
and Kill Lord Antonius
Build
5 X 3 Lair
Build
3 X 3 Hatchery
The
first few levels of Dungeon Keeper 2 are not really challenging but are there to
provide you with some help in getting started in the world of Dungeon Keeper.
The Narrator of the levels will often give you clues and hints throughout the
game and in the first few levels will guide you to your objectives. Simply
listen and all will be revealed.
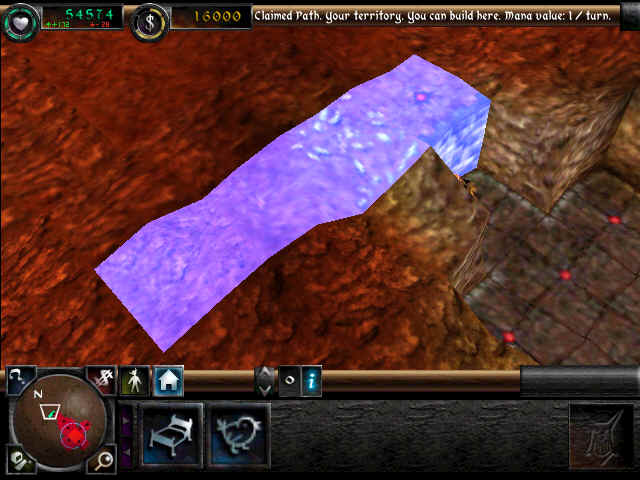
When
the mission begins listen to the narrator and follow his instructions. Tag the
first piece of gold (it will be marked in red by the narrator) now watch as your
Imps scurry to mine it down. Now continue until you have 12,000 gold just like
you were told.
After
this the Narrator will set you the task of claiming the Portal near your Dungeon
Heart. Tag the 3 flashing red blocks and your Imps will mine through to the
Portal and claim it for you. You now have a Portal under your control, this
allows creatures to travel to your Dungeon and come under your control.

In the first few levels the Narrator will help you overcome your objectives.
He will tell what to do and his orders will be marked in red as shown.
Next
the Narrator will outline the places for a Lair and Hatchery. Comply with these
orders and soon Goblins will begin to enter your Dungeon. A short time after you
have built a Lair and Hatchery some Dwarves will break through your walls and
into your Dungeon. Your Goblins will race to attack them (unlike Dungeon Keeper
you simply cannot pick up creatures and drop them near your attackers. When
dropping a creature they become dazed for several seconds before returning to
normal, while they are dazed they are extremely vulnerable and can be killed
easily.) and will make short work of the Dwarves.
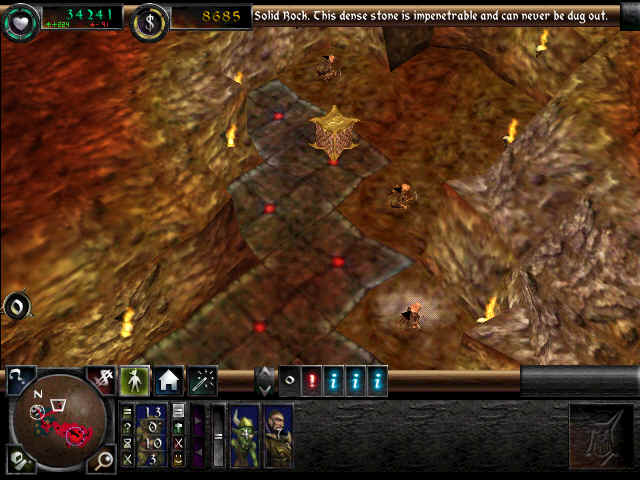
You
will soon be told to head north and break into Lord Antonius’s lair. Before
doing so you will want to find the secret of this level. Where the 2 red,
flashing blocks are to head into Antonius’s Lair send your Imps to tunnel out
the first block. From here turn west and tunnel 3 blocks here. Once they are
tunnelled out the secret will be revealed.
Mine these blocks to get to the secret of this Level
Once
you have the Secret, mine the other red block and Lord Antonius will arrive to
(try, and fail miserably) fend you off. Once again your Goblins will run to the
rescue and cut down the Do-Gooder. Well at least that’s one good guy out of
the way. When he is dead Horny will arrive and collect the Portal Gem.
“Enchantments”-
Sing-Song
Invade
Lord Darius’s Keep and Kill Him
Build
Library
Research
all Spells
Train
your Creatures
This
level is slightly more challenging than the last and the Narrator is also here
to help you. Like last time follow the instructions of the Narrator. Build your
Lair and Hatchery and then tunnel to the Portal. Claim it and wait for a
creature to arrive.
When
a creature enters your Dungeon tunnel out areas for a Library and Training Room.
With that done build these rooms keeping in time with the narrator. The ideal
size for the Training Room and Library is at least 4 X 4.
Continue
to follow instructions, mine gold and expand your rooms.
Build a Library of at least 4 X 4 squares to attract Warlocks to your Dungeon
You
will soon come under attack from some Dwarves, there are more this time so make
sure they do not get near your Dungeon Heart. If you like you can use your new
Spell, Lightning Bolt, to thwart the enemy. They should soon be dead and
hopefully you shouldn’t have many casualties. Rest your creatures by feeding
them and putting them in the Lair to rest.
You
will be told to head north and tunnel into the Keep of Lord Darius. Make sure
your creatures are rested first then tunnel into the Keep. First a horde of
Dwarves will attack, your creatures will make short work of them. While they are
fighting have your Imps mine the area to the right of the area you just
breached. It will keep moving into a larger until you come to the Secret. When
the Dwarves are dead Lord Darius will make his appearance.
Follow the arrow to get to the Secret
Here lies the Secret for this Level
After the Dwarf attack your creatures will head back to their Lairs. Grab them and place them a short distance away from Lord Darius. They will rise and lay waste to him and his Dwarven bodyguards. To make it easier on your creatures use your Lightning Bolt Spell to help kill the enemy. When Lord Darius is dead Horny will come for the Gem and leave you to proceed to the next level.
“Greed”-
Ramshackle
Send
the Greedy Lord Avaricious to his Grave
Mine
all Gold to entice Lord Avaricious out of his Castle
Build
and Place Traps throughout your Dungeon to stop any Intruders
This
level is now getting into the Campaign and you will no longer have any help from
the Narrator like the last 2 levels, though he will offers clues and hints to
help you finish your objectives.
Begin
by building a Lair, Hatchery, Training Room, Workshop, Library and a Treasury in
this order. When you have completed building a Lair and Hatchery tunnel in and
claim the Portal. When you have a workshop built build a Wooden Door and a
Sentry Trap in the entry to the Portal.
When
everything is built you should almost be out of gold, to the north behind the
Portal is a large lump of gold. Mine this and you will also gain access to
another chamber. In this chamber are several plots of gold, you must mine all of
them to entice Lord Avaricious out of his Castle. Also littered around this area
are many Cannons. They are hard to destroy so it is best if you leave them
alone.
When
the gold is all mined Lord Avaricious will come to seek you out. He has come
prepared bringing many Dwarves and other Warriors. Let them approach your traps
and then set your creatures upon them.
Whilst
they are fighting send your Imps to northwest. When they explore around here
they will find the Secret for this level. There are many cannons guarding it but
your Imps are much faster and should have no trouble grabbing your prize. Make
sure an Imp picks it up and brings it into your Dungeon.
Here lies the Secret for this level, be wary of the many cannons that surround it.
Lord Avaricious can be a dangerous foe and using your Lightning Bolt Spell also helps in killing his minions. Using your creatures, traps and your Lightning Bolt Spell together you should be able to kill Lord Avaricious quite easily. When he is dead Horny will come for the Gem.
“Snipers”-
Shadygrove
Traverse
the Moat of Lord Ludwig’s Fort and Wrestle the Gem from him
Find and
Claim Guard Rooms
Lead a
Charge of Grouped Creatures into Lord Ludwig’s Fort
Walkthrough
Start off this level like any other by building a Lair, Hatchery, Training Room, Workshop, Library and a Treasure Room in this order. When you have completed a Lair, Hatchery and a Training room, go and claim the Portal, which is not far from your Dungeon Heart.
Continue mining gold and building rooms. Research all your spells and then place all Warlocks in the Training Room. Also build lots of Doors and Traps throughout your Dungeon. Defend against any enemy attacks because they will start to come quite frequently, then destroy the door. 3 Warriors will emerge, kill them and let your Imps go about their business. Claim the Portal and grab the first secret, which is in the Portal Room. To the right of the second Portal tunnel through the dirt and gold and you will open a passage tot he second secret.
Continue exploring and digging tunnels. Keep training creatures and building Sentry Traps. Remember to mine gold all the time. Move to the left and right of the new area you have acquired and tunnel here and upwards. You will open a passage into the moat of Lord Ludwig’s fort. There are many cannons here so be careful, to take them out Possess a creature then create a group and attack them. They will fall quite easily if there are more of you.
Destroy the door and stay in Possession of a creature and his group of creatures. Attack Lord Ludwig with everything you have. He isn’t that well defended and will fall easily.
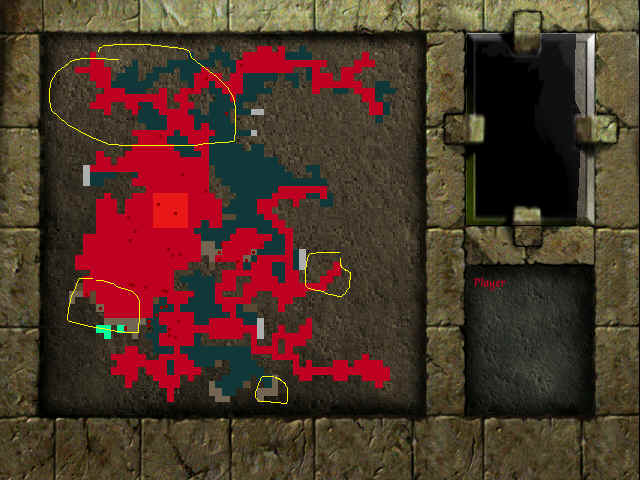
The other 3 Secrets are in the areas in yellow, the fourth is in the 2nd portal room
“Fear”-
Elmshadow
Force your
Way into the Keep and Kill the Cowardly Lord Constantine
Find and
Claim the Prison
Create
Skeletons to help you Finish your Objectives.
Walkthrough
Start off this level by building a Lair, Hatchery, Training Room, Workshop, Library and Treasure Room. Try to build them small at first because you don’t have much room to start off with. When you have a Lair, Hatchery and a Training Room claim the Portal and start bringing creatures into your Dungeon. Start tunneling south. You will come to an enemy area, some Wizards patrol this area. There are only 1 or 2 so they are easily killed. Let your Imps claim everything here. They will also claim the Prison.
Make sure you have the Prison set to imprisonment (by clicking on the door). Now every time there is a battle all enemy creatures will be taken to the Prison. When they die in Prison they will return as a Skeleton. Skeletons do not eat or sleep making them a great warrior.
When you take the Prison you will be under constant attack from the north. Build Doors and Sentry Traps here to help your defenders. When you have had a chance to construct some defences and you have had your creatures training for a while, start tunnelling north.
Also tunnel right of the Prison. You will come to a door guarded by 2 Dwarves. Kill them and demolish the door, behind the door is another door, demolish it and 2 Skeletons will emerge, they are friendly so leave them be.
Keep tunnelling north, remember to construct Bridges to new areas so that you can claim them. Tunnel everything here and you will come to the Keep. It is guarded by many Warriors and Knights as well as 4 Fear Traps, you must use your Skeletons to destroy the Fear Traps because they are the only ones unaffected by the Trap. When they have been destroyed 2 Knights will emerge, kill them quickly before the main attackers come.
When they are dead many Knights, Mages and Dwarves will emerge through the Hero Gate. Try and lure them back to your defences or you will lose may creatures. Also once they are on your territory you can use your Lighting Bolt Spell. Make sure every single creature is fighting or you will become greatly out- numbered. Remember that Possessing a creature enhances its attacking ability.
When the goodly Lord Constantine is dead Horny will come to claim his prize.
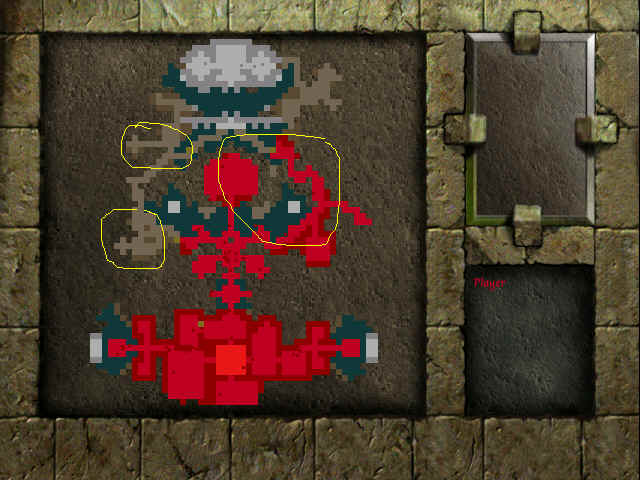
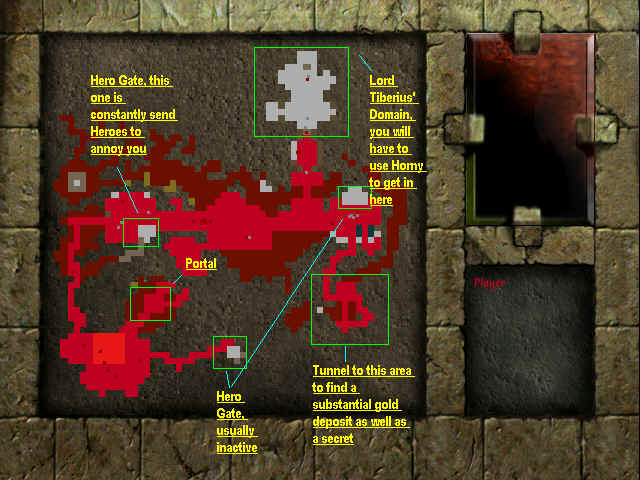
The Yellow circles indicate where the secret boxes are. The 5th you will find as you start the game. One of the 5 boxes is part of the Horny Talisman. It must be used in the next level.
Refer to the picture to find all 5 secrets. One section of the Horny Talisman is also available in this level. Refer to the picture to find it.
“Rout”-
Sweetwater
Intercept
and Kill Lord Ironhelm before he reaches the Hero Gate
Capture the
Wandering Heroes
Interrogate
the Enemy Warlock to find the location of the Hero Gate
Walkthrough
First of all grab the enemy warlock from your Prison and place him in the Torture Room. He will give up the location of Hero Gate. Hmm, that is a fair way away. Now expand the rooms you already have and then get straight into building a Training Room, Library, Workshop and a Treasure Room.
With
that done start mining the gold to the east and west of your Dungeon Heart.
After mining the gold to the west you will come to an enemy tunnel. Let your
Imps claim everything here. Act quick by placing a Wooden Door and a Few traps
in the west to stop anyone getting into your Dungeon. Attacks will start soon
enough so be ready. Make sure your Prison is on imprisonment so that you can
create an army of Skeletons.
Explore
the west tunnel until you come to a Sentry Trap. Destroy it with your minions
and explore the tunnel behind it. When you come to the door destroy it and kill
everyone inside. Build Bridges if you have to but you must claim these tunnels.
There will be a few more Warriors but they are easily dealt with.
Now
tunnel straight ahead of your Dungeon Heart. When you come to the door destroy
it and continue to claim this area. Build Sentry Traps after each new area you
claim, they will be needed. Keep moving towards your objective and destroy the
next door you come to. Kill all the Heroes that rush out, lure them back to your
territory and use your Lighting Bolt Spell.
Use all of your creatures so that your casualties are few. Have your Imps
drag off Prisoners and kill them to make Skeletons.
Continue
northwards following the already tunneled tunnels. Destroy any doors that get
in your way as well as any do-gooders. Take the Guard Room by sending every
single creature you have at it. They should be no match for you. Claim the Guard
Room and move on.
You
will eventually come to the area that was first shown to you. Don’t break down
the door just yet. Claim the area outside of it and build lots of Sentry Traps
here. They don’t have to be near the door just somewhere near it. When you
have a decent army and a decent defense, break down the door. Inside is Lord
Ironhelm and his many guards. Move every single creature in to attack. Now is
the perfect time to summon Horny (if you summoned Horny before hand don’t
worry because you can go and kill other victims lying around the map, kill them
and turn them into Skeletons and use a Skeleton army as you main attack force),
click on the Talisman and click somewhere near Lord Ironhelm. Once Ironhelm
enters your territory fry him with your Lighting Bolt Spell, and bring back
every creature to kill him. He will make a dash for the Hero Gate so be
observant and make sure he doesn’t get away.
To
find the 11 secrets it is a matter of getting to Lord Ironhelm’s Chamber
before he leaves for the Hero Gate. Fortify it with lots of Sentry Traps and
lots of Fear and Barbed Wire Fence. Then proceed to sear every single tunnel on
the east and west side of the map. It doesn’t take long and you shall soon
find all 11. Some of the final ones remain in the middle of the map in enemy
rooms.
“Caverns”-
Emberglow
Dispose of
the Fiery Tempered Lord Sigmund and Retinue Giants
Traverse
the Giants Caverns
Be Wary of
the Molten Lava
Walkthrough
Most
of your Dungeon building is already done for this level, only a few Giants
patrol the now dead Keepers Dungeon. The first one will approach you, use
whatever you have at your disposal to kill him. Then make you way to the vacant
Dungeon. Your Imps will start claiming the rooms. Keep the last 2 or 3 Giants
off their backs while they do it. When the Giants are dead you will be left
undisturbed for a while.
Make
sure everything is claimed and expand any rooms you can with the Training Room
and Library first on the list, also below your Dungeon Heart start tunnelling
out an area for a Prison. Build the Prison and make sure your creatures are
training. Build Doors and Traps throughout your Dungeon because the Giants will
be back soon.
From
the Dungeon Heart head right, when you come to a Door, destroy it and any
Warriors behind it. Have your Imps claim the new area and move on. You will come
to an area with 3 passages leading to 2 doors all very close together. It
doesn’t matter which you pick because they all lead to the same place. Be
ready for a fight, knock the door down and let your creatures kill the Warriors
and Giants in the Guard Room. When they are dead claim it and keep heading right
and slowly downwards.
You
will come to an area where there is a small lava river then a Wizard protecting
a Door. There are barricades protecting him so you will need to kill them first.
Use Salamanders because they can cross lava. Charge the Barricades and rip them
pieces along with the Wizard and the Door. When they are gone build a Bridge
across the lava and have an Imp claim the new area. The Wooden Bridge won’t
last long in the lava so you must hurry.
This is the area where Lord Sigmund hides.
From
here head south. Continue south until you come to a large mass surrounded by
lava. Build bridges over the breaks so that your Imps may claim the area. Use
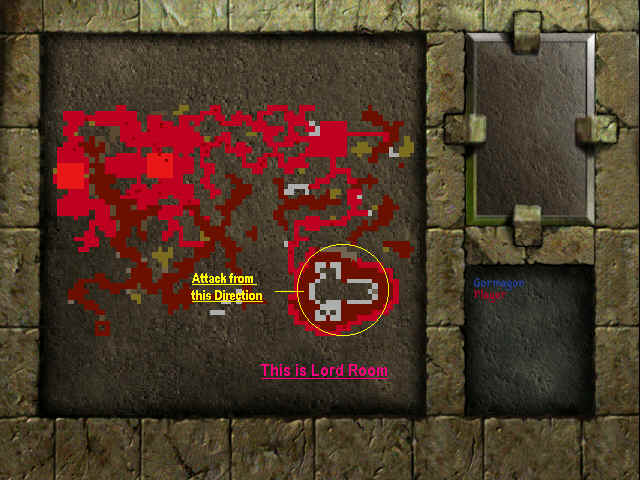
the directions from the screenshot (above) to attack the fort. The right end of
the fort is armed with 6 Sentry Guns and it is impossible to kill anyone there,
instead attack from the left. Using a Bridge take down the Braced Door with
everyone you have (use Call to Arms Spell if you need to). As soon as it is down
bring everyone off of the Bridge. Wait till it collapses then place everyone on
the opposite side of fort. Your Warlocks and Dark Elves will start to attack the
enemies in the fort. This will take a little while if you do it this way,
another way of doing it is to build a Bridge with one unit as bait and lure the
enemy onto the bridge, then sell it. This may kill some of them but you will
still need to snipe with your Warlocks and Dark Elves.
When
Lord Sigmund’s guards have died construct another Bridge and charge with
everyone no matter what (using Call to Arms inside the fort so that everyone
gets off the Bridge is a good idea). He shall soon fall under the attack of your
Minions then Horny will come for his prize.
The
secret to obtaining the secrets is simple, you must knock down every Door,
search every loose piece of dirt (try to stay to the lava areas) and search
every where. Underneath your Dungeon Heart lies one and another lies in the lava
to the middle south and another to the right south. I leave the rest to you.
“Aftermath”-
Snapdragon
Take Over
Keeper Dante’s Abandoned Dungeon and Massacre Lord Titus
Find and
Claim All Scattered Rooms
Defeat the
Guardian Wizards
Walkthrough
Like
the last level there is another abandoned Dungeon for you to take over. You will
also notice that you have acquired another piece of the Horny Talisman, as
before this piece must be used this level. This time, however, the rooms of this
Dungeon are scattered around your Dungeon Heart making it terribly difficult to
claim them easily. Also there isn’t much room to build any rooms so you will
have to go and claim them.
Start
off by building a Stone Bridge to the Lair, kill the 2 Dwarves and the Warrior.
Don’t go after the Portal yet. Have your Imps claim it and the move onto
claiming the Hatchery. In the Hatchery proceed through the left to the Treasury.
Claim it and proceed through the door to get to the Guard Room. Claim it and
head back to your Dungeon Heart.
Build
a Stone Bridge to the Portal and tunnel your way into it. There is an Alarm trap
in the Portal Room but that will be no problem. Possess of one of your
Salamanders and group the others up. Move into the Portal Room and set the Alarm
off then immediately move back to your Lair. You will survive much longer from
here rather than in there. As they march out to get you slaughter them, and then
move in to destroy the Alarm Trap.
Your
Imps should have already claimed the Portal so now build Bridges all over the
next room. There is Fear Trap here, you will need to use your Dark Elves to kill
them, use their Sniping Ability to destroy it. A little while after it has been
destroyed several Dwarves will attack you. Remember to claim the secret.
Move
through the passage the Fear Trap was guarding. Make sure your Imps are claiming
all this. Break the door you come to and kill all that is inside. It isn’t
hard and with all your creatures you should sustain little or no casualties.
Snipe the Gas Traps here with your Dark Elves so they don’t harm anyone. Then
head to the Workshop and break its door and claim it. Build Bridges so that your
Imps can claim it.
Head
down the passage opposite of the Workshop, there are Gas Traps and an Alarm
Trap, snipe them with your Dark Elves again. Head down this area claiming as you
go. You will come to a door, this leads to the Casino. Break in and claim the
Casino (your creatures will be happy about that!).
Now
destroy the top left door of the Casino, it will lead to a Hero Gate (not your
Objective though). Inside are several enemy units, a Wizard, some Warriors and
Dwarfs. Break into this area and slay them all. This area is the key to the rest
of the rooms and the pathway to your objective. Leave the steel grate door alone
for the moment and destroy the other 2 Wooden Doors. Inside are a Prison and a
Torture Chamber. Inside the Torture Chamber are 3 Mistresses. They are neutral
creatures so one of your creatures must make contact with them no turn their
allegiance to your cause. Now that you have a prison you can start interrogating
Prisoners if you wish or leave them to rot and make you a Skeleton army.
Back
at the Casino take the top right door and claim the Hatchery, you may need to
build a Bridge first. A library resides next to it. Claim this room as well. You
may encounter some resistance at the Hatchery but it isn’t a lot and you
should handle it quite easily.
Back
at the Casino take the bottom left door to arrive at another Hero Gate. There
are a few creatures in this room but your main obstacles are the Barricades
blocking off your attack. These should be your first targets with the enemy
units next. When they are all dead claim the area including the Training Room.
Well done, you just captured all the rooms.
Back
at where you claimed the Prison and Torture Rooms destroy the steel grate door
and move into this area. Possess a Dark Elf and snipe the Gas Traps. When they
have been destroyed or you have been noticed bring everyone in and slaughter all
opposition including Lord Titus.
The
key to finding the secrets in this level is the same as any other, search every
where, every nook and cranny. Search all enemy rooms and don’t leave one
tunnel unsearched.
“Ambush”-
Silverstream
Ambush Lord
Voss as He Traverses This Realm, Gem in Hand
Attempt to
Capture the Heroes Outposts Along the River
Walkthrough
TIME = 20 Minutes
This
level is a timed one so act quickly. The time refers to when Lord Voss will
appear and make his journey to the Hero Gate.
Start
off by quickly constructing a Training Room, Library, Prison and a Torture Room.
With that done begin to build Traps and Door throughout your Dungeon. To the
north there is supply of gold as well as an infinite supply of gold from the Gem
block.
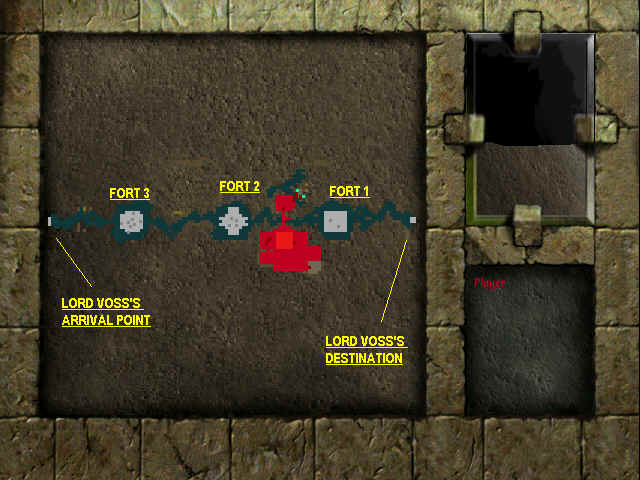
This shows the forts marked as 1-3 and where Lord Voss will arrive and
(attempt, if you have anything to do with it) depart.
When you have a decent supply of creatures, possess a Bile Demon and group up some creatures and head for the first fort. Head straight for the Sentry Traps, take them out and then move on through the Wooden Door and into the Guard Room. Kill anything and everything, Sentry Traps, Warriors, the lot. Now release your creatures and let them rest, heal, and train.
When
the timer hits 8.00 group your creatures and head for the second fort. Just like
the last one rip it to pieces. Make sure nothing survives. In the mean time
build Bridges to the forts and claim them.
When
both forts have been claimed let your creatures retire to their own business for
a little while. Build a Bridge from the second fort to the third will fortifying
the second fort with Sentry Traps and Fear Traps. At 4.00 move to the third fort
with another group of creatures. There isn’t much of an opposing force so
march in and wipe them out. Claim the fort when you have finished destroying
everyone in it.
Move
back to the second fort and wait for Lord Voss. Try and have as many traps set
for his arrival as you can. When the timer hits 0.00 Lord Voss will enter the
realm and will begin his run to his departure point. He will not stop to attack
anyone so you must stop him. When he nears your force at fort 2 strike him down
with your Lighting Bolt Spell. Your creatures will run to dissect him, whenever
he gets up strike him down again. He shall soon be dead under your Wrath and
Horny will arrive for his prize.
The
finding of secrets is just the same as the previous levels, search, search,
search. But don’t let it distract you from your main objective.
“Smash”-
Woodsong
Defeat
Keeper Asmodeus and Take the Gem From Him
Smash Your
Way Through Lord Ronin’s Lines to Attack Keeper Asmodeus.
Walkthrough
This is another timed level, this time with a twit added in for fun. Instead of Lord Ronin holding the Portal Gem and being your main enemy, Keeper Asmodeus has already taken the Portal Gem from him but his Dungeon was put under siege from Ronin’s army and he couldn’t escape in time. It is now your job to find a way into Asmodeus’ Dungeon and take back what is rightfully yours.
Start
by building a Lair, Hatchery, Training Room, Library, Workshop, Prison, Torture
Chamber and a Treasury. Mine the gold around your Dungeon and begin building
lots of Traps and Doors. The Heroes will soon find you out so you must start
training creatures as soon as possible.
The
Heroes will start to attack from all directions. They will usually come one by
one or in small groups, nothing you can’t handle. When you have some prisoners
interrogate them for Map Info. They will usually give your Map Info on where
their siege is. This is good because now you know which area to avoid for the
time being.
Move
south and claim the Treasury. There is a Fear Trap inside of the Treasury so use
your Skeletons to destroy it. Now tunnel to the east and west of the siege. You
will to 2 rooms, guarded by several enemy units. Bring everyone in to kill them
then claim the rooms.
Let
your creatures rest, heal, and train while you build Traps and Doors. When your
creatures are all at full health or the clock approaches 15.00 or 10.00 now is
the time to strike. Build a bridge to the enemies Bridge in the middle of the
water. Cast the Call to Arms Spell on the enemy bridge, now build bridges to the
little Guard Rooms on the water on your half. Claim them all as well as the
enemy Bridge while your creatures kill whoever lurks in the water. You will
encounter some resistance from the 2 rooms to the east and west. It is
Imperative that you LEAVE THOSE ROOMS ALONE, they are filled with enemy units
and you will be massacred if you step foot into them.
Now build a Bridge to Keeper Asmodeus’ Dungeon. Destroy his Sentry Traps and
work your way to the west and along his wall. Your Dungeon Heart will also come
under attack, don’t worry about it because it will take them a long time
before they destroy it and by then you will have destroyed Keeper Asmodeus and
have already taken the Portal Gem. Use the Tremor Spell to de-fortify his walls
and then tunnel into them. Now is the time where you must act fast. Move all
your creatures to the breach in his walls. Lead a pack of creatures straight to
his Dungeon Heart. Once they are there leave them and cast the Call to Arms
Spell at the Dungeon Heart. By the time you reach the Dungeon Heart all the
Heroes will start making their way to Keeper Asmodeus’ Dungeon Heart as well.
You must act fast fore they have greater numbers and will easily kill you. As
soon as they near your creatures strike them down with the Lighting Bolt Spell
to give you enough time to destroy the Dungeon Heart and take the Portal Gem.
The
finding of secrets is just the same as the previous levels, search, search,
search. But don’t let it distract you from your main objective. Also the
Secrets will start to appear in very easy to find places, like enemy rooms or
just sitting out in the open.
“Carnage”-
Sparklydell
Kill All of
Your Rival Keepers!
Hold Off
Strong Rivals While You Deal With the Weaker Ones
Use Your
Newly Granted Traps to Inflict Maximum Damage
Walkthrough
Start work by building the usual, Lair, Training Room, Hatchery, Library, Workshop, Prison, Torture Chamber and a Treasury. Also notice that you have acquired another piece of the Horny Talisman. Start building lots of Traps and Doors throughout your Dungeon because they are the keys to keeping the enemy out for this level.
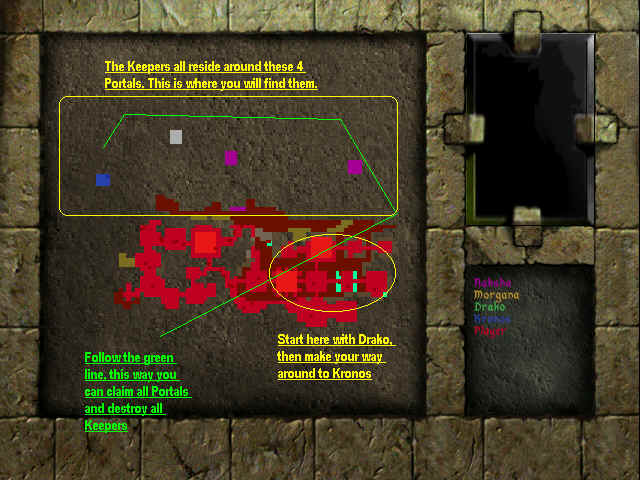
Follow this strategy to successfully defeat all of your rival Keepers.
Drako (the Green Keeper) is the weakest so take him on first. He is quite close to you but he is not that well advanced and his creatures are not well trained. Tunnel towards him and smash your way into his Dungeon. He will send a few pitiful creatures at you, nothing you can’t handle, kill them and move past the Hatchery into his Dungeon Heart. There are a few traps you should be aware of, inside his Dungeon Heart room, are a few Trigger Traps make sure these are disposed of carefully. With these gone you can safely destroy the Heart in peace.
There is a chance that the keeper near
him, Yellow Keeper Morgana, has been destroyed by another Keeper. This is good
because it saves you the trouble of slaying her. If she hasn’t then it is a
simple manner of claiming the Portal and moving through the connecting tunnels,
you will soon come to her Dungeon Heart with little or no resistance from her.
Remember
that you have the Horny Talisman to use, use it at any time you feel the need
to.
Now
train your creatures and Booby-Trap your Dungeon. Traps will keep intruders out
while you devote your time to attacking rather than defending. Claim the Portal
that Morgana and Drako so kindly left you and set to work training all of your
creatures. When you believe that your creatures have been thoroughly trained
follow the plan on the screenshot above.
Continue
this way until you reach Raksha’s Dungeon, with your horde of trained
creatures she shall soon fall to your attackers. Her defence is weak and her
traps are lame, your creatures will make short work of them. Move to her Dungeon
Heart, use Call of Arms to help you, destroy it quickly and get back to claiming
the new ground you just won. Remember to claim the Portals for more creatures,
the more the better.
The
last and most powerful Keeper is Kronos. He is situated to the very left of the
map above your Dungeon Heart. Tunnel to him from Raksha’s dungeon and invade
his privacy. Kronos is a little more organized with Traps and Doors spread
throughout his Dungeon. Possessing a creature also gives you the edge in combat.
Even with Kronos’ Traps and Doors it will not be enough to keep your out. Use
every little trick you have to bust into his Dungeon and break a path to his
Dungeon Heart, don’t bother with anything else because it is just a waste of
time. Once at his Heart, have every
creature pitch in to destroy it. When the last Keeper has been destroyed Horny
will come to get the Portal Gem.
Secrets
will start to stick out more and it isn’t really a challenge to find them,
just make sure that you don’t get too distracted from your Main Objective.
“Scavenge”-
Goldenglade
Finish Off
Lord Brambles Remaining Forces and Take the Portal Gem From Keeper Malachai
Amass An
Army of the Undead Through Exploration and Resurrection
Walkthrough
Start
off by building the usual rooms, Lair, Hatchery, Training Room, Library,
Workshop, Prison, Torture Room and a Treasury. Claim the Graveyard to the right
of your Dungeon Heart. Building these rooms may take some time because you will
probably run out of space and out of money. Wait until there is more land to
build on. Don’t worry about a Workshop or a Guard Room because you will only
have Skeletons and Vampires for creatures since there is no Portal.
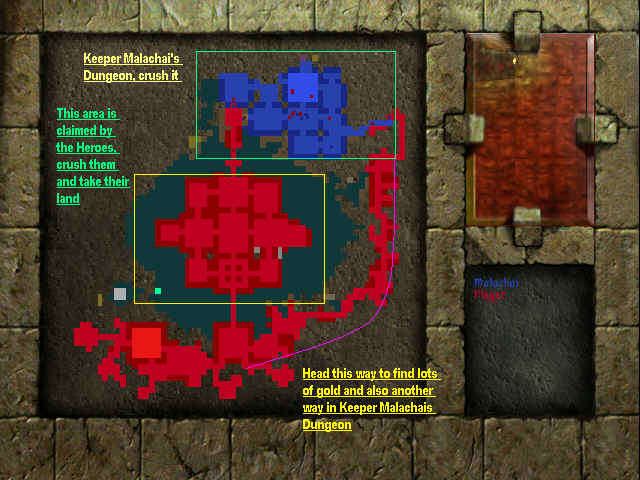
Use this screenshot to help you finish the level.
Move
forwards into the remaining Heroes camp. There isn’t a lot of opposition and
they can be taken out quite easily. When they are dead move in and claim
everything. They have kindly left you lots of pre dug rooms. Now you can build
bigger rooms or rooms that you missed. You must continue to raise Skeletons and
Vampires because you will need a large army of these creatures to over come your
enemy. Make sure that any prisoners that don’t return as Skeletons get placed
in the Graveyard to attract Vampires.
You
will find 3 Sentry Traps looking in at your newly claimed territory. Build a
bridge to them and destroy them. Head right for more gold. You will be
constantly attacked from small packs of enemy creatures they are so easy to kill
that they shouldn’t be called opposition. Make sure they either come back as
Skeletons or are food for the Vampires. You need to raise an army of at least 10
well-trained Skeletons (Level 4 or higher) and at least 5 Vampires (Level 4 or
higher). When you have this army start an attack into the enemy Dungeon.
Keeper
Malachai will let loose all of his defenders, they are easily killed because
your Skeletons and Vampires shall make short work of them while they are dazed
and when they rise they will be ripped to shreds. There is a possibility that
you won’t lose a single creature but that depends on how well you look after
your creatures. Use the Call of Arms Spell and cast it at his Dungeon Heart,
with Malachai defenceless he can only sit and wait while you destroy him and his
dungeon.
When
the Dungeon Heart has been destroyed Horny will come to collect his reward.
Secrets, same story, they will start to become rather easy to find with only one
or two requiring a little searching to find them.
“Conversion”-
Cherish
Crush
Keeper Malleus’ Vampiric Hordes and Take the Portal Gem From Him
Capture and
Convert the Monks of St. Cuthbert
Use These
Converted Minions Against Malleus’ Undead Hordes
This
level has a different way of achieving your objectives, rather then rushing in
with every creature you must convert the Monks of St. Cuthbert, fore they hold
the key to defeating Lord Malleus’ Vampire army.
Start
building a Lair, Hatchery, Training Room, Library, Workshop, Prison, Torture
Room and a Treasury. When you have built at least a Lair and Hatchery, head up
past your Dungeon Heart and claim the Portal.
Mine
the gold that is around your Dungeon. You may start to be attacked at this
point. Hopefully you should have a Prison. Make sure that your have
“Imprisonment” turned on. When the Monks attack have them brought first to
the Prison. You will now need a Torture Room. Start converting creatures to your
cause, the Monks especially.
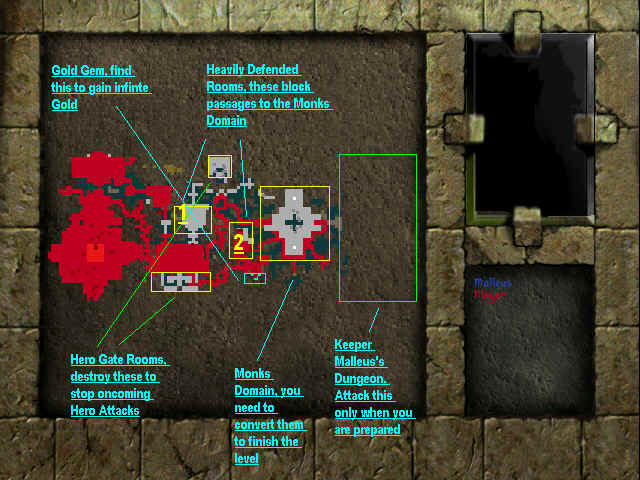
Use this screenshot to help you finish the level.
Note:
To convert a creature you must place him/her in the Torture Room. You have to
heal the creature to prolong its agony, the more it suffers the weaker its gets
and it will eventually turn to the dark side.
: - )
Start
to move to the right. There is a Hero area here, there is little defense
and
your creatures should be able to overrun it in seconds. There is a Prison and a
Torture Room in your newly acquired area, if you don’t already have a Prison
and Torture Room keep them if not then sell them for the cash. Remember to build
lots of Traps and Doors, especially to the entrance to the right of your
Dungeon.
Now
head to the right further and you will come to a small room holding the
entrances to a Treasury and the second Heavily Defended Room (see Screenshot).
Take the Treasury first, break down the door and have your Imps claim it, there is
no opposition here but the Guarded Room is a different story.
Several
Sentry Traps, Ice Traps and four Elven Archers guard this room. Your creatures
will need to be all in good health before you take on this room.
Have
someone break the door but don’t attack yet. Instead bring in a Dark Elf,
Possess him and snipe away at the four Elven Archers inside this room. Try and
kill at least one and wound the others. When one dies it is time to bring in
everybody. Use the Call to Arms Spell to have everyone attack. When they get
there, there will be chaos. Naturally your creatures will overrun them quite
easily because Sentry Traps are not the strongest Traps in the world. Just make
sure to heal them every now and then to prevent any unnecessary loss of life.
Claim
this room and take the secret. You will start to come under attack from
wandering patrols (they tend to wanders straight to your Dungeon Heart!), they
will usually consist of a Wizard, 2 Warriors/Guards, Giants and a Monk. Remember
to continue converting all the Monks you can get your grubby little hands on!
You need as many Monks as you can get for the final battle.
Start
heading towards Heavily Guarded Room 1 (see Screenshot). This is the key to
gaining access to the Monk domain. Tunnel into this room and destroy all the
Sentry Traps. With this room cleared start moving ahead onto the Monk domain.
Destroy the door and head in and take on the remaining Monks with every creature
you have, use Call to Arms to get everyone involved. The monks have the ability
to heal each other, so to counter that you will have to heal your creatures
often. Also possessing a creature gives it an edge in battle. To win this battle
you will have to keep your creatures healed and also try and get a few shots in
with the Lighting Bolt Spell. When the Monks finally fall make sure that they
are brought to your Prison, then begin to convert them.
When
your Imps make it to the room where the Monks were, they will find the entrance
to Keeper Malleus’ Dungeon. He will now set loose his Vampire army, set forth
to crush you. This is where the Monks are involved, they are believed to know a
way to stop the living dead (the Vampires). Your Monks are your best chance at
stopping them. Cast Call to Arms at the room right of your Dungeon Heart. This
will gather every creatures to stop the foul menace. With your Monks help the
Vampires will be slaughtered with little loss to your side. The only problem is
that they do not stop their attack, but they do stop in their consistency. They
start off as a massive horde but are soon diminished to one or two at a time.
When
it gets to this stage it is then that you can make your counter-attack. Bring up
two Skeletons and place them at the room where the Monks were. Now Possess on
and group the other, walk over into Keeper Malleus’ Dungeon. You will come to
two Fear Traps, these must be destroyed because they block the passage into his
Dungeon Heart. When they are destroyed exit the Skeleton and cast Call to Arms
right next to Keeper Malleus’ Dungeon Heart. With his main force destroyed he
has but one or two Vampires to use at a time making it easy work for you.
Do
not worry about defence because once your are attacking his Dungeon they will
stop their attack on you and divert their attention to defending themselves. If
one does make it to your Dungeon Heart simply put him down with the Lighting
Bolt Spell. Your creatures will destroy Keeper Malleus’ Heart before they even
get a chance to harm yours.
When the Dungeon Heart has been destroyed Horny will rise and come for his prize. Secrets are beginning to become rather easy to find, now not much effort is required to find them, but make sure you don’t head to far right and breach Keeper Malleus’ Dungeon or the Vampire army will be triggered too soon.
“Reap”-
Peachtree
Summon
Horny and Kill Lord Tiberius
Claim All
Mana Vaults
Start
off by building a Lair, Hatchery, and Training Room. Later on you will have room
to build a Library and a Prison. Also note that you have all four pieces of the
Horny Talisman, this means that you can now summon Horny at any time you like
but the cost is 100,000 Mana points.
Use this Screenshot to help you through the level.
Mine
the gold near the Portal, and then start tunneling
to the right of your Dungeon
Heart. Also tunnel left a little then tunnel north. Hero patrols will be around
this new area, they are a fair challenge consisting of a Wizard, Elven Archer,
two Giants and two Monks. You will probably need most of your creatures to
defeat them.
Head
along this new area and destroy the Magic Door. Continue right and head into the
room. This is the first Mana Vault. Inside are two Guards and an Elven Archer.
Kill them and claim this room, make sure the Vaults are claimed. Make the Guard
Room bigger, and when Dark Elves come place them in there. You will notice that
there is a Hero Gate in this room, you cannot destroy it so keep an eye on it.
Constant Hero patrols will emerge through this gate so you will need to be
prepared.
Destroy
the Steel Door in the first Mana Vault, head through this passage and destroy
the three Sentry Traps looking into the big area you just entered, you will have
to use Salamanders. When they are destroyed, claim this area and build a
Library. Keep moving right and ignore the door across the Lava and continue
right. With everyone destroy the Magic Door and claim the last Mana Vault.
There
is a Hero Gate in here but is inactive unlike the other one. In the second Mana
Vault there is a supply of gold here, you will need to mine it. Also there si
room here for a Prison, I suggest that you build one. Now after mining the gold
mine south of the second Mana Vault. You will come to an area with a secret on
an island surrounded by lava, two enemy Doors and lots of gold. The Doors lead
to more lava passages. Build Stone Bridges to the secret and to the gold
deposits. Mine the gold and take the secret.
When
you reach 100,000 Mana Points you will be told to summon Horny near the door
that I told to ignore. First though, build a Stone Bridge to that area. Now send
your creatures to destroy the door blocking your path into their lair. Let your
creatures attack for a little while, just enough to get their attention and move
them back as quick as possible. This will trigger a massive Hero attack. Now is
the time to summon Horny and let him loose on the Heroes that come forth from
their lair.
This
is their main defense
force and once Horny decimates it there will be no
stopping you. Horny should be able to kill them all himself but to make sure
have your creatures help him. When they are dead wait until you have enough Mana
to summon him again. When you have enough to summon him again, use the Call to
Arms Spell to have your creatures move to the centre of the Heroes domain. Once
they are there summon Horny, together they will find Lord Tiberius and kill him.
When
Lord Tiberius lies dead on the ground Horny will rise and take the Portal Gem
from him. Some old story with secrets, do a little searching to find them
because they will start to stick out like lights on a Christmas tree. Just make
sure you don’t forget about your Main Objectives.
“Reap”-
Peachtree
Storm the
Fairy Fortress and Kill Lord Volstag
Build the
Combat Pit to Train Creatures to Higher Levels
Start
off by building the usual rooms, Lair, Hatchery, Training Room, Library,
Workshop, Prison, Torture Room, Combat Pit, Graveyard and a Treasury. Start
mining the gold around the area. There is plenty of room to build so don’t
skimp on rooms.
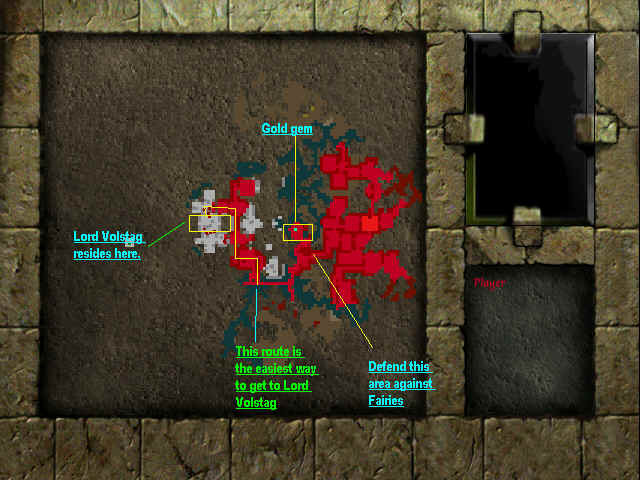
Use this screenshot to help you finish your objectives.
Go
ahead and claim Portal 1 (see Screenshot). Once that one has been claimed go and
claim Portal 2. There are some Fairies guarding this Portal but they are easily
dealt with. Fairies are not the strongest enemy but in packs they pack a punch.
When
creatures have reached an experience level of 4 use the Combat Pit to train them
higher. Just remember to make sure the loser (if a friendly creature) is taken
care of and nursed back to health.
You
may be attacked from time to time from two or more Fairies, use all your
creatures to combat this menace so that casualties are low. Now start tunnelling
south for more gold because you are probably starting to get low on it. While
tunnelling south also start tunnelling into the middle of the map (see
Screenshot for better directions. Build a Bridge to the Door and destroy it. Use
Call to Arms to bring every creature down to the door and kill all that emerge
from it.
Head
left through the enemy domain. Head straight up from here killing all that
oppose you, you will have to heal your creatures regularly. If they become too
powerful for your troops, back off and call in Horny to finish them off.
Head left again destroying anything in your path. You will come to a
large room in the middle of the Heroes domain (see Screenshot). The right door
is where Lord Volstag is hiding. Use Call to Arms to have your creatures destroy
him, and also use Horny to give you that extra edge in battle.
With
all your creatures might, Lord Volstag will fall quickly, be wary of the Ice
Traps that littler these rooms because they can easily kill your creatures. Your
Dungeon Heart may come under attack but if you are near Lord Volstag or are
fighting Lord Volstag then don’t worry about it, but if your not then race
back to defend it. When Volstag falls Horny will come to claim his prize.
Secrets
are really becoming easy to find, but there are just more of them. Enemy rooms
hold some secrets while the rest are to be found else where, they are not
particularly hard to find and only require a little searching. Just make sure
you don’t forget about your Main Objective.
“Creep”-
Stonekeep
Kill the
unsuspecting Lord Pureheart
Stealthily
Build Up Your Dungeon Within Lord Pureheart’s Walls
Make Good
Use of Secret Doors to Expand Within Lord Pureheart’s Walls
Hmm,
this will be a difficult task, building a Dungeon inside the enemy’s fort!
Start off by unlocking the door and tunneling
into the enemy area. Now as quick
as you can tunnel into the two Workshops at the weak points in the wall. Build a
Secret Door at the end of the passage leading to the rest of the enemy area to
stop any would be attackers.
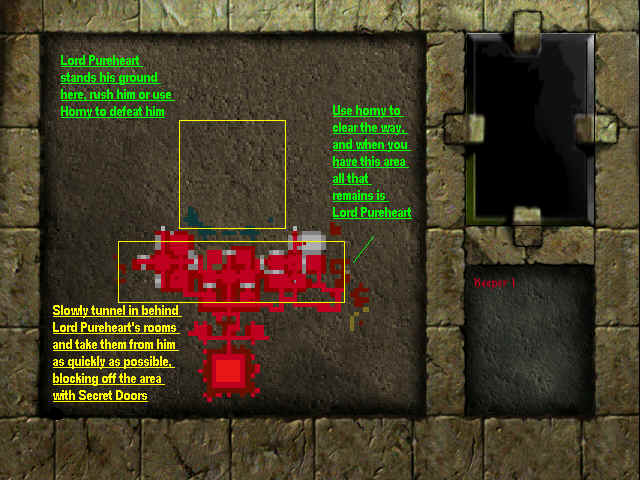
Use this screenshot to guide you through the level.
With
that done sell one of the Workshops and build a Lair. If you don’t do this,
your creatures will rebel. Also at the Door you have tunnel to the left and
right here for gold. With the room left from the tunneling
you should build a
Hatchery. Where the Workshop and Lair is you can tunnel to the sides and come in
behind a set of Prisons and a Library. To the left if the Library and the right
the Prisons. Go for the Library first, tunnel into it and kill the Wizard.
Destroy the door here as well and build a Secret Door in its place.
You
will notice the Hero patrol that wanders through this level, you will need to
Horny to dispose of them for you. So once you have the Mana, summon him in their
path and watch him pummel them into the ground.
Head
right now and tunnel into the first Prison. Kill the Guard and release the
prisoner. Build a Secret Door here as well. Do the same for the next two
Prisons. When you have these rooms, move outside of your Library and start
claiming the area here, there is an Alarm Trap here but set it off. You want to
see how many defenders are left, if it isn’t too many engage them with all of
your creatures but if there are quite a lot, summon Horny and let him do all the
work. There are Hero Gates in this level but once the main defenders have gone
your troubles are usually over, unless you disturb them.
Claim
the area out here and also claim the area near your Workshop and Lair. Take the
Treasuries here, the Dwarf and Elven Archer shouldn’t be much trouble. Claim
everything here but leave the Doors untouched for now. Where the Prisons are, is
another area similar to the area where the Treasuries are, there is a Torture
Room here and a Door leading to another Prison and another Door leading to the
Hero Gates. Destroy the Doors in the Prisons and kill the one or two creatures
that may be in here. Once the area is clear bring in your Imps to claim the
place. Make sure that they get the Torture Room and the fourth Prison as well.
Block
off the Door to the Hero Gate with a Secret Door. Back over where your Library
is there are several other rooms that are of interest. There are more Libraries
and a Mana Vault. Destroy the Alarm Trap and claim all these rooms. There
shouldn’t be much opposition, maybe a Wizard or two. Look for the Magic Door
and have everyone attack it. When it falls destroy the Lightning Trap guarding
the Mana Vault. Make sure all these rooms are claimed. Sell the Library and
build a Training Room, but whatever you do don’t expand any of the rooms.
Sell
off your third and fourth Prison and extend the first two to become one. With
the room from the fourth Prison start building a very small graveyard. By now
you will have to have started using the Create Gold Spell. This will be your
main source of income now. Remember to use it all the time to pay your creatures
wages.
When
your creatures are ready and you have enough Mana to cast Horny, break down the
middle Door and advance into this new area. Lord Pureheart and the Portal Gem
reside here. All that protect him are a few enemy Heroes and several Lighting
Traps. Charge in using Call to Arms and head straight for Lord Pureheart. At the
same time summon Horny and together you and he will bring Lord Pureheart to his
knees. By himself Lord Pureheart is weak and will fall quickly and he will fall
quicker still if Horny has anything to do with it.
When
he is dead Horny will come for the Portal Gem. Secrets remain really becoming
easy to find, but there are just more of them. Enemy rooms hold some secrets
while the rest are to be found else where, they are not particularly hard to
find and only require a little searching. Just make sure you don’t forget
about your Main Objective
“Angelic”-
Moonshrine
Use the
Dark Angels to Crush Your Rivals, Harkan and Carrion
Kill 20
Heroes on the Dark Angels’ Temple to Gain their Favour
Capture if
you Can, the Temple, and Use its Unholy power
Start
off this level by building the usual, Lair, Hatchery, Training Room, Library,
Workshop, Prison, Torture Room, Combat Pit, Graveyard and a Treasury. There is
plenty of room and gold so doing this shouldn’t be any trouble.
Use this Screenshot to help you through the level.
Claim the Portals, and enter the new area with all the Magic Doors. There are also several Sentry Traps. Destroy these first and then push into the middle area. There are several Heroes here that need to be killed, they are not really a threat and you should kill them quite easily.
You will come to a small area blocked off by a Steel Door. Don’t destroy it yet, instead use Call to Arms and place it a little way away from the door. When everyone arrives Possess one creature and with it destroy the Steel Door. You will be rushed by many Heroes, you will need to heal you creatures all the time whilst they whittle down the Heroes numbers. When they are dead move into the middle of the map.
You need to kill at least 20 Heroes near the Temple, head to the four Guard Posts ad kill the Heroes here, this should fill your quota nicely. Continue to do this until you have killed the 20, then you will gain the favour of the Dark Angels. They will enter your Dungeon so make sure you have enough Lair space, you don’t want to lose them because they are all Level 10 fighters.
Harkan and Carrion will now appear on the map. Tunnel into Harkan’s Dungeon using Call to Arms and the Dark Angels, with the Dark Angels help you will make short work of Harkan. Move straight for his Dungeon Heart, killing anyone that stands in your way. When Harkan is destroyed move your Imps in to claim all the rooms.
Rest and heal your creatures and prepare for an attack on Carrion. Tunnel into Carrion’s Dungeon and set everyone loose upon him. Make sure all of the Dark Angels are here because Carrion is stronger than Harkan and you may lose several creatures, just remember to heal everyone as they fight. Using your Call to Arms Spell move everyone through his Dungeon and to his Dungeon Heart. With everyone attacking the Dungeon Heart Carrion will soon fall. Once he has been destroyed Horny will come for his prize.
The Heroes guard most of the Secrets in this level, search all of their rooms to find some of them and dig into remote areas to find others.
“Brotherhood”-
Cherry Blossom
Defeat
Keeper Nemesis and His Despicable Cohorts
The Lesser
Keepers Faust and Fabian Support Keeper Nemesis
Defeat Them
First and Use their Resources
A
whole family to destroy this time Keeper, you had better watch your back. Build
the usual rooms and the now available Temple, and claim the Mana Vault by tunneling
north of your Dungeon Heart.
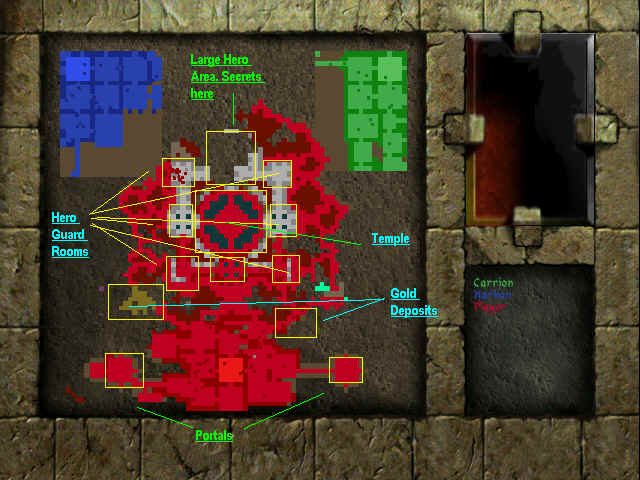
Use this screenshot to help you through the level.
Claim Portal one and claim Portal two as well as the prison and Torture Chamber near the second Portal. You can sell these if you already have them or keep them to save building them. Now head for the Gold Gem (marked on Screenshot) and mine that for your gold. Get all your rooms built and then start on Traps and Doors. You will also find yourself under attack from Heroes, they are coming from near the second Portal, seal off this area with a Secret Door but don’t lock it so that any creature that comes from the Portal can get through.
Near the gold gem is an area filled with lava, build a Stone Bridge over this and mine the gold to open up some tunnels. Head down the tunnel and you will come to Hero Gate, at this point a horde of Heroes will emerge. Use everyone to kill them, and when they are dead back track and tunnel through the earth which is above the tunnel you just went through. Some Fairies will attack you. Kill them and search through the water to get to a Temple. Claim the Temple.
When you have at least a small army of creatures start tunneling towards Keeper Fabian, the green Keeper. Head for the area indicated on the screenshot and just before tunneling through into his Dungeon use the Call to Arms Spell to get everyone attacking. Burst into his Dungeon with all of your creatures and slaughter the pitiful army of his and move through his Dungeon and to his Dungeon Heart. Use the Call to Arms Spell to get everyone moving. With all of your creatures attack his Dungeon Heart he will soon fall leaving you all his resources to plunder.
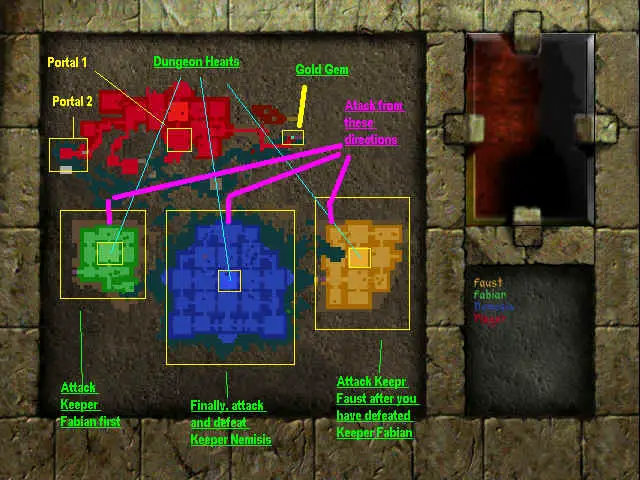
Make sure your Imps claim everything here. It is probably best that you sell nearly everything, and build a big Prison and a big Graveyard. Because for the next two Dungeons you will need a big army, and when the Portals attract as many creatures as they can you will have to rely on resurrecting Skeletons and Vampires.
Rest and heal your creatures and when they are fit again start tunneling towards Keeper Faust, yellow Keeper. Just like last time before tunneling into his Dungeon use the Call to Arms Spell to have everyone ready to attack. Break into his Dungeon and be prepared for a little opposition, Faust’s army is larger than Fabian’s so you will have to keep an eye on your creatures and Heal and use the Lighting Bolt Spell when necessary. When his defenders fall move onto his Dungeon Heart, using the Call to Arms Spell you should get everyone attacking his Dungeon Heart. It shouldn’t take long for his Heart to be destroyed and when it does fall, you will have another Dungeon to plunder.
Keeper Nemesis will be very distraught once his two sons have been killed and he will vow to destroy you (fat chance). Rest and heal everyone and remember to imprison creatures and carry dead ones to the Graveyard. Also claim the empty Dungeon and everything inside. Get every one who isn’t a Level four creature or higher training for the final battle between you and Keeper Nemesis.
When you feel ready, tunnel to Keeper Nemesis’ front door. Now is a great time to summon Horny and let him rip apart Nemesis’ defenders. His Dungeon is strongly booby-trapped so you will have to be careful. When Horny is finished with the defenders move everyone into his Dungeon using the Call to Arms Spell.
Let them destroy everything and everyone in the first room. Now head for Nemesis’ Dungeon Heart, make a beeline straight down from the first room destroying everything as you go. You will eventually come to the Dungeon Heart, make sure everyone is attacking it and don’t worry about the remaining creatures defending his Dungeon. With all of your forces attacking Nemesis’ Dungeon Heart will be short work for your creatures.
When he falls Horny will come to claim the Portal Gem. Secrets are spread throughout this level but they are not hard to find. Just do some quick searching to find them.
“Interception”-
Butterscotch
Capture and
Convert the Three Princes
Prevent any
of the Princes from Escaping, or the Gem Will Be Lost
None of the
Princes Must Die Before Conversion, or the Gem Will Be Lost
You start off in this land with a Dungeon already pre-dug for you, all you have to do is build the rooms in the holes. Build a Lair, Training Room, Workshop, Library, Combat Pit, Graveyard, Temple and a Casino. Start mining the gold around your Dungeon.
Use this Screenshot to help you finish the level.
Some Fairies will probably attack you but they shouldn’t be any trouble. Head for Portal 2 and kill the three Elven Archers that guard it. Build a Stone Bridge to the Secret on the island and then build another Stone Bridge to the land north of it. Kill the Giants and take the Secret. Ah, that’s better, now you can see everything.
Don’t head any where near the enemy’s territory yet, but start building bridges to their land. Build one at the Portal and one from your Dungeon to the first Hero Gate. Leave it unfinished so that your Imps won’t go and disturb them. Build another from the right of your land to theirs (below the second Portal, and over the land where the secret is). Leave this unfinished as well. When no one is near one of your Bridges send an Imp to start claiming the territory around it. As soon as an enemy comes pick him up and pull him away.
To the left of your Dungeon is a Combat Pit, it needs to be claimed and it also houses a Level 10 Black Knight. To get to it mine the gold around that side and you will come to a Door, destroy the Door, claim the area and make contact with him. He is a great help.
At the first Hero Gate there is a Door blocking anyone’s attempt to get in to it. Finish the Bridge and have some Black Knights destroy it. Immediately pull them back and let your Imps claim the area around the Door. If any comes, pull them all back. Start building a Secret Door. When it is finished make sure it is put where the enemy Door was and lock it. One Hero Gate secure.
Up at the other Bridge you built (the one under the Bridge at the Portal) start claiming the area here as well. Just make sure that if anyone comes that you pull everyone out immediately. Move into the big room that leads to the second Hero Gate. If there is a door here use the Black Knights to destroy the Door and anyone inside guarding this room. Using Horny isn’t such a bad idea, just get rid of him before he engages the Princes. Claim this area and build another secret Door where the enemy Door was blocking the Hero Gate. Another Hero Gate secure.
When both of them are secure you can rest in safety that there is only one way that they can escape. Blocking off the last Hero Gate is really hard and it isn’t worth the trouble. Instead move up the passage where you found the “Reveal Map” Secret. There will be some Giants and other guards here so use everyone to kill them. Keep away from the Princes while doing this, timing is everything. Claim these rooms you have just cleared out and you will be left with a small passage to the last Hero Gate. Wait till you have enough Mana to summon Horny and then cast Call to Arms just outside the Hero Gate Door. You will need to claim this passage for this to work properly.
When your creatures arrive all the guards from the Hero Gate room will attack you as well as one Prince (this could differ for some people). Summon Horny and let him and your creatures pulverize them. Move all your Imps to where the first Prince was knocked out and make sure he is dragged to the Prison. The other two princes may come to attack you or seeing that their escape route is cut off they will both head for the room directly under the second Hero Gate.
Cast Call to Arms where they are hiding and slaughter them all. They are not particularly strong and will fall under the might of your creatures. The only problem you will have is them dieing before they can be carted off to your Prison. To stop this happening you will need to place your Imps where the last two Princes fall to immediately drag them to Prison.
As soon as a prince is in your Prison, place him in the Torture Chamber and heal him to start the conversion process. Do this for all the Princes. While they are all being converted have your Imps start claiming the area where the Heroes were. When they are all converted they will give you the location of the Portal Gem and Horny will come to claim it.
You can’t miss the Secrets in this level! They are all so obvious that they shouldn’t be called secrets! If you are having trouble here is a hint, LAVA.
“Regicide”-
Heartland
Kill King
Reginald and open the Gateway to the Sunlit Land of the Heroes
Cut Off the
Heroes Attack Routes, or You Will Be Overrun
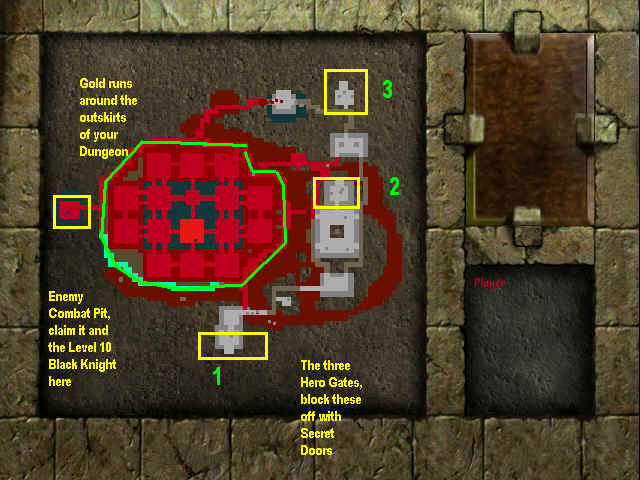
At last, the final level! King Reginald holds the last Portal Gem, when you have this you have the key to the Sunlit Land of the Heroes. Start off by building a Lair, Hatchery and a Training Room. Head right of your Dungeon Heart for gold and the second Portal. Now build a Workshop, Library, Prison, Torture Chamber, Graveyard, Combat Pit, Temple and a Treasury.
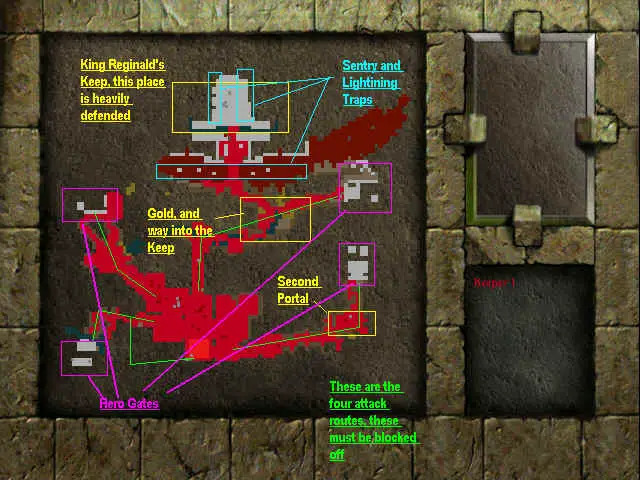
Use this screenshot to help you finish the level.
You Dungeon will soon come under attack, they will breech your Dungeon from the north (this may vary, see screenshot for their attack routes). You will need to use everyone to combat them, not too soon after they are dead another attack will start from another of their routes (see screenshot). Kill them like last time, using everyone and healing as you fight.
After three attacks they should stop for a while, now is your chance to act. Start building Secret Doors in the tunnels where they attack from. Place all of your Bile Demons and Trolls in the Workshop to speed up construction. When the Doors are in place, lock them so that your creatures won’t go and mess anything up.
You will still probably come under attack but it won’t be as strong as they were. You now need to start making your attack instead of defending. Where the Heroes breeched your Dungeon to the north send an Imp past the Secret Door to start claiming the area here. Continue all the way to the Mana Vault, claim the Mana Vault and continue to the right. You will come to an area with lots of Gold that branches off to the right more and also branches off to north and to the left. The north left passage is the one you want.
Continue defending against attacks and seal any more breeches that the enemy make. Remember when combating attacking Heroes to use everyone to minimize casualties. When your Portals attract as many creatures as possible you will need to rely on resurrection, make sure Heroes are imprisoned and that dead Heroes are taken to the Graveyard.
Start mining the mass gold deposits, and explore the tunnel to the northwest. You will come to a large area defended by Sentry Traps. Drop some Salamanders near them and Possess one of them. Create a group of Salamanders and go and destroy all of the Sentry Traps and Barricades in this area, including the ones on the Lava and the ones on the walls.
When they have been destroyed make sure your imps claim this area. Keep up your defense against the enemy and continue to block them off with Secret Doors and traps. Now you will need to wait until you can summon Horny. When you have the Mana summon Horny in the new area you just claimed, place him near the Steel Door at the top of the room. Let Horny smash through the Door and into the next area, he will probably ignore the Lighting Traps and go straight for the Door. This Door leads to King Reginald and his guards, most of them are Level 10 and that is why we called forth Horny to do our dirty work.
Before Horny leaves your Dungeon he should kill most of the guards and maybe even King Reginald. After Horny has laid waste to the guards use the Call to Arms Spell just outside of where the Lightning Traps are. Your creatures should easily kill the remaining guards without too many casualties. Now King Reginald will enter the fray. He is a mighty adversary, if you can summon Horny again. Reginald will probably slaughter most of your creatures but that is fine if you have Horny here to help you. Summon him as soon as possible, King Reginald may be a bad boy but Horny is badder.
Horny should dispatch him in seconds. Finally King Reginald is dead! But wait there is one more obstacle. Two Stone Knights guard the Gate to the Sunlit Land, your creatures are useless against and there is only one person/creature/thing that can kill them… HORNY!
Have your Imps claim the area where King Reginald now lies dead and when you have the Mana summon Horny outside of the Gate. He will march in and duel the two Stone Knights, naturally he will slaughter them and claim the final Portal Gem! (Obviously the key to victory for this level is Horny, so don’t feel bad about using him all the time)
Well done Keeper. You have just finished the Single Player Campaign for Dungeon Keeper 2! Now doesn’t that feel good, err I mean bad!
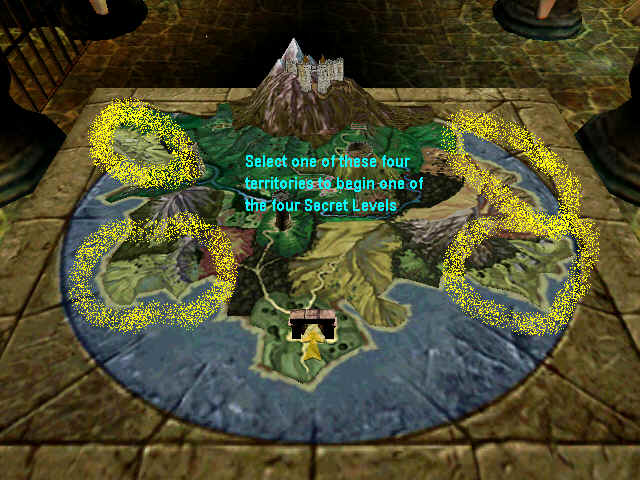
This screenshot shows which territories are the Secret Levels.
HOW TO ACCESS IT
Locate the
Hidden Realm Secret in Level 5 “Fear”
MAIN OBJECTIVE
Play a
Three-Round Game of Golf for Relaxation
A lovely game of Golf for a stressed out Keeper. You must complete three rounds of golf in the time allotted. The golf ball is a giant boulder, to move this rock you slap it, you also have a limited number of slaps. When you slap the boulder it moves in the direction your camera is facing, move the camera for better shots. Also if you hit the boulder too many times on one hole it will crumble, it will also crumble if it touches water or lava so be careful Keeper.
HOW TO ACCESS IT
Locate the
Hidden Realm Secret in Level 7 “Caverns”
MAIN OBJECTIVE
Shoot the Heroes
in this Fairground Duck Shoot
Just like at a carnival Duck Shoot, except the ducks are Heroes and you’re a Warlock. The Heroes will walk past you and you have to shoot them down with your Fireball. Though this Duck Shoot has a small twist, some of the ducks shoot back. You are stranded on a small piece of land to do your shooting and every now and then Elven Archers and Wizards will teleport in around and start shooting you. You must keep your eyes open Keeper, or you will fail this simple game.
HOW TO ACCESS IT
Locate the
Hidden Realm Secret in Level 10 “Smashing”
MAIN OBJECTIVE
Make Your Way
Through the Maze Back to Your Dungeon Heart
Sounds simple doesn’t it, yeah right. You are in control of a Dark Angel and you must get back to your Dungeon heart within the time allotted. Along the way are Trigger Traps which will give or take away part of the walkway which you must use to get across the lava, there are Boulder Traps that will squash you flat, there are Sentry Traps and Wizards that are just plain nasty. To top it off, you must vanquish the Level 5 Guardian at the Temple to successfully finish your journey. All of that to deal with in under four minutes!? Good Luck!
HOW TO ACCESS IT
Locate the
Hidden Realm Secret in Level 13 “Conversion”
MAIN OBJECTIVE
Kill the Dwarves
with the Boulders
Fancy a bit of bowling? Well this is your lucky day, its bowling with a twist. Your bowling ball, a Boulder. Your target, the annoying little Dwarves that are always in the way. Boy is this gonna be fun! You control the boulders the same way as you did in golf, slap them and move the way the camera is facing. Move the camera to move the boulders with ease. Remember that too many slaps will destroy the boulder and lava also destroys it so be careful.
You have six minutes to squash as many Dwarves as you can. Good Luck!
Thank you for reading this walkthrough. Please send any comments or suggestions to my email address.
Dungeon Keeper and all related materials remain copyright to Bullfrog and Electronic Arts.