


Many thanks to Morten D. Nielsen who
made this available for download
in *.pdf-format. Get Septerra Core Walkthrough here.
Shell
2:
It will be a bit difficult
to write an absolutely linear walkthrough, cause later
in the game you'll
get more and more possibilities making your way through
the shells. I
sometimes added headlines for the bigger tasks. For you, who
seek something
special, I marked key-objects in turquoise, fate cards in
pink and birds
in green. Late you'll find weapons too.
Please mail, if you're stuck
somewhere.
I'll mention all barrels and chests that I discover, but the
furniture (bookshells,
tables, crates,...) you'll have to investigate
yourself, except there should be
an important item.
You start the game
on Shell 2 with Maya, the main character of the game.
I would suggest you
first explore "Downtown Oasis" where the game starts,
visit the shops and
talk to everyone there. You start at home, get the bread
out of the fridge.
Here are all locations:
Downstairs from home is the 'Stock Pile', a
weapon-shop, further down the
exit to the maps. From stockpile upstairs is
'OldJ...', where you meet some
townspeople. Down there is another shop with
food and items and stairs up
to two empty areas. Down from food-shop is an
armor-shop, 'Junk Mail' and
the exit on the right side.
A word about
shops: try to buy any new and better weapons and armor that
you can. Most
you'll find healing/restoring stuff in chests, barrels and corpses,
but armor
and weapons are seldom. While shopping and moving the cursor
over the desired
object, characters that may use it get a blue frame. You can
even look at
members not in your current party. Increasements are shown
green and
decreasements in red. Be sure to buy weapons like the Buzzsaw
or a sword that
first no one can use, your later members will be thank- and
more
powerful.
Not mentioned in the manual is that
you can press TAB to let a map show up.
Your main task so
far is to visit your class in the temple. And you worry about
the ships of
the chosen, the behaviour of Tori and the misuse the mayor does
with some
work-bots as well as the fact that someone smuggles weapons.
When you
finished exploring downtown, have a look at the other sections of
Oasis to
get more topics for smalltalk: the Smelting Complex in the
middle
(restricted) and the Junk Heap south (restricted).
Then step onto
the world map (that globe icon) and visit the available areas:
N - the
Factory
S - Pumping Station (Conduits)
S -
Grubb's workshop (Generator)
W - Badlands
(monsters)
W - Azziz's Temple
After visiting Azziz's Temple (you get a
Hydro-Attack and another
Fate-Card
from him) you should go back to Oasis, talk to Uncle and
rest if you're injured (in
bed at home). I bought a core-engine and some
bread from the rest of my gold
too. The first tough fight is coming up.
Uncle said that you'll meet Tori at the
Pumping Station, where we'll go
now.
You'll meet Tori indeed while trying to make a deal with a sinister
guy that
immediately leaves as you show up. Then three guards approach,
Tori
vanishes, and you have to fight the guards. You should first
concentrate
your attacks on the guy in the middle who attacks you with
special moves
and heals himself. You'll get a Heal-Fate-Card after that battle. If you're
running low
on health-points, eat some bread (I needed two).
Then return to Downtown
Oasis, talk to Uncle and sleep if necessary. Then
collect Grubb and Runner at
Grubb's Workshop. If you like go training a bit
at the badlands. I think you
can sleep and return there as often as you like.
After preparing yourself go
to the Pumping Station and let Grubb have a look
at the Control Panel. Then
attach the conduits and after that the generator
and the further way is
open.
Now you have to make your way through a pipeline area. NW in the
first area
you'll find a chest. Find the exit SW to get to Galdon, where you
can loot the
animals and visit the saloon. After fighting the bounty-hunters
there (let Maya
and Grubb talk to them) you'll be able to buy supplies and
rest there.
Now go to Outlaw Canyon. You'll discover a locked door and
after fighting a
lot of bounty-hunters you'll meet Tori again with his new
'friends'. You send
him back to Oasis to tell Uncle where you are and then
you start the journey
to Shell 3 by clicking the animals.
Shell 3:
After a short trip inside a
chosen ship, you'll find yourself on Shell 3 south of
a locked tower. Your
task is to find Bowman, the Leader of the Holy Guard
who should be in Wind
City. To the east is a forest where mysterious rocks
surround a tree. One
after another can be used and turns into a nasty monster
(I just managed to
kill the first monster, but the second one...).
Wind City is in the west.
South of it is South Farm where you can buy armor
and weapons and get 10 Bird Seed from an old woman after repairing her
diskplayer. There's a tavern with a bed too. You hear of raising Helgaks
that
are sold to Shell 5 to support the growing armies there. Be sure to buy
at least
one Vial in the food-shop and a sword
from weapons shop (here or in
Wind City).
There's a kind of curse
spreading from the near graveyard where beneath a
zombi you'll find a locked
door and a statue with a missing head. Fill the vial
with the Zombi's Blood to get an Acid
Vial. Cross the passage north to a
chest and a bird you can feed with the seed.
North of Wind City is
the Northern Forest where a locked door is in the north.
Far west is Helgak
Point, an airport where you need a passport to travel.
Wind City
Okay, then lets enter Wind City. There
you'll find some shops, the Capitol
Building with the library inside, where
the missing head is attached to a
table. Use the filled vial with it to get
the Head. You can read many books
there and talk
to the monk in brown. A kind of broken core is there too, but
Grubb has not
the proper tools at hand. If you help the guy standing left of the
building
you'll get a Kyra's Tear. The Holy Guard can be found a bit east, but the
members mourn and don't let anybody in. On the city map you can go to the
Reservoire (closed).
Graveyard
Now return to the graveyard and use the head with the statue to invoke a
fight
with Draxx who summons four zombies to support him. Take out Draxx
first.
You'll get the Geo Strike-Card from him.
Then enter the tomb. A switch opens
the door in the north. There's another
switch you can't reach and a wall to the
north that could be smashed by a
bomb. Proceed to the exit and meet the Holy
Guard. Bowman stays and is
assassinated while you and the rest of the guards
flee through the
catacombs.
Runner 'runs' and Corgan, a member of the Holy Guard, joins
your party.
Equip him with the sword and make your way back to the graveyard,
Corgan
opens the door. In the next area look for a switch SE for the northern
gate and
a chest NE. Enter the northern gate, fight again with Araym and the
other guy,
Araym already starts doubting the reasons for all that
killing.
Then you'll meet the others again and decide to ask for help on
Shell 5, but you
have to fulfill a task before. You shall get some supplies
for the people hiding in
the mountains from Armstrong, the hometown of Corgan
which can be reached
through the mountains.
Armstrong
Arriving at Armstrong you have to notice
that the town has been raided by the
chosen under the command of Doskias.
Selina, his mate and general seems
to be disappointed about that, but
nevertheless attacks you with two guards.
After defeating her you'll get the
Barrier-Fate-Card. NO you'll find a barrel, NW
is
a graveyard, where the seal is missing at the shrine. Corgan seems to be
very upset. W in the centre you'll find a chest that contains the needed
Supplies.
Return to Frost Mountains. After a
cutscene walk the way down the mountain
to Layla and hand her the supplies.
Receive the Summon-Fate-Card. The only
way to
reach Shell 5 is from the Helgak Port. When you arrive there (walk
through
the graveyard) you see chosen guards entering the ship and a trembling
clerk
tells you that you still need a passport to enter the ship.
Next stop is
Wind City, a ship is in the air above and the gates are closed.
Um...okay
lets go to South Farm, fight the guards there and talk to the people.
The
second man in the weapon-shop is a monk from the library that
helped
preparing a tunnel from there to the library to bring people out of
town safe.
When you got Corgan with you, you may enter the tunnel there.
Enter and talk
to the monk, who will hand you a Passport.
Before moving on to the Helgak Port, you
should visit the nasty forest E again.
I managed to kill the second monster
now, good exp. and item, but the third
one...
Finally go to Helgak
Port, hand over your passport and enter the ship to...
Shell 5
Gregor
You (Maya alone) awake in a
hostel, take the shoes from the cabinet, talk to
the people and head outside.
A little south sits a bird that you can feed
with
the seed from the old woman in South Farm. Don't ask me about the
results.
Then go downstairs and shopping at Kingpins Boutique. Buy the
wrench, a Med-
Sword, three StrongEngines, the buzzsaw (for Grubb's staff)
and what else you
like. A Metal Coat can be found in a device E of this
area. A man beneath the
boutique gives you Corgan's
sword that appears as a key-object.
SW Corgan stands inside a cage.
Give him the sword and talk to the guards.
You're re-united again. Loot the
wooden chest there, then head north to the...
Mesa
Canyons
This is the first larger area containing two barrels and a
bird, here's a simple map:
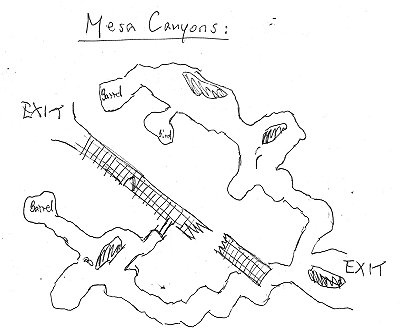
Allright, loot the barrels, feed the bird and proceed to the
east.
Ankaran
South of the exit is
Ankaran Base where you can loot a barrel and talk to Led.
Go north and enter
the Jinam Ship. Look for two switches to open the middle
door. Behind you'll
find Grubb with a Holo-disk (equip him with the
buzzsaw and
StrongEngine if you have).
Return to the Base, talk to the
soldier who hands over Jinam Dogtags. Use
the
Holo-Disk at the computer there and talk to Led. She wants you to find a
converter
to add enough power to her ship to reach the capitol to bring the
message to her
father.
Walk back to the Jinam Ship, unlock the door N
after the entrance with that dogtags
and find two other locked doors. One of
them can be opened by a switch in a small
room a slim passage leads to.
Behind the door you'll find a laboratory with a Jinam
device and a corpse to
loot. In another room you'll find the Converter that
you should
give Led back in the Base.
After a crash-landing you should
talk to the people and to the guard to get access
to the military quarters.
You have to hold back Led's father from activating the
'Doomsday Device'.
Meanwhile Doskias minions stole the keys to the Core.
The passage to the
east leads to a locked prison door. South you'll reach the
subway. All the
way south-west and along the passage you can loot a barrel. The
other
direction leads to the world map with only the Ankaran Research
Lab
available. After another cutscene your task is to go to the inner shell
to prevent
Doskias forces from mining while the right hand of the emperor
gathers a fleet
to fight Doskias' ships.
Shell 4
The World
Bazaar
You start here in the 'Ill Repute', a hostel in the
Redlight District. get upstairs
and talk/fight the bounty-hunter there, he
seems to have a key to the sewers,
but vanishes. Explore the area and go
shopping. SW is the exit to town/world-
map. Let's visit the Bounty Hunter
District, downstairs you'll find a locked gate
to the sewers, upstairs is a
shop, a room with another bird and some kind of
headquarter, the two guards don't let you in.
At Shipping Transport you
may get passage to Shell 3, if you free Araym from
the bounty-hunters, the
captain will even bring you to Shell 7. Here's another
locked sewer-gate with
an ancient symbol onto and a nice shop.
Lets have a look at the Slums too,
where you can talk to the people and loot
some crates and tables.
If
you wish take the trip to Shell 3 with Corgan and Led and fix the globe in
the
library, it's worth a soul stone. The birds you feeded are gathering in
front of
the locked tower on Shell 3, you could talk to Layla in the
mountains (nothing
important going on there). I even passed the mountains to
visit Armstrong again
and found a really nasty monster in front of the shrine
in the north.
Or just continue by looking (Led or Grubb) at the bottom of
the crane to lower
the crate and fight the guy again. Hit the crate and the
key is yours. Now enter
the bounty-hunter district
and open the gate to the sewers there. Enter and
in the next area loot a
chest and go upstairs to pull the switch that opens
Araym's prison-door.
After a short talk you can meet him at the brothel (Ill
Repute). Before
leaving to Shell 7, make sure you buy earplugs in one
of the
shops. Then go to Shipping Transport district and journey on
to...
Shell 7
N
from Landing Area is Bone Circle Village, the Underlost living there can't
get
past two bone pillars that produce a strange sound and you can't get into
it either.
Enter the East Mountain Caves north of the village. If you take
the exit SW, you
have to cross another caves-section to reach a kind of
lava-room that you
immediately leave again cause of another strange noise
there. Wear your ear-
plugs now and re-enter. You'll have to fight a boss
(use hydro-attack) to stop the
noise and get a Hell
Blast-Fate-Card.
Then take the northern exit of the caves to the
world map. You can travel south
to the Mold Forest, west to the Dark Lake or
north to the Mining Ruins.
At the ruins you'll find Explosives and a chest as well as the lost worker
there.
You can fill the Biolum Lantern from the
chest at a red plant in the Mold Forest.
After entering the main area of the
forest go far east. SE is an exit to a part of
the forest where the air is
unbreathable. N from that exit is another one that leads
to a part of the
forest where far east you'll find a big red plant. To fill the nectar
in the
lantern you have to open the plant first.
N in the main forest is an old
door that can only be opened by Underlosts. I think
we have to fill the
nectar from the lantern inside the bone pillars at Bone Circle
Village, but
we have to open that plant. The worker said that only the singing of
helgak
opens the plants. But how do we get a singing helgak there?
I remembered
that shop in South Farm, where a guy carves whistles out of helgak
bones, but
he doesn't sell them, he only sells his service of carving, so it seems
that
we need helgak bones.
So go to the Dark Lake then and use your explosives
there to make bridges of
dead helgaks. Follow the path to the east near the
entrance to find another bird.
Exit to the north
and enter Helgak Graveyard. Get the Bone and return
to the shop
in South Farm where you hand the bone to the carver. He'll make
a Whistle for you.
Now all the way back cross
the mountains of Shell 7 to the Mold Forest, exit east
and open that Red Plant by using the whistle. Use your lantern with it
and return to
Bone Circle Village.
Here you use the lantern with the
pillars to get the trust of the Underlost. Talk with
the chief and take Badu
in your party, the most tough fighter in the game. Only he
is able to open
that door in the northern Mold Forest, where we go now. Then you
have to
cross several areas to reach an exit NE. At the beginning NW you'll find a
barrel and NE the first exit. Passing the final exit you encounter Kaleb who
leaves.
Instead you have to fight a tricky monster. Forget all you already
know about helgaks,
this one is really nasty. You can only hit it, when the
'head-shield' is completely open.
That happens after it attacked you 8-12
times for 20-40 hitpoints. Bad news is that
you then will only have the
chance to do one strike before it closes again. :-(
Don't know if you just
can wait until it opens or if you have to fight the beast to invoke
that. My
strategy was letting Badu wait for the big hit, and the other two attacked the
monster or healed the party. After six blows of Badu the beast was
destroyed.
The party then rushes after Kaleb to destroy the lenses.
You'll arrive in a battle-ship.
There are two switches S to open the
force-fields, N is a barrel, E is the exit to a
cutscene. Gunnar came with
his fleet to destroy the lenses and defeat Doskias
what he nearly managed
until Selina prevents him from killing Doskias who vanishes
then. The battle
ends with the destruction of the lenses and the ship you were on.
You awake
on...
Shell 6
From Crashed Lenses (pick up the Corite), the starting point, we should visit Scumm
Town
to the east. Finally a possibility to spend some of our money for nice
equipment.
Be sure to buy Meat too at the Barter
Mall. When you enter the Shipping Docks take
the Drill in front of you. To enter the port you need an
official manifest. There is one right
behind the next corner, but it's
guarded.
To the south is the Green Mire Swamp and SE the Mountain Pirate Base
West.
The swamp splits into three areas. In the East March you'll find
another bird as well
as some Leeches in the SW that you can take by using the
meat.
The West Swamp contains a Sleeping plant SW,
N of it is a kind of piranha to which
we'll return later.
At South Mire
exit NW to meet Lobo (I think) who doesn't let you in.
Now explore the
Mountain Pirate Base West. In the first area we'll go upstairs, exit
SE to a
snowy path that we cross to exit north to a passage where we find a
barrel
and another locked door. In the middle of the path you'll encounter an
insect
defending a nest. Defeat it and you can take a Helgak Egg. Drill it and put the leaf
of the sleeping
plant into it to produce a Helgak Egg Drugged. Then
go back to the
snowy path and exit, then take the northern exit to a barrel
and a fuel pump with a
broken pipe. Head back to the first area and exit to
the world map.
To the east you can visit Lone Isle where you get a view
of a pirate docking bay.
South you'll find a small village called Pranno.
Visit the tavern to meet your friends
again. Take Araym in your party and get
the Antidote herb and feed the bird at the
end of village, then return to South Mire to
meet Lobo, who only supports us when
we free his crew from Connor's base.
Only way to get into it is going as a slave-girl.
But first we want to
feed our leeches, hehe. Head back to West Swamp and visit
that piranha-like
creature again. Use your sleeping-bomb on it, then the leeches
to get Leeches Bloated. Allright, back to scumm town and the
tattoo-girl.
Talk to her again about tattoos and give the leeches to her to
get a temporary
tattoo. Return to Lobo who hands you a key and a flare and advises you
to look
for a backdoor to let the others in. When you shoot the flare, he'll
come and get
all out of there. There should be shipping crates with equipment
too.
So lets get back to the Shipping Docks in Scumm Town. Let Araym talk to
the
man with the manifest and enter the shipyard
there by showing the manifest to
the guard. You'll end up alone with Maya in
a, um...torture chamber.
Be sure to move your mouse over the ordinary
barrels the following two areas.
Loot a table on your way to the exit. Short
before exit a door/bridge lowers after
you crossed it, two other raise N and
E, where you can access a switch that raises
the just passed one again. If
you cross the new northern bridge/door, you'll come
to a locked door and a
barrel. Now go to the switch and finally exit SW. Pull
another switch and
take the new exit to the surface where you use the flare to
get your team
back.
Return, and some bridges lower again, pull the switch and open the
chest with
the Blue Isle Key inside. Exit to the
first of these two areas and use the key at
the lock. Another bridge/door
lowers, open the barrel, another lowering and you
have access to a barrel
holding the Red Isle Key. Return to the second
area.
You will have to pull the switch again to get to the middle of the
level where you
unlock the door closing the western area. Finally exit to the
north and prepare to
fight Conner. It's a bit tricky again. You can't beat
Conner directly, but by casting
some spells on the turrets, they will turn
and aim towards Conner for a while.
Check his throne after the fight and
head all the way back to the prison cells.
Use the Key-ring of Conner to free the people and the crew of Lobo.
Then take
the south exit in the second area to reach the ship.
Bingo.
You are free to travel all the Shells now by using the Globe
Map!!!
First I would go shopping. There is many cool stuff available in
the shops
now, I NEED MORE MONEY!!! (spent my 45.000 in the first two
shops).
At this point you could visit the eastern forest on Shell 3
again. Now you will be
able to defeat the third beast and get a Quick Gem for
it. The next rock
produces two nasty beast, too hard for my party. I checked
the area with the
broken pipe after passing the snowy path on Shell 6, no
chance (Zombies from
Hell). I tried to defeat the ugly thing at the shrine in
Armstrong in vain.
I visited Shell 2 again, talked to Azziz, visited the SW
island, where a 'cloaked'
boy is running around. The trick is not to meet him
until you reach the well, so
first walk along the inside of the eastern fence
then south around to the west side
of the well and wait. And I fought the
bots at Junk Pile to get a piece of Pipe and
a
Grappling hook. I talked to uncle and the other folks
downtown and then tried to
get into the Smelting Complex, no chance. So I
headed for
Shell
1
Visit the Chosen Capitol where they fight each
other again. Here we may chose
between
West-/Central-/East-District.
Let's begin in the west. SW is a barrel holding
the Red Capitol Key. Now march
on to the East
District, use the red key and free some townsfolk SE, W and north.
Get the
Tank engine.
In the Central District use the
engine to clear your path, open the barrel east, pull
the switch and head
back to the other side. Take the Long Sight far west, the
barrel then east,
then one NW and finally face the guards that lead you to a
cutscene with
Gunnar who sends you to the palace that is betrayed by Doskias'
magi, who
beneath hold the keys to the core. Unfortunately the door behind you
is
locked after entrance.
The
Palace
Take the first exit NW, go NE and pull the switch. Go to
the western area, pull
switch, go to the middle and upstairs to find a
barrel with a Blue Palace Key
inside. Go back
downstairs, exit and use the blue key to open the next passage.
Exit there
and pull the switch SW in the next area which blocks the passage to the
east
but opens the gate in front of the stairs SE. Open the barrel and go
downstairs.
In the western area pull the switch that closes the gate to the
stairs but opens that
one beneath the stairs. It opens a gate above too.
Further on to the stairs and up
to the area NE, loot barrel NW and pull the
switch for the last gate to the east.
Now head back to the switch SW to open
the front east gate again and walk east,
get ready to fight a Magi. Beat him
by pushing the orbs back to him and destroying
them there. I had Maya and
Lobo use Grenade and Shrapnell for that while Grubb
casted Barrier and Heal.
If you wear earplugs, the damage from Magi-attacks is
low. You'll get a
Law Of Marduk-Fate-Card and the Red Palace Key from him.
So head back to the red
lock by taking the exit SW, go downstairs, back again
to the first exit from
W, go upstairs, along the passage to the middle. Open and
meet your second
Magi, blast him to hell, hehe (SPOILER). Get a Slow-Fate-Card
and the Yellow Palace
Key. Head back to the main passage now and enter the
next unexplored
exit by unlocking it with the yellow key. Take the east passage
and pull the
switch at the end of the passage south. Free three soldiers and loot
a
barrel, then take the north passage there and open the northwest-door in
the
center of the level by pulling the switch there. South of the switch are
three
prisoners and a barrel.
Go the new open area in the middle and pull
a switch to open a door you'll pass
later. Now enter the southeast of the
middle-section.
Throw the switch there and and enter the last section of the
center. Battle three
Magi to get the Green Palace
Key. Then head back to main passage and open
the lock far east. Enter
and defeat the other three Magi there. You'll receive one
of the Core Keys and find yourself in front of the palace again.
Hey, take a look
in your purse...it's shopping-time!!!
Here are some
things I did/noticed at that stage of the game. I used that sleeping
plant
with the bowl and bones to get Mold Antidote. Be
careful not to hand it to the
miner on Shell 7 too early. Seems to be one of
the bugs. Just wait until he demands
it or until I managed to do it later.
I bought Terrariums in the World Bazaar's Red
Light District.
I looted the shops in Scumm Town.
The 'Duke' has his
secret base at Outlaw Canyon Shell 2 (the locked door S).
Another bird to feed there, where we met Tori and his helgaks.
So we should try calming the dispute between Corgan and Selina. Take
Selina in
your party and go to the locked door of the bounty-hunters'
hideout. It will open and
after a short fight you'll get the Armstrong Seal. Take it to the shrine of Armstrong,
defeat the beast (Bowman) and use the seal. Corgan will show up and make his
peace with Selina.
Conner took Ankaran as his new home. Could get
into prison through the
mountain subway exit. The bounty-hunters were too
strong for my party.
Araym could blast the wall in the tomb of the
graveyard only to find another wall,
there's a Resurrect-Fate-Card in front of the first wall if you
haven't collected it.
And you could talk to Layla again in the mountains
to receive the Reservoir Key.
We shall free the
rest of the Holy Guard, but have to cross the reservoir to reach
Northern
Forest. But we need a boat.
We could show the lens shard to the last
worker at the Mining Ruins on Shell 7,
but we'll need a Diamond Wheel to let
him cut it.
The Mayor controls his war-bots from a central computer
inside the Melting
Complex, but we got nothing to manipulate it.
You
can show Azziz the Core Key and he will tell you that you have to melt the
shell around it. But we need a device to lower it in the lava.
Now
talk to the guards in Ankaran until you can fight one and get the Research
Lab Key from him. Go to the Lab, unlock the
door and enter. Take the eastern
exit and throw the switch east to open a
door above. Another switch here that
opens two rooms in the middle of the
area. You'll find a chest conaining one of
three Breather
Masks. Head back to the first area and take the western exit now.
The
room NW holds another Mask, in the middle room you
can take a Diamond
Wheel from a desk. Exit SE and
get the third Breath Mask. Now back to Shell
7.
Shell 7
again
First visit the worker at the Mining Ruins
again and give him the Diamond Wheel.
Next give him the shard and get a Corite Lens. Then visit the Mold Forest again,
where
we'll try to enter the last unknown area (the exit SE) by using the
masks.
Open the chest north from the entrance, that one in the center of
the area and
another in the NE. Proceed and exit east. In the eastern room
there is a barrel,
exit east again. Go to the barrel SE and get the Red Village Key from a barrel NW.
Return to the exit and
march on. Take the northern of the west-exits and open the
chest in SW, open
the red door with that key, open the barrel to get the Blue
Village Key and return to the exit. Then take the southern of the
exits, open the
barrel, then the blue door and take the Hell God Claw. Use that with the Core Key.
Now you
can return to the mountain caves to this exit south where you defeated
that
fire-beast at the lava-lake. Use the claw with key in the lava and you'll get
a
Revealed Core Key that you can show Azziz. He
advises you to travel to the Core
to meet Doskias and get his half of the
key. Only hint how to get there was that
Doskias himself entered by
mining.
But first get your pipe and grappling hook from the Junk Pile in
Oasis, if you
haven't got it yet and travel to the Helgak Graveyard on Shell
7. Use the hook
with this green remains of a helgak there and your Large Helgak Shell is pulled
up to Lobo's ship. Now
return to Wind City Reservoir and use the shell with the
the water to reach
the forest. If possible take Lobo with you, then you won't have
to return
later.
At this point I got two more fate cards (+ the one I don't
remember from Azziz):
Lightning Strike, Kyra's Cure and Kyra's Bless. If
I find out from where I got them,
I'll add that to the concerning
parts.
Throw the switch NE to open the door south. Below the switch is a
chest, in the
clearing SW too, NW from there another one and one in the
middle of the northern
area. Then take the exit NW. N from the entrance is a
barrel. Take the south path,
at the east end is another one. Then take the
path north and loot the barrel in the
northern clearing. At the exit to the
east you'll meet two Holy Guards that will stay
there as long as the
energy-cable to Wind City isn't destroyed. The exit there leads
to the cable.
If you got Lobo with you, use the lens with the cable.
Otherwise (and after
destroying the cable) take the exit NW of the area with the
guards. See a
locked door NW and throw the switch in the clearing SE of it. In a
clearing
SE of there is another barrel as well as south from the entrance. The
second
switch is far SE. Now you can pass the door and exit to the world map.
If you
haven't got Lobo with you (like me), take him in your party and return to
the
cable to destroy it, then all the way back. Now we are supposed to meet
Layla.
She gives us the task to enter the battleship over the town by
climbing the roof.
Take Corgan in your party and use the tunnel in South Farm
to get into the library.
Talk to the monk who opens the door to the inner
rooms. In the northern of the
accessable rooms is a switch that opens the
door to NW in the main passage.
The switch in the room east opens the door in
front of the stairs, where we exit.
In the far east room there is a switch
for one of the doors SW, another one in the
room NW. Now pass that doors and
exit west to another area.
In the eastern of the north rooms is a switch that
opens two doors nearby and the
first of the doors north. The north room of
the eastern part has a switch too, that
opens a door nearby and the second
one leading to the exit east which we pass
now.
On the roof enter the
ship, throw the switches in both rooms to proceed through
the exit NE. You
gonna fight Balcaam who leaves and drops two Fate-Cards:
Observe and Affect
All.
Time again for SHOPPING!!! Go to Wind City and buy all that
nice new stuff,
talk to Layla in the Cathedral (Building of the H.G. in NE)
and to the monk in the
library. Get the Paint
Spray in front of the house in the middle of the town. Then
head back
for Shell 2 and visit Azziz. You'll get the Chosen Sewer
Key. But
instead of travelling to Shell 1, we have another task to
fulfill before we are no
more able to do it (read about that on a
board).
Go to Shell 7 and enter the Mold Forest, pass that door Badu
opened and exit
NW, then exit NE.
A switch east opens the northern door
near the entrance. Enter there. South of
the end of the passage is a switch
that opens two doors SE. South of the eastern
exit is another switch for the
other door near the entrance. Exit south by jumping
into the hole there.
When you check the map of the new level, you will notice, that
all of the
"hallways" are closed by locked doors with only one exception: There is
a
tiny door down the western way; you might have some problems passing through,
but if you use your arrow-keys instead of the mouse, it works fine. After
passing you
will meet a demon, similar to that of the armstrong tomb. Fight
him and get the Red
Core Key,
three doors open and the one you just passed closes. Proceed through
the NE passage to the middle and exit back to the last area where you take
the
northern exit now. Unlock the red door, the switch in the east area
opens two doors
and locks the one behind. Now head back to the middle exit,
then back to the southern
exit and to the passage to the east there, where
beneath new monsters a Yellow Core
Key is waiting
for you.
Now exit again, take the northern exit again and unlock the yellow
door there.
Proceed to the switch at the end of the passage that opens three
doors. Back
to the last area and south exit again, this time the Green Core Key waits on the
floor of the southern
passage. Back to the Core-door level and open the green
one and throw the
switch there. Back to key-area and get the Blue Core
Key
from the western passage. Now all the way back to the blue door
and proceed
to the exit south that leads nearer to the Core.
Here throw
both switches SE and W to get access to the middle where you'll
fight the
Hell God (must be a bunch of weaklings in hell, hehe). Summon + Water
is a
fine combination for that. He'll leave a Mirror-Fate-Card. Do both switches
here too and proceed
to the NE where you'll meet Doskias and watch him
initializing the
conjunction. Make your way back to the world map through the
mines and Mold
Forest. Well, would be bad if you would have missed that or?
I talked to
Azziz again and tried to warn the people in Pranno, then I moved on
to...
Shell 1
again
Open the Chosen Sewer Duct with the key and enter to
get access to the plans
of the Doomsday device. So make your way to the first
exit to a large area, throw
the switch in the first room to get access to the
rest of the level. I first cleared the
area SW, then proceed to the east and
pull the switch there to open the gate to
the rest of the area. Search the
passage to the right, then left, then go upstairs.
Um...seems familiar here,
take the (only available) exit NW. Oh lord, it seems we
have to search the
entire palace again for that damn plans...*yawn*..., sorry, lets
continue.
Here we go:
Throw the switch in the room far east as well as the one SW
to open the double-
door, you'll find a barrel with the Green Palace Key inside. Go back to the main
passage
(exit NW) and unlock the door NE. Exit here to fight Kaleb (Summon
Ouroboros)
and get the Doomsday Blueprints. Seems we have to
leave as we
came, take the middle exit, go downstairs, take the SE exit and
finally exit the
sewers-passage to the world map.
Now show the plans to
Azziz who sends you to Shell 6 to stop the Doomsday
Device by destroying its
brain. North of Pranno on Shell 6 you can enter the
Doomsday Rift and exit
through the hole. Now you have to smash a lot of ...
um...devices. I got good
results using summon + water. Explore the area (not
very large), destroy
these devices and finally proceed through the exit SE. The
same in the next
area until the way is cleared to the exit NE. Proceed to exit NE.
Now you
have to fight the brain, first four shells, then the brain itself. I again
used
that summon+water combo plus slow. After it is destroyed you'll get a
Chaos-Fate-
Card and Balcaam shows up killing
Layla. The landmass then raises nevertheless.
After that cutscene you'll
find yourself onboard of Lobo's ship. I visited Pranno, but
it seemed there
was no one left to be saved. Allright then, we got business
on...
Shell 2
again
Talk to Azziz about the Core and Tori. Then visit
Uncle (and re-supply if needed)
and talk about Tori too. He'll tell you that
Tori is at the Factory where you'll meet
him. Have Corgan in your party and
look at the factory to open the door. The
Elder living there hand you a Reformatting Disk for Mayor's computer inside of
the
Smelting Complex, our next goal. They will even try to re-animate Layla,
but
they need a talisman from an ancient chosen temple on Shell 6 and a
healing
plant out of Lens Forest on Shell 4 that can be reached by a sewer on
Shell 4.
Mayor has the key to the gate, so we enter the Smelting Complex and
demolate
some robots (sorry Runner) until we reach the computer NE. Use the
disk and
Mayor and some townsfolk will show up leaving the Canal Key behind.
So head for World Bazaar on Shell
4, enter the Shipping Transport and use the
key at the sewer gate. Then an
ankaran soldier arrives telling you that Led's father,
General Campbell, is
waiting for you in South Farm on Shell 3. So you have to
decide, I think
Layla is dead and will not become 'deader', so lets head for the
tavern in
South Farm where we meet Campbell, who tells us of an anti-doomsday
device
developed by the Jinam that must lay under this shell now. He gives us
Explosives to break our way through the catacombs. But we
need a keycard to
enter the lab. Don't know if that's Lobo-specific, but by
talking to Campbell Lobo
mentions a wrecked Jinam ship as source for a
keycard. So lets go to that wrecked
ship on Shell 5 and search it again for a
keycard. Take Lobo with you.
I visited the southern forest on Shell 3
again, now being able to defeat all five waves.
The two beasts from rock 4
cast berserk, so first I casted Barrier + Berserk + All,
then I tortured them
by using Summon + Gemma + All. Rock number five produces
three ordinary
beasts and a Spirit Guard, that protects against all elementary
attacks...um, okay...back to the wreck.
In the wreck take the exit NE and
follow the passage then. Let Lobo have a look at
the door and get your Jinam Security Pass. Now proceed to the northern part
of
the area and let Lobo look at the device in the room NW. Now he's able to
cure the
disease Jinam spread in Ankaran. Exit the ship and do something
good, visit
Gregor east of the wreck that is occupied by pirates now. Talk to
a man wearing
green trousers and Lobo will heal the townsfolk. Led shows up
and apologizes
for her former behaviour.
I decided to visit Lens
Forest now by entering the sewers in the Shipping
Transport, exit west, then
exit south and reach a little accessable piece of the
forest. E from the
entrance is the desired Healing Plant. South you'll
come to
a strange place with a plant, a light-beam and a hole in a wall. Take
one of that
Leaves by using the terrarium to get
Terrarium with Leaf. Put it inside the hole.
Take
the Optic Vine from the plant.
Chosen Ruins
Now lets go
for that talisman, head for Shell 6 and enter the Chosen Ruins located
north
of the shell. Use the Optic Vine to open the door and go upstairs. Then the
next stairs up and feed the bird on the right
side. then downstairs, the next stairs
down and loot the barrel in the
northern room for a Speed-Fate-Card. Upstairs
is
only a little area with a broken bridge. go back to the first area and make
your
way to the exit NE. The door downstairs there is locked, so take the
exit.
In that area walk along until the end of the passage to throw a switch
that opens
three doors at the east side of the level. The room near holds a
chest with a Holy
Relic inside, the other little room SW has a chest too.
Proceed through the middle
east passage, throw the switch that opens the door
NW of the entrance and the
two rooms south of you, each holding a chest.
Enter the NW sector now, there's
a chest that holds the Red Temple Key. Three doors open, some close. Now
loot
the barrel at the end of the entrance passage. Exit again, go
downstairs, unlock
the door, throw the switch to destroy 4 bridges and rise
one. Explore the southern
area, a chest far SW. Make your way to the
southern exit. Explore the southern
area there until you reach a room with
stairs, two beasts (2 x Summon Gemma)
and a switch that closes the door
behind us and opens two others.
Now go upstairs, then downstairs on the other
side, proceed to the first stairs in
the north, there's only a little area
between broken bridges. Go back downstairs
to the stairs SW, go upstairs,
throw the switch to fix 3 bridges. Go downstairs,
back upstairs and to the
left. Proceed until a bridge breaks behind you to find a
barrel with the
Chosen Talisman inside. After a fight you'll get a
Cloak-Fate-Card.
Now proceed and go downstairs
to the other stairs, throw the switch again, go
back downstairs, exit NE,
downstairs, and throw the switch after that red lock to
clear the way back.
Now go upstairs again and make your way to the stairs far
SW that finally
lead to the exit to the world map.
Now return to the Factory and hand over
the healing plant and talisman to the
watcher there. He tells you that you
may await Layla in the Cathedral in Wind
City. Have Corgan with you to
spread the crowd gathering in front of the building.
A little sequence
follows where Corgan has to face the price for Layla's return,
she became one
of the watchers (bit too large for cosy hours now, hehe).
The Tomb
is a damn
dungeon. I just explored half of it, but I'll start over again. This place
is
large and has many switches that change the structure of each area. So I
get
armed with a screen-grabber and try to map this for better orientation
(yours and
mine). Besides there are a lot of goodies hiding in graves,
corpses, coffins,... and
a lot of monsters granting many many XP. All those
bunches of zombies and skulls
I killed with a Summon + All combo. The tougher
ones with Summon + Gemma +
All, or without All if single. Then a Gemma and a
Bowman should do it. Equip with
some extra core-items for that (I always got
20x +150 Core, 20x +75 Core and
20x +200HP as well as some of that 200HP all
and Full HP/Core all).
Hmm, at the end there's a big surprise, should I
tell you? Okay, I'm not so evil not
to tell you, finally you'll end up in
front of a wall. I ain't got no explosives at that point,
so I have to leave
that place and try to get some from the miner, then return (the
first thing
that really disappoints me, running and fighting for hours, then a wall).
I
don't know if you may ask him before entering the tomb (possible bug of
giving him
the antidote too early), think best strategy would be blasting
that second wall, then
trying to get some before conquering the entire tomb.
Only give him the antidote if
he tells you nothing except that he's
sick.
However, here's the first level:
Blast the second wall and go upstairs
ST 2 to the second level:
East is switch SW 2 that moves four gates named 2. Explore the
rest of the area,
in the room SE is a chest with a Titan Charm. Go downstairs
ST 3 and take the
exit L1 SW. Explore and loot every chamber and get the
Red Catacomb Key
from the southern room. Back to
the exit, upstairs ST 3 and downstairs ST 2.
Take the southern passage
leading to switch SW 3 that manipulates the gates
named 3. Proceed to the
east and use the key at the door with the red lock.
Exit to level
3:
Go
downstairs ST 4:
If you wish, go upstairs ST 5 and down again. Put your hands
on switch SW 4 to
move the gates named 4. Go upstairs ST 4 again. You could
check the little area
now open by going downstairs ST 5. Proceed to the
cross and throw switch SW
5, go downstairs ST 6, pull switch SW 6 that opens
door 6. Head back up and
downstairs ST 7, the room in the SW holds a chest
with Curse- and Vampyre-
Fate-Cards. Make your way
back ST 7, pull SW 5 again, head back north, pass
the doors 6 and 7, go
upstairs ST 8, downstairs ST 9 and...and...finally...stand in
front of
another of these weak walls. Arghhhh!!! All that work...for a
wall...*cries*.
Allright, so I had to make my way back to
the world map by throwing SW 4 and
SW 3 again, talk to the miner, give him
the antidote, and receive a Pick Axe and
two Explosives from him. Now all the way back to that damn wall
by throwing only
SW 3 this time, blast the wall and finally enter the Jinam
Lab area that splits into
Jinam Control Lab, Jinam Research Lab and Jinam
Main Lab. Lets loot the
Control Lab first. Save often, here I got first
problems with little bugs (freezing
while fighting and no map anymore,
restart/reset to solve, it's not often).
The switch NE opens two doors,
proceed to the main passage south, then to the
eastern rooms, where the
switch in the northern of them opens two other doors.
Check the corpse in the
now open room N to get a Core Token. Go to the rooms
west, where you'll find
a barrel with the Red Jinam Lab Key. Exit that level
and
enter the Jinam Research Lab. Use the red key and throw the switch in
the room
SE that opens two doors north. The room NE has a switch for two
doors west.
At the west side of the double-cross is a barrel holding the
Blue Jinam Lab Key.
Check the now open 5 rooms at
the main passage and exit to enter the Jinam
Main Lab.
Open the blue lock
south, the cyborg in that rooms holds Blast, the last
weapon
for Runner. To the west is another switch that opens a door above.
Proceed to
the main passage and NE, the table in the room north got a Sphere, the last
weapon for Maya. Move on to the switch
in the middle and return to the main
passage. Enter the room that's
furniture look like an X (map) and explore the
rest of the area. Use that
pass at the lock NW and fight Draxx to free Shell 3
from the Curse and get
access to the barrel holding the Secret Weapon.
Hoped for a cutscene to get out of here? No way, we're gonna walk all the
way
back through the tomb (SW 3, you remember?).
By leaving the tomb
we get our cutscene and are free to go shopping again.
North of Helgak Port
is a lake where we could kill two lobsters to get a Khali-
and Heavy
Shell.
Now I'll explore Shell 3 (South Farm/Wind City) to see if the
curse vanished.
You could show the Secret Weapon to Layla in the Cathedral,
then the story
continues by Doskias' attempt to raise Shell 4. You have to
form a party
around Corgan that shall slow Doskias' plan by using the weapon
while
Maya's party should help evacuating the area.
I would suggest to
go shopping before initiating the rise. South Farm and
Wind City had nice new
items, now I'll check the World Bazaar before it
crashes underneath Shell 7
(or whereever it will be stopped).
After showing the weapon to Layla,
Maya's party has to organize the
evacuation of Shell 4. Visit the Shipping
Docks in Scumm Town and talk
to the clerk who got ships but no fuel and hands
over the Treasure Lair Key
that opens a door
behind the east exit of the Mountain Pirate Base after
crossing the
snow-path. Use the key and then use the spray at that corona
in the middle of
the room to be able to fight (Summon Water) and get the
Pump Key.
Now return to the first area and exit NW to
use the pipe and the key. Then
go back to the Shipping Docks in Scumm Town to
get the Dock Key. Talk
to the two bounty-hunters
in front of that door in Bounty Hunter District at the
World Bazaar. Now both
parties have to fight (Barrier+All/Summon Marduk)
and get the Imperial Seal that you use with the Talisman to get a Talisman
Seal, You get the last fate card (there are
only 21) named Joker.
Now talk to Layla again
who advises you to retrieve the swords of Marduk
to be able to fight Doskias.
Kyra's Mirror should show the way, but first you
have to search entrance to
the ancient city of Babylon located somewhere
on Shell 4.
Defeat Conner again
Got o Gregor and talk to the man
in blue upstairs to get the Anakaran Subway
Key. I
suggest taking Grubb with you, there's a device to use later. Now go to
Old
Mountain Hoghway and enter the subway. Take the first exit. Exit there NE
after using the key. Then a switch SE opens the door to the exit west. But
we'll
first exit SE. In the northern room of the first accessable area is a
switch, in the
south is another and a barrel. At the south end of the middle
passage let Grubb
look at the device. NW is a barrel and a second one holding
the Red Prison Key.
Go back to the first area and
exit NW now.SW is a switch that opens a door
below. In the western section
are two switches for the doors far west that lead
to a chest with the Blue Prison Key. Back to first area again, unlock the
doors
and proceed to a fight with Conner (level 1 beats on the switch) who
leaves the
Kyra's Mirror Frame. Now head back for
the world map and the miner on Shell 7.
Show the frame to him, and he
tells you that he'll fit the mirror in the frame, but he
can't create the
mirror itself. So visit the chief in Bone Circle Village who tells you
that
he needs Doric Ore to combine it with the lens. Take Badu in your party
now,
he's the only one who can sense that ore. Then enter the West Mountain
Cave
and look at the left wall just in front of the entrance. Use the pick to
get Doric Ore.
Return to the Underlost and give
the ore and the lens to the chief to get Lens With
Doric
Ore. Now visit old miner again and give him the lens to get a Mirror Surface.
Use that with the frame and you finally
re-created Kyra's Mirror.
Take it to the Lens
Forest (enter sewers in Shipping Transport Bazaar) where
you use it to
re-direct the light-beam there. NE is a barrel, in the nest room
following
the passage is antother one and, one SE and one in the middle of
the eastern area.
Exit SW to get access to the...
Ancient City
It's divided into five seperate areas,
Earth-, Water-, Fire-, Air Temple and Marduk's
temple.
First I visited the
Fire Temple. Go upstairs, then downstairs to feed the last bird.
NE is a switch, another one south of it. Take the
east stairs and downstairs to
explore the now open area to the south, go
upstairs. There's a switch inside the
east section, go downstairs SW.
There's the switch for the last door. Go back
upstairs and throw that switch
again, then downstairs and proceed to the area E
to fight a fire-thing
(Barrier + Fire + All / Summon + Water + All). You'll get a
Temple Key.
I couldn't stand it no longer and headed out
of there to visit that mysterious tower
on Shell 3 where we once landed after
leaving Shell 2. Nice items there, would
have been a shame not get them right
now. Allright, satisfied I'll return to the
Water Temple.
SE is a switch
for a door and a chest south of it, go upstairs SE for another
switch,
proceed NW to fight a water-thing (Barrier + Water + All / Summon +
All +
Air) and get a second Temple Key. Loot the chest far
SE and exit for the
Earth Temple.
Go upstairs and downstairs, pull the
switch there, go upstairs and proceed to the
middle. Pull the switch north
there to access the east area. Go downstairs there,
throw switch SE and loot
the barrel a bit west of it. Another switch is NE and N,
then fight the
earth-thing (Barrier + Earth + All / Summon + Fire + All). Get the
third
Temple Key and proceed to the Air Temple.
Pull the
switch inside the east 'hammer' and loot the chest in the western one.
Proceed to the middle and pull the switch there, take the stairs up NW and
do
the switch east and west. Head for SW, take stairs SW and get ready to
fight
the air-thing (Barrier + Air + All / Summon + Earth + All) and get the
fourth Temple
Key. Go back upstairs to the east
sector and pull the switch. Go downstairs there,
loot the chest SE and exit
finally to Marduk's Temple.
Unlock the four doors and use the Talisman
Seal at the red door. Conner shows
up for a very last time and you get two
Daemon Swords. Go back to the world
map.
A
little side-quest not mentioned yet is the relation between Led and Grubb.
Take both in your party and look at that closed door in the middle of
Ankaran
Capitol. After entering you'll have to decide for Grubb wether to
help Led or
get a gadget (ForceBlitzer, not worthy).
Then take Corgan
and Selina in your party and talk to Layla who tells you that
you have to
enter the crashed battleship of Doskias to retrieve the D.D.D.
The ship is NW
of Oasis Shell 2. The party is split into three then, Grubb,
Runner and Badu
shall take out Engine Room 1, Lobo, Led and Araym shall
take out Engine Room
2 while Maya, Corgan and Selina head for Doskias'
bridge. We start with the
first party around Grubb. Except Grubb this is a very
slow party, therefore
the fights become a bit more challenging than before.
I would suggest casting
'Summon + Dogo + All' first, that should give enough
time to take the
enemies out by weapons.
Engine
Rooms
Take the (only open) northern exit. Pull switch NE and go
back to the now open
room south. Pull the switch there and proceed to the
west area, pull the switch
north to access the middle area. Pull the switch
there to open the middle
passage, switch there to open doors south where you
fight for the Red FS Key.
Exit and unlock the red
door, enter. Throw north and east switch, then go to the
now open circle near
the entrance to fight the first part of the engine. As long as
the switches
are in middle position, the lids remain open and you can damage
the thingies
inside. First cast 'Barrier + Air + All'. After that fight you'll get the Blue
FS Key that the next party needs to destroy the
second part of the engine.
Unlock the blue door and enter. A switch south
opens the door above, the switch
there opens the door to the west area, the
switch south there opens the rooms
south. Pull the switch there to open the
last area NE. Fight for the Yellow FS Key.
Exit
there and open the yellow door, enter and pull the east switch below the
entrance. The switch at the southern end of the main passage too. Go back to
the east, pull the switch south there that opens the western circle-area. In
the last
circle fight the second engine-thing and and slip inside your third
party.
Final Fights
Follow the main
passage to NE. Before you can reach the yellow exit, Maya
approaches Kaleb,
who tries to defend Doskias. He will cast shields that seem
to consist of
different elemental material. If you cast Summon + Water on a fiery
red one,
it will take about 4000 damage. I only summoned Thanatos, who just
hits for
about 700, but that's enough and you don't have to think about the
proper
summoning. When a shield is down, you got the chance to hit Kaleb
himself.
Speed the party and do not summon Thanatos on that 'chickens from
hell', they
will be healed by that).
After defeating him you'll be
immediately taken to the bridge where you have to
fight Doskias at last. I
had no special strategy, a barrier for all could be useful,
he casts some
ugly earth- and fire-spells (among others). Speed your party up
again and
hope that this armageddon-like spell doesn't kill them all. If you
carefully
listen, you can hear him cry: "...gimme gemma...gimme gemma...".
Good
luck with the fights. I hope I could help some people with that, and
beneath
it was fun doing it. Now the Revenant is watching me from his cover,
greedy to
feel my hands on the mouse letting him kill hordes of
monsters.
Here are some more tips for the final fights I received from
Foo Yu Jye:
Just adding my 3 cents worth on the last part against
Doskias. A undead barrier
will nullify his Armageddon like attack....from
600+ damage to just 50+. When he
creates images of himself, it is possible
to hit out the fake images one by one. In
that case, he will not cast that
Armageddon like spell. But there is a 1/3 chance
and 1/2 chance to hit the
correct one. A cloak spell on everyone also helps avoid
the spell.
Against Kaleb...just cast joker on him. I dunno whether it is a glitch or
not...but he
stops moving after that.
Thanks Foo, and Morten for the
pdf-file.
~ Soulbox, 26.11.99 - 21:30 ~