![]()
Solution copyright © Mike Marcelais. Version 1.0, October 2, 1999.
The newest version of this solution is always delivered to the Spoiler Centre: https://the-spoiler.com/ first. Check here for the latest and most complete version before complaining to me.
Thanks to Andrew Becker for providing some of the information in this solution.
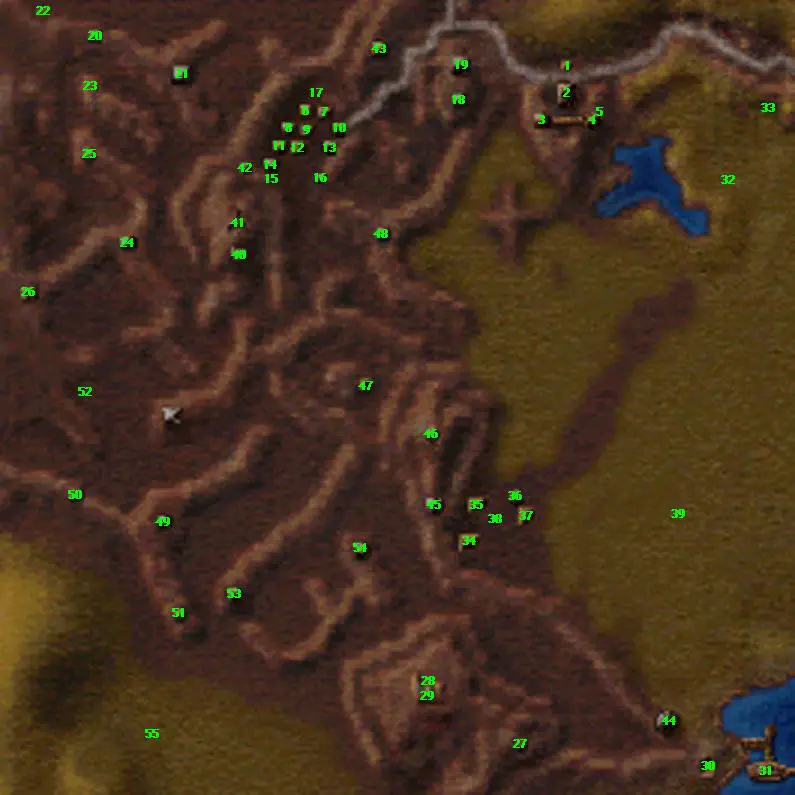
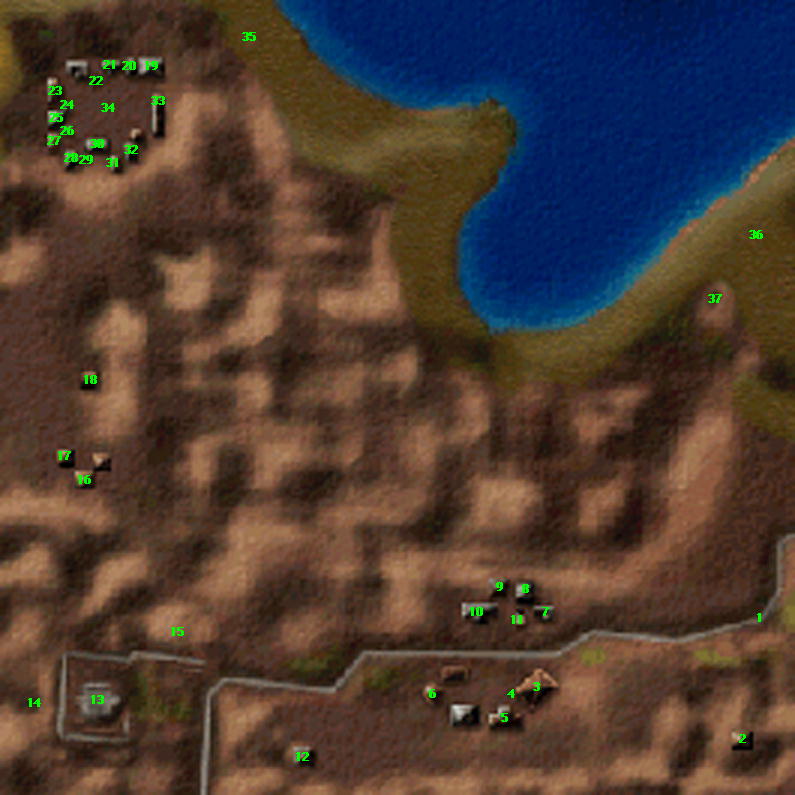
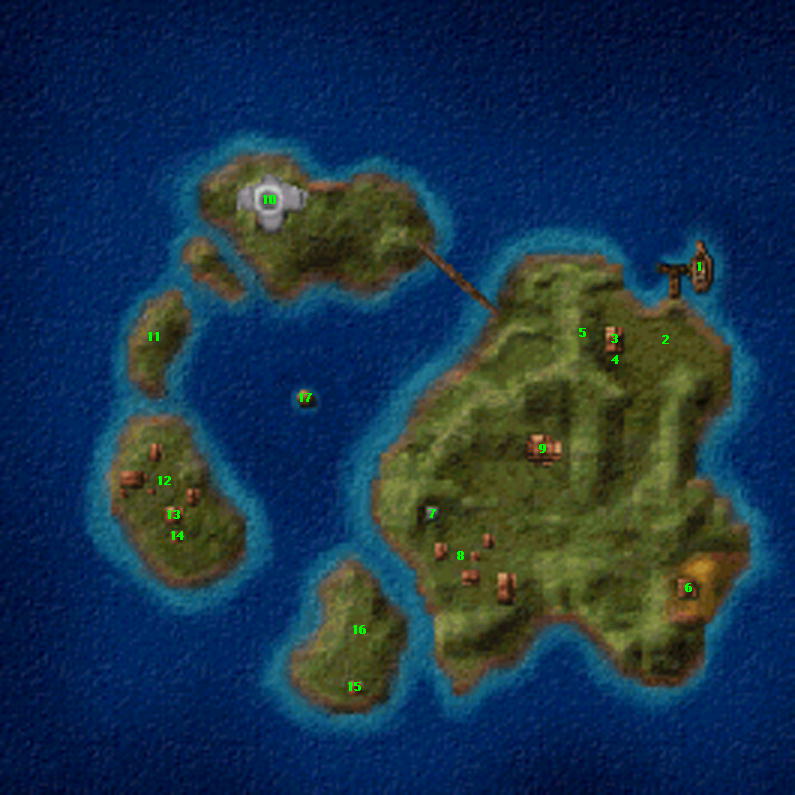
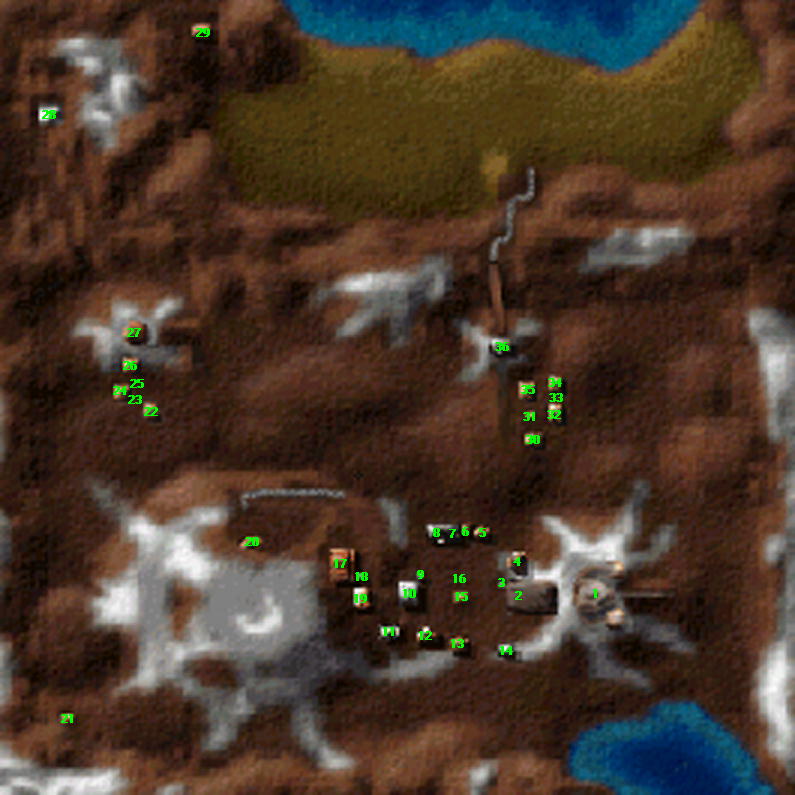
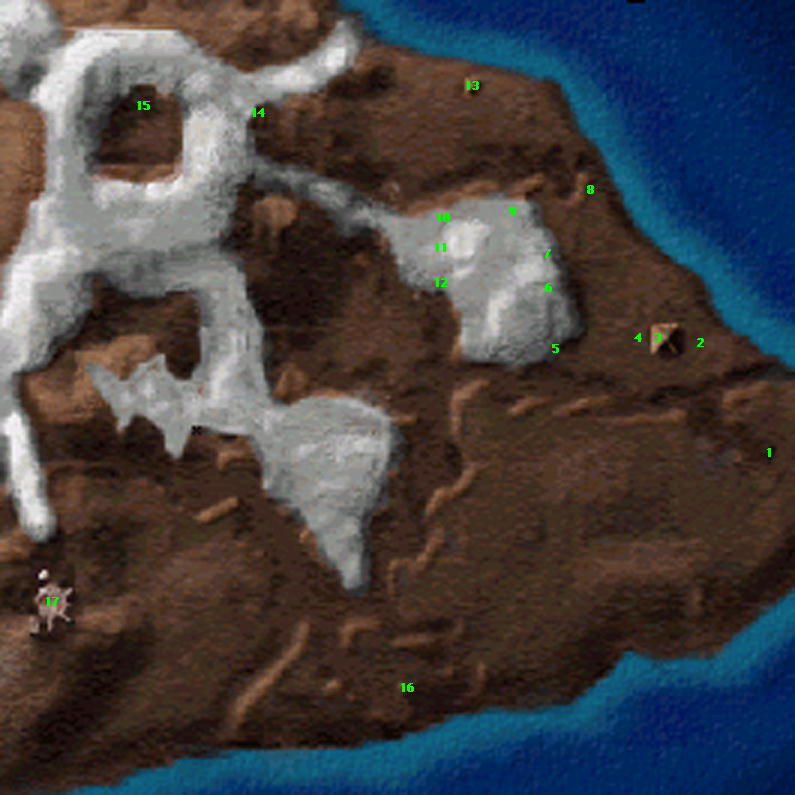
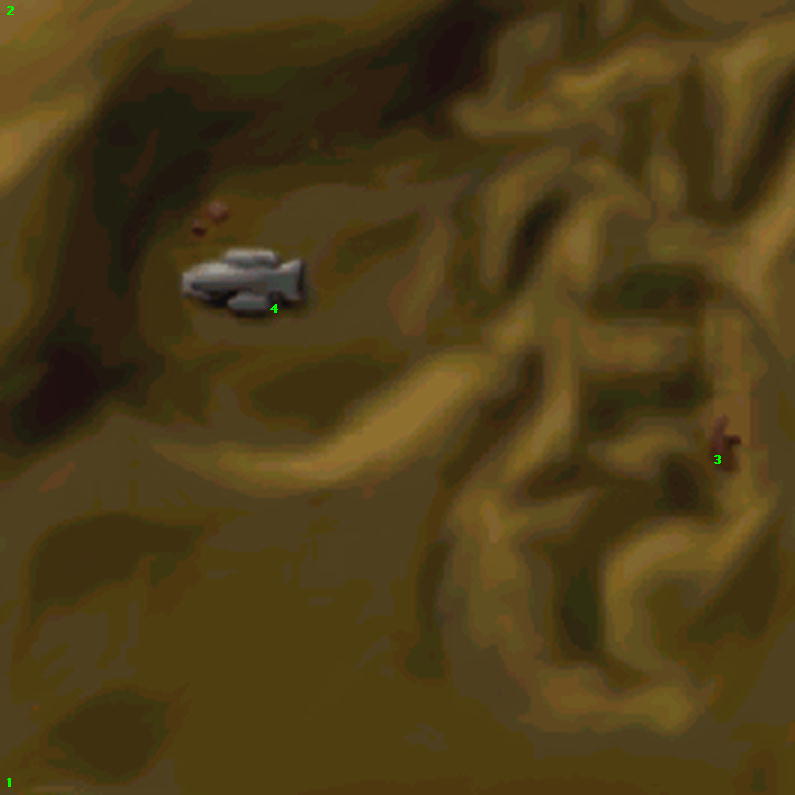
Like its predecessor, Might and Magic VII is a very loose game -- i.e., there is very little linearity. Although there is some linarity to the game, and many more quests are dependant on previous actions, this is still very much a game of visit everywhere and complete all of the individual quests. Because of this freedom, the walkthrough will be in the style of a "tour" of the lands. Each major grid location is listed (along with a screen capture of the map from the game), and all surface locations noted.
For towns, each building is described, along with what and who can you can talk to, who to buy skills from, and what quests are available. For the outlying areas, the dungeons are listed.
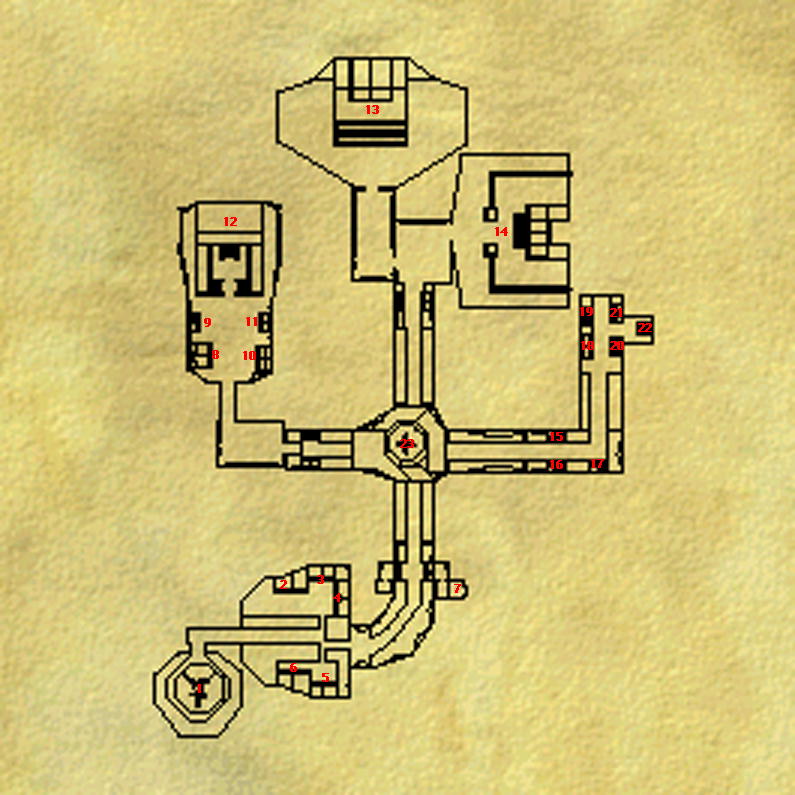
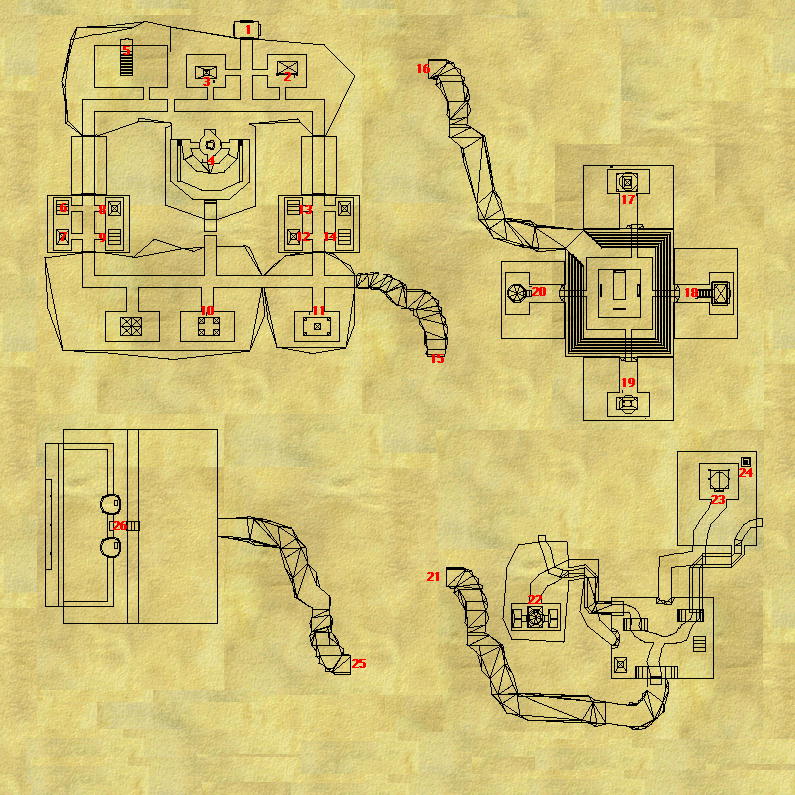
Dungeon maps are not given -- they would be too extensive to fit easily into a web page and the automapping in the game is excellent. Also, every dungeon should be explored completely to get all of the loot, but only puzzles and hidden locations are described. I also skip most of the fighting because it isn't something that you can easily describe, nor does it matter in most places, except that you have to survive it. I do list the creatures that you will encounter in a dungeon or grid location to give you an idea of how difficult the location is.
Stores are listed with a "buy" and "sell". The "buy" value is multiplied by the items value to determine the price you have to pay for it. The "sell" value is divided by the item's value to determine the price you can sell it to the store for. Higher is always worse, and a "buy" or "sell" of 1 means that you are buying/selling an item at cost.
Every location has a "reset" timer. This starts when you first enter the area, and after it "goes off", the entire grid square resets: monsters reappear and random treasure is replaced. Nonrandom treasure (including most stat-gaining liquids) is not replaced. All dungeons have a reset of 2 years (24 months), unless otherwise noted. Overland areas have reset times listed with their descriptions.
Artifacts are unique items that can be found. Some of artifacts are placed at specific locations; others are randomly generated.
Some of you may notice the similarity to my Might and Magic VI solution. I figure if New World Computing can put out a game based on basically the same engine, I can put out a solution with basically the same format.
Fairly simple set of tunnels to explore. As you enter, when you get to the first open cavern with a natural pillar in it, there is a chest hidden in the wall behind the pillar. There is another chest if you take the left exit from this room, then the left exit from the next room and go all of the way to the end of the tunnel. Both of these chests contain minor random treasure.
To the north, the cave stops being natural passageways and starts being constructed hallways. It turns to a room with lots of bats and rats. Along the far side of the room, there is an altar with a pair of fire bolts shooting across every few seconds.
The north exit follows a hallway to a guardroom with friendly guards. There are several cabinet chests in this room, one of which contains a wealthy hat needed to complete quest 6.
The south exit leads to a library. The north side of the west wall is secret leading to a second librar room where a piece of tile is on the floor. This tile is needed to complete quest 4.
Just one room, filled with scattered treasure, rats, and one large dragon. The dragon will attack the rats first, which buys you valuable time to explore the cave.
Just inside the cave is a contestant's shield, which is what Lord Markham wants in order to complete quest 7. There is also a longbow on the floor, needed to complete quest 3.
The first time you visit here, the castle is unrepaied and infested by goblins, bats, and rats. There is nothing secret here now; just clear out the main entrance room and follow the corridors to the left and right, killing all of the monsters.
Once you have gotten the dwarves to repair the castle, your Throne room will be open, and you can meet with the Elvish and Human ambassadors.
Once you have selected an arbiter and completed the prooving quest for them, your castle will be upgraded once again, opening up several new areas, including an upstairs. In the torture chamber below, the southwest cell has a tunnel dug out of it that leads to a small cache of treasure. The library in your castle also has a document describing cryptography that is useful in decoding the message for quest 64.
At this time, four stores open up in your castle.
From the entrance area, head west, following the corridor ahead as it turns to the north, and then heads east. It will eventually dead end at an ore vein, where you will find a pile of bones, a note, and an Arcomage deck. You need to return with the deck to complete quest 10
Returning to the entrance, take the north passage. It will turn to the northeast and turn south where there is a ledge. Opposite the ledge to the north is a secret door in the wall behind which are several chests.
Part of Stone City is an ordinary city, although it is on an indoor map instead of an overland map. The second part is the caves under the city.
The lower caves are connected to the city by a pair of elevators. Once down in the caves, the simply for a large loop with side rooms. Scattered through the caves are troglodytes and chests.
In the far northwest corner of the loop, there is obelisk #14. Just to the east is a passage that leads to the Nighon Tunnels.
The barrows are a series of interconnected sections forming a complex maze. Each barrow has two tunnels exiting from them. Each tunnel, except those leading outside, has a lever to flip that exit between one of two possible destinations. You can always tell which barrow you're in by looking at your automap.
Some of the barrows have a wall plaque between the two tunnels that describes the four exits by listing the barrow numbers for all four combinations. The keys that are found in the barrows allows you to open up some of these. (Unfortunately, there are three locks and only two keys.)
| Barrow | Left Up | Left Down | Right Up | Right Down |
|---|---|---|---|---|
| 1 | 11 | 6 | 5 | 15 |
| 2 | 11 | 13 | 14 | 5 |
| 3 | 12 | 8 | 10 | 4 |
| 4 | Tomb | 15 | 12 | 3 |
| 5 | 2 | 1 | 9 | 12 |
| 6 | 13 | Tomb | 11 | 1 |
| 7 | 9 | 10 | Outside | |
| 8 | 14 | 3 | 15 | 13 |
| 9 | 5 | 7 | Outside | |
| 10 | 7 | 3 | Outside | |
| 11 | 2 | 13 | 1 | 6 |
| 12 | 14 | 4 | 5 | 3 |
| 13 | 11 | 2 | 8 | 6 |
| 14 | 8 | 15 | 2 | 12 |
| 15 | 8 | 14 | 4 | 1 |
The southwest wall of the west side room and the east wall of the east side room are secret walls that have a room of items behind them.
Directly across from the entrance tunnels is a secret door that leads to a water-filled passage. Another secret door leads to this same tunnel from the second crypt room just down the stairs from the entrance. If you follow the tunnel all of the way down, it leads to a room with three chests. One of these chests contains the Lantern of Light that is needed for quest 9.
There are no secret areas here.
After going down the first tube tunnel, there will be a circular room with a central pillar. On the west side of that pillar is a button that will open up a door on the east side of that pillar. Behind the door is a pair of chests and some skeletons.
There are no secret areas here.
Directly across from the entrance tunnels is a secret room. It can be opened from the secret door here, or the secret walls in both side rooms. It contains a collection of items.
The floor against the north wall will sink into the ground if the button on the north side of the southern altar is pushed. If you jump down this newly formed shaft, you'll be in a corridor that leads to a room. Stairs lead up and down to another room. At the peak of the stairs between these two rooms, there is an altar. The top of the altar slides away to reveal a sliding lever. The lever opens the wall opposite it allowing you to return to the barrow tunnels.
Go through the corridor to the first room. There is a secret door in the west side of the room revealing gold and items. Heading out the south exit, the west wall of the corridor is another secret door revealing a room of items. Finally, in the south wall of the last room is another secret door hiding more items.
A bookcase in the entrance area hides a tunnel leading down. The far wall in the room at the bottom of this tunnel hides a chest that contains a barrow key. These barrow keys can be used on the keyholes in barrows 7, 9, and 10 to unlock some of the map guides in the barrows.
The chest at the top of the stairs has a barrow key. The northwest wall is also a secret wall leading to a corridor that ends in another secret door. Behind this door is a large crypt with a few gold pieces.
There are no secret areas here.
From the starting room, head west. The two doors in this room are opposites -- clicking on the north door opens the south door and vice versa.
In the southwest corner of the east room is a secret wall revealing some chests.
There are no secret areas here.
Go through two doors. The odd colored square in the middle of the room is an elevator that raises you up to the last room.
Directly ahead is the coffin where you need to put Zorkar's remains to complete quest 50.
If you go down the passageway, you will get to a room with a pool in the middle and four side rooms in the cardinal directions. The pool is the lost meditation point needed for quest 13.
From the starting room, head up the stairs and open the door. You will be in a library. Against the west wall is a bookcase. The top-left book in this case is sticking out. If you push it in, it will open the north wall of the library.
The lever against the north wall in the new passage is a trap. It will shoot a fire bolt at you if pulled. Follow the corridor down the stairs and turn left. Clean out the chests on your right as you pass by.
The corridor leads to a pair of doors which open up into two bedrooms. If you continue out the doors of the bedrooms, they lead back to the main entrance.
Return back the way you came and go all of the way around. You will reach two more doors that open into two more bedrooms. The northern of these two bedrooms has an Angel Portrait on the wall, which is one of the three paintings needed to complete quest 21. Exiting the bedrooms by their main doors leads back to the main entrance.
Note that there a lot of friendly Dwarves and Warlocks in these tunnels. However, if you hurt one (even accidentally), they will all come after you.
From the entrance from Stone City's caves, head down the ramp to your right. In the room below, head north, turning west when you pass the campsite. As you head down this passage, you will get to a room divided by a chasm. Jump in the chasm. To the south, the passage dead-ends. To the north, it loops around to an area just north of where you entered the caverns.
Head south and west again, returning to the chasm you just jumped into. The eastern edge small enough to jump over. Cross over the chasm and head down the corridor. This tunnel will generally wind its way northeast. It ends at a ledge overlooking a lower level. Jump in.
At the end of the tunnel, it forks into two main passages. The southwest passage leads back to the starting area (after jumping down a short ledge). The southeast passage leads deeper into the caves.
In the next cavern, the southeast branch dead-ends. The east branch leads to a room with a pool. Head south, east, and then south. From this room, clean out the three rooms to the west, then return here and head southwest. When the tunnel forks, the southeast passage leads to Thunderfist Mountain in Mount Nighon. Take the northeast passage instead. It will eventually end in a pit. Jump in.
In this water filled section, head due north. At the dead end is Zorkar's Axe and Zorkar's remains. These are the remains that you need to return to the Barrow Downs to complete quest 50.
Head south and east, continuing down the water filled passage for a long distance until it narrows and starts going uphill. After going through a pair of rooms, the passage will end back at the pool room.
This is a rather small cave system. Follow the tunnel south, east, a bit north, and then west to reach the large central hideout of the bandits. In the chest in this room is the Signet Ring needed to complete quest 11.
Enter from the entrance to the northwest of Erathia and pass through the first room, taking the corridor north and then east. Follow it all the way to the east and kill all of the thieves and rats in that room. Retreat to the corridor and follow it north emptying that room of hostiles. Then return back the way you came and head up the stairs to the south.
This passage leads to a star room with exits in six directions. If you step in the center area where the paths meet, it will set off an explosive magic trap. Head to the southwest exit from this room. Follow the path around through two doors until you get to a ledge. A lever to your right will raise a pathway across the room. Follow the path all of the way around to a room with three levers that overlooks a room. Pull all three levers, waiting after you pull each one for the blocks of stone to move into place before pulling the next lever. As you return to the star room, a shrapmetal will shoot at you as you round the corner.
Return to the star room, take the southeast exit. This leads to another passage identical to the previous one ending in another set of three levers. Pull all of these. The stone blocks should now be lined up (more or less) across the room.
Return to the star room again and take the south exit. This leads to the sewer entrance under the bridge. Instead of heading outside, jump off a ledge.
Follow the corridor to a room with a pair of chests. The western north exit from this room leads to the area under the passages in the star room. The eastern north exit forks. To the east is the northeast Sewer entrance and a passage that leads to the area below the path that you raised to cross the room to the eastern set of levers. Heading up the stairs leads back to the star room.
Take the north exit. You will be in a room with walkways leading to three arches. Only the right arch is a doorway and when you through it, you will be in the wrong ledge to cross the room. Jump off the ledge into the room below.
Exit the room through the corridor south, then west, turning north at the end of the corridor. Click on the wall at the dead end and you'll be teleported to the right arch. You should be able to walk across the stone blocks to a room filled with chests, barrels, and items.
William Lasker also lives here:
If you're just here to see Queen Catherine, you can enter safely, walking straight up the stairs and either around the pillar, or just go directly ahead through two secret doors to the throne room.
Once you have completed quest 14, you can get quest 33 from her. If you are on quest 32, you can inform the Queen of this and it will change to quest 35.
Otherwise...
Head through the entrance and up the stairs, turning north. The first door on the right is a large meeting hall. There are no other exits from this room so exit and head up the stairs, turning right at the hallway. This hall goes to the corner tower room. Turn around, heading north, cleaning out the two conscript's bedrooms on your right on the way by, reaching the other corner tower at the end of the hallway. In this tower, there is the painting of Archibald Ironfist, one of the three portraits needed to compelte quest 21.
Return back to the entrance area and head south. The first door on the left is a large mess hall. Behind it is a corridor. South leads to a simple meeting room. North leads to another meeting room on the left, behind which is a bedroom. In the bedroom here is a chest that contains Catherine's Key, and the wall has the painting of Roland Ironfist, another one of the portraits needed for quest 21.
Back in the hallway, the north wall has a secret door in it. Behind it is a set of stairs leading to a back door entrance to the castle requiring Catherine's Key to open.
Returning back through the mess hall to the corridor, continue south. The corridor that you enter is a mirror of the one on the other side of the castle -- two corner tower rooms and two bedrooms. The west bedroom is where Alice Hargreaves lives. You need to capture her to complete quest 67.
As you enter the building, you are warned not to procede any further. Ignore their warning and kill the guards in the room and open the door across from you, heading down the stairs. At the bottom of the stairs is a trap, causing fire bolts to shoot down the hallway. In that hallway, there are four doors which lead to guard bedrooms containing random treasure. There are no other exits.
Return to the top of the stairs and head down the stairs just to the right of where you entered the Fort. At the bottom of the stairs, there is a hallway. The two doors on the left lead to a view of the bridge crossing itself. The two doors on the right lead to storerooms.
In the near storeroom, the west wall has a secret door on it leading to a set of stairs. At the bottom of the stairs, is a long corridor with side rooms branching off on both sides. The first two rooms are more bedrooms for guards.
The third room (this one is on the right) opens to a meeting room. The painting on the west wall can be moved and reveals the plans to the Fort. These are the plans needed to solve quest 32.
Continuing down the corridor, the next two rooms are more bedrooms. The next door, on the right, opens up to a small storeroom with four chests of random items.
Following this, on the left is a small jail. The two prison cells can be opened by pulling the levers, but there is nothing inside. Across the hall is a room with crates. The last door in the corridor contains a few stat gaining barrels.
The corridor ends in an exit that leads down into the river.
To even get in this area, you need to solve the cipher that you received as part of quest 64. The instructions for how the cipher works are described on a scroll in your castle, and the Scroll of Waves that contains the keyword is in the School of Sorcery.
The keyword is the third word of the Scroll of Waves: pattern. Repeat that word over and over for the entire length of the cipher message. Then take the cipher character and count it back one letter in the alphabet for each position in the keyword the letter is. [Eg, 'P' is the 16th letter in the alphabet, so you would count a cipher letter paired with 'p' back 16 letters.] Hence, the scroll decodes like this:
  Y iupj xckox nmw henv ik eoiuyl pwzmjh usv vqwy xjvisfx nmw qeey zwga xjm htlsi.
  p atte rnpat ter npat te rnpatt ernpat ter npat ternpat ter npat tern pat ternp
  I have found the tomb of master kelwin and have deduced the code from his notes.

  Jn cx fchub yfkh iponm osiu uhi usduyl.  Rq xec cm igbu bhx yzs tfvn uswt.  Hiii disl.
  at te rnpat tern patte rnpa tte rnpatt   er npa tt ernp att ern patt ernp   atte rnpa
  It is north east south west and center.  My job is done and the debt paid.  Good luck.
(Side note: it isn't too hard to break withouth the keyword, if you know the kind of code. Seeing that "nmw" appears twice in the first line, if you guess that the word is the same word, it means that the key word is either 5 or 7 letters long. Trying both "and" and "the" for that word and using that key fragment everywhere else in the message. It becomes clear that "the" works very well with a keylength of 7 and lets you determine what some of the other words are easily, and hence the key itself.)
The tomb itself is fairly small. The stairs go down from the entrance to a room with a Lich and his vampires. The sarcophagi in this room also act as chests containing random items. There are also two side rooms to the north and south with more sarcophagi. In the north room, the coffin contains the Shadow's Mask. Retrieving this item is enough to complete quest 64.
If you're just here to see King Parson, you can enter in peace through the main entrance, going down the elevator, and turning left and heading to the end of the corridor. Once you have completed quest 14, you can get quest 32 from the king. If you have received quest 33, you can inform the king and it will change to quest 34.
Otherwise...
Its best to enter from the entrace in the Tularean Caves. From the entrance tunnel, follow it to a secret door that leads to an elvish bedroom. From the bedroom, go up the spiral staircase that leads out to the area just in front of the throne room. (The throne room is now locked.)
Open the two doors to the east to reveal two barracks rooms. Continue down the main corrdior, past the lift, until it turns to the north. The two doors on the left are two more barracks. Both doors on the right lead to a large library.
The floor in the northwest corner at the end of the hallway is a secret door that reveals stairs going down to the elven treasury. Raiding this treasury is necessary to complete quest 68.
Return to the lift and take it up. Off of the main room here are two other large rooms. Each one contains stat-gaining liquid barrels in them.
From the start, head down the stairs to your right. If you head all of the way down, you end up in the area below the entrance at the base of all of the pillars. Go back up the stairs a short distance and out into the large cavern.
This set of tunnels is mostly a collection area for various other rooms where you can fall down from. The passage leads eastwards into a large, empty room; leads west then southwest into another empty room, and directly west to a room with a few chests. When you have explored this area, return to the main entrance and take the stairs upwards.
Follow the tunnel continuing north at the fork. The chest in this room has a scroll documenting the invisible bridge. Proceding south from this room, the ledge has three stone blocks on it that try and push you off the ledge into the room below. Should they be sucessful, a tunnel leads from that room back up into this room. On the other side of that trapped area is a door that provides a back entrance to Castle Navan.
Return all of the way back to the fork and take the west path, which quickly turns east and overlooks a room. Jump down from this ledge into the room. The east door leads back to the entrance. The west path leads to a chasm. This is where the invisible bridge is, so just walk across. (Or if you're feeling paranoid, you can use a Jump spell to cross.)
Head up the stairs into a large room. Pull the lever on the far side of the room. Then return back down the stairs and take the north exit. In this room, there are three arches (which were revealed only when you pulled that lever) mounted against the far wall. The left and center arches lead to the Castle Navan entrance in the caves. The right arch leads to the top of a cliff.
From the cliff, take the ramp down to the north and it will eventually turn around and lead to the room at the base of the cliff where you started. There are a pair of chests here, including one on a pillar that constantly moves up and down.
Exit this room and take the steeper ramp up. It leads to the prison cell where Loren Steel is being held. He will join your party. This is whom you need to rescue to complete quest 33. You can exit the caves by returning to the top of the cliff and hopping through the arch in the wall.
From the entrance, turn to the left and head up the stairs, turning right into a room at the top. Pushing the button on the south side of the room will open up a panel that conceals two chests. Jump down the well in the middle of the room to a small storeroom and head up the stairs leading out of this room back to the entrance. Drink from the pool. This will open up two more side rooms upstairs (where you just jumped into the well) that contain three more chests each.
Back in the hallway, head west and follow the corridor around. The first door on the left is a laboratory with lots of magical potions and reagents. The next two doors both lead to small bedrooms with three chests each. The hallway ends at a library. In a nook at the south side of the library is a book that is pushed out of the bookcase. If that book is slid into place, a secret door opens.
The secret passage leads straight ahead to another lab room with potions and reagents. Just outside that room, to the east, is a room that contains the magical defenses that must be destroyed to complete quest 60. The passage west leads back to the entrance.
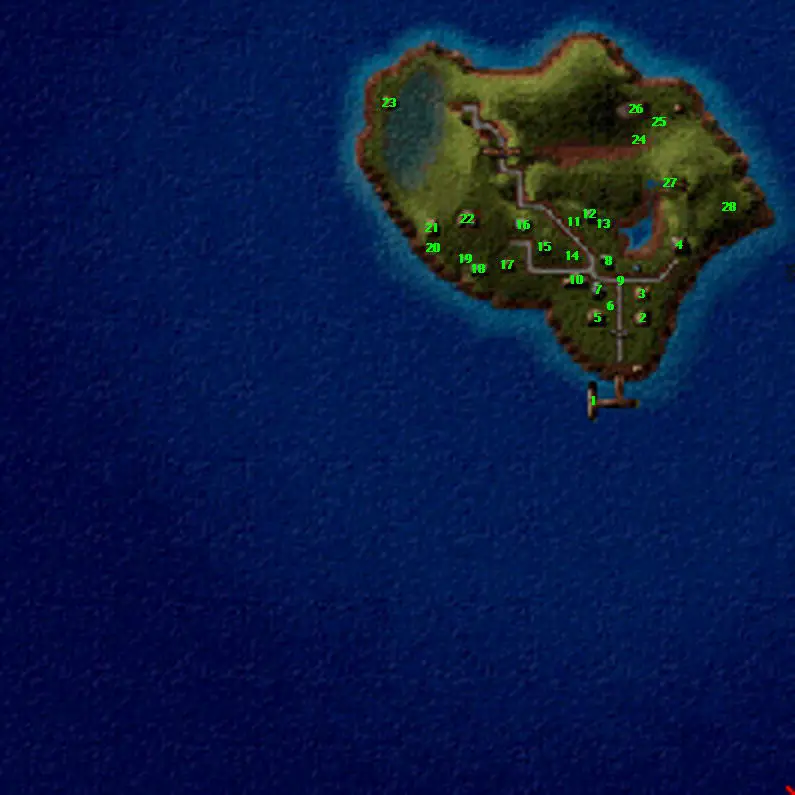
Very simple. One blue dragon live here -- Wromthrax. Killing this dragon is what is required to complete quest 17.
Straight ahead from the entrance is Lord Markham's chamber. This is where you can talk to him to complete quest 19 and receive quest 22.
If you open the doors to the east or west, the guards will become hostile and Lord Markham will lock the doors to his chamber. Through the east door, there is a button located on the side of the desk that will open a secret wall to the north revealing several chests of treasure.
Through the west door, around the corner to the north, the vase that you are required to fetch for quest 20 is sitting on the hearth above the fireplace.
The flooded entrance tunnel leads to an underground wooden building guarded by thieves. In side that room, there is a stairway heading up. There is a secret room underneath the stairs. To open the door, you have to be standing right against the wall, and because the door is trapped, use the character with the disarm trap skill to open it. Inside is a chest of random items.
Heading up the stairs, you come out on the deck of a ship. Head straight and go down the stairs into the hold and turn right. To the south is a secret door, behind which is a pair of chests. One of the chests has the map to Evenmorn Island that you need to complete quest 30.
The hole in the hull here leads to a large chamber of thieves and another chest of random items. Returning to the deck of the ship, if you just "overboard", you can find a secret passage in the southeast wall of the cavern that leads back to the entrance area.
Head through the first door and quickly clear the entrance room of archers. Head up the stairs and all the way around to the left. In the south end of the west wall is a door that leads down to one of the rooms filled with archers that can shoot you through ports that open into the main room. When they are finished off, take a similar path through a door on the south end of the east wall.
Now that the snipers are dead, you can explore in peace. Stay on the 2nd floor and go through the north door. It leads to a conference room containing a chest filled with nice items.
Back in the entrance room, take the west door. When opened, a dagger will shoot down the hallway towards you. The door at the end of this short hallway opens into a storeroom. There is a chest which contains (among other things) a letter detailing how you are a "sufficiently gullible" group of adventurers that could be used to serve their purpose.
Return and go through the east door in the main entrance room. The floor on the other side of the door is magically trapped. The right fork leads to a barracks. Behind the southeast bookcase is an alcove containing several chests.
The door on the left leads to officer's quarters. The bookcase here also hides a room containing several chests. In the center chest is the Heart of the Wood, which is needed to complete quest 46.
The first room looks like an ordinary wine cellar, divided by wine racks. There is an item (usually a gem) hidden in a nook under the stairs and a chest of treasure in the east side of the room.
The northwest wine rack can be moved to reveal a stairway down that leads to a room with vampires and crypts. To the south of this room is a barred cell that can be opened with the lever to your right.
To the north is the main lair of the vampire. Against the east wall is an altar-like pedestal that can be pushed. It opens a room on the west side of the room containing three chests.
Killing all of the vampires in this area completes quest 41.
After going in the door and down the passage, you will come to a room with a large green hill in it. This is the Hill. To find the entrance, walk around the hill clockwise one and one-quarter times. The entrance should appear. The Faerie King will be waiting for you at the entrance allowing you to complete quest 26, quest 27, and receive quest 29.
Behind the King is an elevator going down. Halfway down, you can jump off the elevator into a room that contains a chest with the Faerie Ring -- a ring that increase the effect of all air magic spells.
Jumping down the rest of the way, the passage leads to a forested room with dragonflys. One of the dragonflys has the Faerie Key. The exit from this room leads through another forest and lake room.
The passage then leads to a finished stone room with a bridge crossing a small stream. The walls where the stream flows into and out of this room are both secret doors that have treasure behind them.
Continuing straight, the next room is dominated by a large tree. In the southwest corner of the room is an exit that dead-ends. On the small segment of wall at the corner, there is a secret panel that reveals a keyhole. If you use the Faerie key on the lock, the corridor raises into a stairway and a door opens on the wall to the west. In the room revealed is a chest and several items.
From the entrance, head down the ramp to the west. When it straightens out into a corridor, go into the first room on the right. The northeast corner of the room reveals a secret passage that leads to the bedroom of some clerics. The exit of this room leads back into a corridor that you would arrive at going down the east ramp.
Head south and go in the first room on the right. Again, the northwest corner of the room has a secret passage that leads to a storeroom, and back out into the corridor you originally came down on.
Proceding north down the corridor, you will end up in a small jail with three cells filled with devils. The three buttons in the middle of the room control the doors.
When that room is empty, head back and cross to the east passage and go north. The door that is directly ahead leads to a small store room that has a message from Xenofex (the head of the devils) detailing their failed plan in Enroth. (This describes the events in Might and Magic VI.) Continue down the passage north and you will reach the sanctum of the Baa order. The High Priest of Baa is here (one of the Priests of the Moon), and on her corpse is the Cloak of Sheep. Killing her completes quest 49.
Returning down the corridor, jump down into the core of the spiral ramp and finish off the last of the priests and devils down there. Then take the lift back up to the entrance.
To the right of the stairs is a chest filled with good items. After its been raided, head up the stairs and turn to the east. The corridor will turn north; go east at the next intersection and clean up the side room. Continue north to another room with treasure guarded by dragons. When both rooms have been emptied, return to the intersection and head west.
You will pass through a room with a large pillar in the middle of the room. Continue through this room and turn north at the next intersection. On the right is a another guarded room of treasure. Continue north and turn east at the intersection.
Head all of the way east until the hallway ends. Then go north, west, and north. Follow the corridor, collecting treasure. You will eventually be at a four-way intersection, heading south. Turn to the west and continue west at the next intersection.
At the intersection after that, the corridor continues west to a dead-end, and leads north to another room of treasure guarded by dragons. When both areas have been explored and looted, head south. The hallways in the next intersection lead to two more treasure rooms: the west passage leads to dragons; the east passage leads only to a single chest which contains the Perfect Bow. This is the item neeed to complete quest 48.
The corridor continues south and takes you back to the entrance area.
Inside the entrance, there is a locked door directly ahead and three rooms filled with bookcases. If you talk to the wizard behind the desk in the right room, you can buy membership to the library which lets you get spell scrolls off the bookcases. Through the door in the right room is where you will find Thomas Grey.
Looking behind the desk in the right room reveals a lever that opens the door to the main area of the school. Down this hallway, head left. The first room on the left is a bedroom. There is a button by the southwest bed that opens a secret room to the south containing a chest of items.
Back out in the hallway, continue north through a study room and head up the spiral stairs. In the next room, pull the four levers on the south side of the room. This will seal you in this room, but open the tunnel to the north. In that room, there is a chest containing Clanker's Amulet and two levers that re-open the stairways so you can leave this area.
Head down the stairs to the east and enter the next study room. The bookcase on the south wall has the Scroll of Waves that is needed to break to the cipher as part of quest 64. Exiting to the south, there is another room on the east side containing the last wizards.
In the first room, there is a dwarf statue and an ore cart. All of the ore carts in these mines act like chests -- they can have items inside them. The statue here can be revived by using the Elixer that you got from the dwarf king when he gave you quest 14. Just click on the statue while carrying the elixer and the dwarf will join your party as an NPC.
From this starting room, take the west exit. It leads to a room where the passage forks. There is another dwarf statue in this room. The west exit from this room quickly leads to a dead end. The north exit leads to another fork, both of which end rather quickly, although the north fork ends with another dwarf statue.
Returning to the entrance room, take the east exit. It goes mostly straight, with almost no branching, but leads only to an ore vein and a journal entry scroll.
Back in the starting room, take the northeast exit. When you get to the fork, go north. It quickly ends, but there is a dwarf statue at the end of the passage. Continuing east, the passage will end in a water-filled room with a dwarf statue in the pool.
Returning once more to the starting room, head north, and turn east at your first opportunity. When the passage next forks, the east fork will dead end and the north fork will lead to a room with a dwarf statue. Returning to the main passage heading north, you will arrive at the lift that leads to the lower level. In this room is the last dwarf statue. Returning to the king with all seven dwarves will complete the quest.
Taking the lift down, you will be in a room with several medusas. Clean out this room and the neighboring room to the west and then head deeper in to the mine to the east.
All throughout the lower level of the mines are black Stone to Flesh potions to help against the medusa's stoning ability. In the east room, the two exits to the north connect in a loop. At the top end of that loop, a tunnel leads to a room with some more medusas. The empress medusa in this room always has the Medusa's Mirror.
Heading further east, clear out the side passage to the north and continue east to a room with an overturned minecar. The south exit from the room quickly dead-ends. The east exit continues to a room containing the lift mechanism against the north wall. If you have the broken belt, you can click on the mechanism to use it and complete quest 23.
If you are here to see Gavin Mangus, you can enter safely by going straight north all of the way, then turning left and entering the door on the right.
The room you start out in is a large room with three arches set in the middle of the room and three pillars with locks on them.
Go through the east archway. After it teleports you, head towards the building, through the shimmering doorways and take the elevator down. Run down this tunnel until you reach a room that has pools of water in the center. To the left and right are four fonts (total), each with a button mounted on their rim. Push all four buttons to fill the fonts and the east-most pool will now be empty. Jump into the hole formed and there will be a chest in the room at the bottom of that pool that contains the East Pillar Key. Exit this room via the ramp that leads to a secret door and head back up the elevator and through the archway.
Go through the center archway. Go down the spiral ramp from the center pillar and when you have reached the ground head to the small raised platform in the southwest corner. When you step on it, the platform will raise you up to a small room. In this room is a chest that contains the Center Pillar Key. Return to the archway.
Go through the west archway. Run through the room and up the stairs to the left or right. At the end of the corridor in both directions is a set of three buttons and a lever. When the buttons are in the right combination, you can pull the lever to reveal a recessed area of the floor in the main room. The combination is different each time (there are only eight possibilities) and it is also random whether the set on the left side or on the right side is the one you need to set. Fortunately, you can try all of the combinations while paused in turn-based combat mode. There is a chest in the recessed floor that contains the West Pillar Key.
Back in the main room with the arches, go to the three pillars. You should be able to use the three keys to unlock the three pillars. (The click zones seem to be very small -- it works best if you run up to each pillar and pause the game while you try to get the key to work.) When all three pillars are unlocked, the wall behind the pillars opens.
There is a chest in the new area that contains four empty soul jars, which are needed to complete quest 63. Exiting the Halls through the door on the far side of the room completes quest 39 (assuming you haven't killed any creatures).
The room in the front door is completely empty. Go to the northeast corner of the room and open the secret wall that is there. Follow the corridor around and down the stairs to the real entrance to the temple. Through this entrance is a large room with pools on the left and right.
There are two exits on the south, one of the west and one on the east, that both lead to another room with a pool that overlooks the main entrance. The east room also has another stairway up that leads to a ledge which overlooks the two pools room.
Return to the pool room. Behind the west pool is a scroll that talks about a vision of "the sun setting in the west, the moon setting in the north, and the stars falling in the east." Note this and continue out the north exit. (The door opens automatically as you get close.)
Head down the stairs and continue north. The room directly ahead is the main altar room for the Temple of Light. The stairs to the east and west lead up to a ledge surrounding that room. Go up the stairs. Along the ledge there is a small device that has squares showing icons of the sun, moon, and stars, each of which could be slid down into a wooden holder. Follow the instructions on the scroll and lower the sun icon on the west device, the moon on the north device, and the stars on the east device. Then jump down and click on the altar. This will open a door to the north. That room has a chest containing the Altar Piece needed for quest 40 or quest 62.
Return to the ledge around the altar room and head down the corridor that exits to the northwest. It goes to a room with a pool, chest, and random items. Return and exit the altar room to the northeast. It leads to a room divided by a small channel of water. It is possible to walk down the channel of water downstream (to the north) to another room containing treasure.
You can also walk along the channel south (upstream). When it branches, take the east branch, crossing over a room that you entered through, leading to another room of treasure. Return to the branch and continue south. It will cross over the room overlooking the two pools room and then end in a room that connects to the ledge overlooking the main entrance area.
In the main room, Robert the Wise is waiting for you. On his corpse is a blaster and the control cube that you need to complete quest 75.
In the northeast area of the room is a corridor that leads to several balconys that overlook this room and a chest filled with random treasure.
There isn't much to the Hall -- it is basically a tunnel that leads from the surface of Deyja to The Pit. The entrance area leads to a door, behind which is an elevator that will take you deeper underground. The next room has a chasm spanned by a bridge. Across the bridge is a teleporter.
The teleporter takes you to another hall. At the end of the hall is a chest. If you are on quest 44, the Season's Stole will be in the chest. The door at the end of the room takes you to The Pit, but will only be open once you have selected an arbiter.
You can only get into this area when on quest 51.
Kill the guards in the main room and take the elevator up to the top of the tower. At the top, William Setag (a Master of the Sword) will be there fighting some rats. On his corpse is a Tower Key that can be used to open the north room. This will free Alice Hargreaves; a requirement for completing quest 51.
The south room contains another Master of the Sword. On his corpse is the Villian's Blade. Across the hall from the south room is a secret wall that reveals a chest filled with treasure.
Head through the entryway to the elevator down. Head down this corridor as well, passing by the "backdoor" entrance to the Watchtower, and take the elevator up.
You will be on a central pillar, overlooking a large room with four side rooms in each cardinal direction. There are necromancers attacking you from below, lichs attacking you from the four alcoves, and shades flying around. If you have Grandmaster Water magic, its probably easiest to jump down off the ledge, use the central pillar for cover while dealing with the shades and necromancers, picking off the liches from a distance from cover, and Town Portaling home when you get too hurt.
From the floor area, the north wall has a secret wall that leads to a long corridor that takes you back to the bottom of the lift.
At the top of the elevator, there are two switches. The north switch lowers the elevator again. The south switch toggles one of the walkways (seemingly at random) that lead between the central pillar and the four side areas.
The north, east, and west side rooms merely contain a chest of treasure. The south side area also has a lever in the southwest of the room that raises and lowers the counterweight. This the weight that you need to lower to complete quest 52.
If you are here to see the current king, you can enter safely by going straight across the bridge, turning left, following the hall to a boat, getting in and clicking on the rudder twice, then taking the stairs down. (You only need to use the rudder once to get out.)
Otherwise...
From the front door, turn to the right and head up the stairway to the top of the lookout tower. When all of the guards here have been killed, go down the tower and cross over to the other tower. When both towers are cleared of hostiles, return to the entrance, cross the bridge, and into the next large room.
From this room, head north. It leads to a room with a weird looking fountain in the middle. On the north and south walls are narrow passages with stairs that lead up to a ledge above this room. To the north and south from the top ledges are side rooms with treasure in them. At the end of the north room is the tapestry that you need to complete quest 74.
To the east is a steep ramp down to a room with a chest. This chest contains the Soul Jars needed for quest 42. Continuing down the corridor takes you to a bridge over a lava river, and to a ramp down into a room with a dock. Both this room and the previous room are connected. The first room contains a chest in the lava that contains some good items.
When the room is cleared, get in the boat and click on the rudder to sail it to the next location. From these docks, you can head down a ramp to the throne room. The throne room is locked if you're assaulting the castle. Return to the boat and click on the rudder again.
In this location, clear off the hostiles and exit the boat down the corridor. It leads back to the entrance room. Exit the castle to the south.
Go down the first corridor to reach a bridge over a chasm. There is nothing on the other side of the bridge, so jump over the edge to the waiting Behemoths. Head down the tunnel until you reach a room with a pool. The south exit from this room leads back to the start of the tunnels.
Across, on the west side of the room, is a secret door. The floor just past the door is trapped with a Shrapmetal spell. Turn south and then south at the next fork. Wind through the corridor to reach a room. There is a button in this room that reveals an alcove in the room at the north end of the twisty passage. Head towards that room -- a button there opens an (empty) alcove in the south room. The spellbook of Divine Intervention that is needed for quest 47 will be in this chest.
Return to the trapped corridor and head north. Your progress north in the next room will be blocked by three tall pillars. Head out the southeast exit and follow that corridor to a room with three buttons. These buttons control the pillars. Push them all, return to the room with the pillars and head north.
The next room has a chasm. You can create a brige across the span by drinking from the fonts in the east and west of the room. Push the button on the wall across the bridge, then jump over the edge. If you head west, you will follow a corridor that eventually leads back to the trapped hallway. Heading east takes you to the exit to the Zone, but the exit will be blocked by a wall if the button is not pushed. Using this exit completes quest 59.
Directly in from the front door is the altar area. A small button on the bottom of the back of the altar will cause the altar to slide forward revealing a chest that contains the Dark Altar Piece; one of the two pieces needed for quest 40 and quest 62.
The corridor to the east leads to another chapel room. The south exit leads to several balconys that overlook the main entrance room. The north end of the room has two exits. To the east is a bedroom. The entire south wall of the bedroom is fake, hiding two chests.
The west exit leads to a hallway loop. Heading north at the first opportunity, the hallway passes by a barracks area on your right and curves around to a library to the south. Directly opposite the library entrance is a secret door in the wall that reveals an area with three chests. The hallway continues around past a workshop area and reconnects back with where you were. Continue west to another chapel whose southern exit connects back with the main temple area.
On your way out, jump into the fountain. It is an illusionary pool hiding a tunnel. The tunnel leads to four rooms containing vampries and items. The wall at the end of the tunnel is also a secret wall, but it will dead-end after going through another door (to your left) and going down a steep stairway.
In the main room, Toberti is waiting for you. On his corpse is a blaster and the control cube that you need to complete quest 55.
In the northeast area of the room is a corridor that leads to several balconys that overlook this room and a chest filled with random treasure.
From the front door, turn right and head through the door and up the stairs. At the top of the stairs, turn to the south and go to the end of the ledge. The wall is a secret door that hides a chest. The chest contains the Eagle Statuette. This statuette needs to be placed on the altar in Tatalia as part of completing quest 24.
Go down the other ledge and through the door. The floor will give way and you will fall into a jail cell. There is a secret brick opposite the door that contains a telekinesis scroll which you can use to flip the lever in the other room to open the jail door.
Go through the door opposite the jail door and continue west into a bedroom. The cabinets in this room contain some good treasure. Now head through the door to the north into another bedroom. The bookcase on the east wall hides a small side room. Push the button on the desk in this room. This disables the pit trap that you fell into earlier. Then head out the secret door to the south, past the jail, through the door which leads back to the room you started in.
Head up the stairs again and through the door. This time the floor will not fall away and you can gain access to the library. The west bookcase is a secret wall. Behind it is a desk that contains several very high level spellbooks.
Return to the entrance and go through the northern door. This is a chapel. One of the Priests of Dark in this room has the Moon Cloak. The altar at the head of the chapel is the altar that you need to purify to complete quest 43.
In the opening room, head through the door to the left. In that room is a chest that contains the Knight statue. This statuette needs to be placed on the altar in Avlee as part of completing quest 24. Explore the room to the right as well, but that chest merely contains random treasure.
Heading through the door to the north, the next room is a large square room with an altar in the middle. This is the altar that you need to deface in order to complete quest 65. Next, head up the stairs to the south, just west of the hallway you came in. They lead to the ledge above this room. In the northeast section of the ledge is a door that leads to a room of treasure. Another door to the south here leads to more treasure. Across the hall from the last door is a secret door in the wall. This passage leads down a spiral stairway to a hidden treasure room.
Returning to the altar room, head out the north exit. At the beginning of the corridor is a fireball trap. The hall leads to a chapel of monks and priests of the sun. One of the priests in this room has the Sun Cloak on her body.
To the north of the altar in this room is a secret door. The next door can only be opened by pushing in all six buttons on the side walls, and then pushing in the button in the middle of the room. The revealed room contains some chests of treasure.
In the first tunnel, take the passage to the right. It leads down to a fork. To the east is a bridge over a volcano core. Ignore that for now and head west, then south at the first chance. In a side passage to the north is a lava filled area, with a few items guarded by eyes on the far side of the lava. The corridor you're in turns back to the north and intersects at a four-way crossing. Continuing straight ahead will take you back to the entrance. Heading west will take you to an exit to Mount Nighon at location 36.
Going east will take you back to the bridge. Cross over it this time. When the narrow tunnel joins a large tunnel, follow the large tunnel south to a pair of rooms of minotaurs, and a dead-end. Return north and continue east. Going all the way east will take you to an exit to Mount Nighon at location 1.
Shortly before the exit, there is a tunnel to the north. It will open into a large area. Go east and keep going east at the next fork. This is a narrow passage that will lead down, past a room of warlocks, to an exit to Mount Nighon at location 27.
Return back up the passage and continue straight west. The cavern will eventually end. To the north is a tunnel that leads to the Tunnels to Eeofel. To the south, the tunnel leads back to where you first entered these large tunnels. Head west at that point. At the next fork, the north and west tunnels form a loop. The south tunnel crosses over the volcano core again and enters a contrusted room.
To the east is a library of books. At the back of the library is a chest that contains a case of Soul Jars, needed for quest 61 (if you are on that quest). To the south is a pool filled with lava and another library room further south. There are four bedrooms off the lava room with cabinets of treasure. In the small hallway between the entrance room and the pool room, the west wall has a secret door that leads to a large room of treasure.
To the north of the entrance room is an elevator that goes up. The corridor at the top of the lift leads to an exit to Mount Nighon at location 20.
You are in a maze of twistly little passages, all alike.
Start by heading through the left door and taking a right at the first "T" intersection you reach. This passage will twist and turn and eventually end. Return to the intersection continue, heading south at the next major branch.
As you head south, the passage will go around a tall pillar in the middle of a room. The nearest side of that pillar has a secret wall that hides a chest of treasure. As you continue south, you will reach the entrance room again. Turn back to the north and continue past the passage that you arrived here from earlier.
Continue as far north as possible, by-passing a major side passage to the east. When the passage ends in another "T" intersection, the left and right passages just form a loop. Go around the loop, and get the chest in the dead-end passage in the middle of the loop, then exit the loop continuing north. To the east, the corridor leads to a chest. To the west, it leads to a few items.
Return to the east passage that you skipped earlier and procede down it. The corridor will lead to a large room, divided by a bridge-covered stream. Before proceding further into the room, head to the north-south corridor just to your east and empty out the room at the north end of that passage.
Cross the stream and head into the tunnel to the north. Take the east fork. This tunnel leads to the balcony that some of the warlocks were attacking you from. Return to the main tunnel and empty out the north room. The chest in this room contains the Angel Statue. This statue needs to be placed on the altar in the Bracada Desert as part of completing quest 24.
Continue down the tunnel to the east, taking the south side passage to the other balcony, and cleaning out the room to the north. Eventually the passage leads to a large room with Hydra and Minotaurs. The chest in this room contians Haldor's Remains, which you need to complete quest 31.
From this room, head through several doors and rooms southwards. You will be back out in the maze area again, heading south. Take the first west passage, then south, then turn to the north. This passage will take you to a altar room area, with several valuable items scattered around. The fountains along the side of the room will inflict a random malady on the drinker about 30 minutes after drinking from them.
From this altar room, heading mostly south should bring you back to the entrance area.
Heading down the starting corridor, enter the side passage to the west. The room has a pool and five side coridors leading out of it, each filled with medusae and behemoths. When the area is secure, return to the main corridor and continue north.
The tunnel continues for a considerable distance without any real branches, eventually arriving a room with a stone formation in the center. Quickly explore the east and southeast rooms (which are usually empty) and then head out the north tunnel. It will turn around until it is going south when it enters a large room with two exits. Head east.
At the next fork, the north tunnel leads back to the room with the stone formation. The south and west tunnels lead to rooms of monsters and items. When they are cleared, return and continue east.
Turn north at the first new tunnel and follow that to a set of rooms with behemoths and more treasure. This tunnel ends here, so return south and go east, following the tunnel until the next fork. Continue west to a pier-like walkway surrounded by water. Jump in the water and head north. It will lead to a passage that connects back up at the previous room. Head out on the pier again and jump in the water. This time, go south.
At the end of the tunnel, cast Jump to get out of the water, and head south along the tunnel to another recessed tunnel. That tunnel leads to a raised walkway dividing the room into an east and west halves. Continue all of the way along the walkway until it goes back into a tunnel. It will curve around, leading back to the top of the last ledge you jumped down. Jump down again, head to the raised walkway, and jump off the west side. A tunnel west leads back to the top of the ledge again.
Return to the walkway once more and jump off the east side. A tunnel on this side, leading north leads to an exit to the Land of the Giants. When you first exit, you will be given a blaster by Archibald Ironfist.
Simple cave. There is one tunnel that goes into the mountain with no forks through four caverns. In the last cavern are two dragon eggs and a chest of treasure. The dragon eggs are needed for quest 71.
Just two rooms in this cave. There is a chest in the back room. The Mega-Dragon has the artifact Hermes on his corpse.
Follow the entrance tube to the first split. Take the right tube. It leads to a room with a chest that contains a blaster. Return down the tube the other direction and follow it all of the way to a room. Through the room is an elevator that will take you up to a prison area. Push the four buttons in the first room of the prison area to unlock all of the cells.
The two cells on the right each contain a chest with a blaster in them. The last cell on the left has a raised area in the back. There is a small square on the right edge of the raised area that will lift you up to that level. From the upper level, you have access to the cage. In the cage is Roland Ironfist. He will give you a Colony Zod key, and resucing him will open the tube to the center of the colony.
Exit the prison area by heading back down the lift. On the left is the new tunnel that was opened. Follow it down to a room. The north side of the room has a lift to take you up one level. On this level, the buttons in the rooms on the east and west need to be pushed in order to open the door to the lift in the south room. The room in the west also contains a chest with a blaster.
The lift leads up to a door that is locked -- you need the Colony Zod key to open it. Inside are lots of devils, including Xenofex, whom you need to kill to complete quest 56 and quest 76. The chest in the room contains another blaster.
The first thing you have to do is restore power to the ship or most of the doors won't function. From the bay that you entered from, head southeast and east down the corridor to a lift that leads to the engineering core. The power can be restored by clicking on the southern console by the core. There is also a lift on the east side of the room to the upper level of engineering.
Return back to the main cargo bay and enter the small room to the east. There are four consoles there, each of which will raise a storage bay. The third bay has a chest in it containing three blaster rifles. Head out the south of the bay and push the button against the wall. You will rise up into a cargo moving room. The chest in this room contains another blaster rifle. The northeast corner of the room is a raised area that will teleport you to another cargo room. Go there and return, then head out the door to the south.
That corridor leads to a large central room. Once the droids in this room are cleared, start exploring the exits on this level in counter-clockwise order. The next exit south is a lift that is at the upper level of this room. The door after this is a small conference room. The only exit on the east side of the large room leads to a hallway.
If you follow the hallway north, you will arrive in the cargo moving room that you teleported into earlier. Head south down the corridor exploring the side rooms. All of them are bedrooms except the second door on the left. It is a lift that goes up to the upper level of the main room, and also has another lift that takes you up to a prison area. The small room on the left as you enter the prison area has three buttons that unlock the doors to this area. All of the cells are sealed with an invisible force field and are empty. Return back down the lift and exit onto the second floor of the large room.
Head south to a small storeroom on the east wall at the south end of the room. The chest here contains more blasters and blaster rifles. Cross over to the west side of this room. The northern west exit is the lift back to the first floor. The southern west exit leads to a weapons storeroom.
Exit the large room to the south. Those doors lead to the main bridge. Off the east is a small conference room. In the middle of the upper level of the bridge is a console with a black starfield in it. This console contains the Oscilation Overthuster that you need to complete quest 57 and quest 77. Once removed, the walls will start sparking electricity continuously. It is easiest to exit by Town Portaling back.
All of the quests that appear in the game. If the quest text doesn't contain the entire where of the solution, then more detail is printed here. For the most part, the solution to the quests is listed in the location description for where the quest should be solved.
Where skills can be learned: (Note that the table may miss some locations near the end of the game, as the game doesn't offer to teach you skills you already know.)
| Skill | Business | Location | Cost |
|---|---|---|---|
| Axe | Weapon Store | Stone City | 300 |
| Emerald Island | 475 | ||
| Erathia | 500 | ||
| Celeste | 1000 | ||
| The Pit | 1000 | ||
| Blaster | Robert the Wise | Celeste | Quest 55 |
| Tolberti | The Pit | Quest 75 | |
| Bow | Weapon Store | Emerald Island | 475 |
| Tularean Forest | 500 | ||
| Avlee | 750 | ||
| Celeste | 1000 | ||
| The Pit | 1000 | ||
| Dagger | Weapon Store | Harmondale | 450 |
| Castle Harmondale | 500 | ||
| Erathia | 500 | ||
| Mount Nighon | 712 | ||
| Celeste | 1000 | ||
| The Pit | 1000 | ||
| Mace | Weapon Store | Stone City | 300 |
| Harmondale | 450 | ||
| Spear | Weapon Store | Tularean Forest | 500 |
| Avlee | 750 | ||
| Staff | Weapon Store | Emerald Island | 475 |
| Mount Nighon | 712 | ||
| Celeste | 1000 | ||
| The Pit | 1000 | ||
| Sword | Weapon Store | Harmondale | 450 |
| Emerald Island | 475 | ||
| Castle Harmondale | 500 | ||
| Erathia | 500 | ||
| Celeste | 1000 | ||
| The Pit | 1000 | ||
| Unarmed | Temple | Harmondale | 450 |
| Stone City | 450 | ||
| Emerald Island | 475 | ||
| Castle Harmondale | 500 | ||
| Avlee | 750 | ||
| Bracada Desert | 750 | ||
| Deyja | 750 | ||
| Erathia | 750 | ||
| Tatalia | 750 | ||
| Tularean Forest | 750 | ||
| Celeste | 1000 | ||
| The Pit | 1000 | ||
| Mount Nighon | 1187 | ||
| Leather | Armory | Harmondale | 450 |
| Emerald Island | 475 | ||
| Castle Harmondale | 500 | ||
| Erathia | 500 | ||
| Tularean Forest | 500 | ||
| Mount Nighon | 712 | ||
| Avlee | 750 | ||
| Tatalia | 750 | ||
| Celeste | 1000 | ||
| The Pit | 1000 | ||
| Chain | Armory | Stone City | 300 |
| Harmondale | 450 | ||
| Castle Harmondale | 500 | ||
| Erathia | 500 | ||
| Tularean Forest | 500 | ||
| Avlee | 750 | ||
| Tatalia | 750 | ||
| Celeste | 1000 | ||
| The Pit | 1000 | ||
| Plate | Armory | Stone City | 300 |
| Erathia | 500 | ||
| Avlee | 750 | ||
| Celeste | 1000 | ||
| The Pit | 1000 | ||
| Shield | Armory | Harmondale | 450 |
| Emerald Island | 475 | ||
| Tatalia | 750 | ||
| Celeste | 1000 | ||
| The Pit | 1000 | ||
| Dodge | Temple | Harmondale | 450 |
| Stone City | 450 | ||
| Emerald Island | 475 | ||
| Castle Harmondale | 500 | ||
| Avlee | 750 | ||
| Bracada Desert | 750 | ||
| Deyja | 750 | ||
| Erathia | 750 | ||
| Tatalia | 750 | ||
| Tularean Forest | 750 | ||
| Celeste | 1000 | ||
| The Pit | 1000 | ||
| Mount Nighon | 1187 | ||
| Air | Initiate Guild of Air | Emerald Island | 950 |
| Adept Guild of Air | Harmondale | 1350 | |
| Master Guild of Air | Tularean Forest | 2000 | |
| Paramount Guild of Air | Celeste | 2500 | |
| Earth | Initiate Guild of Earth | Harmondale | 900 |
| Master Guild of Earth | Stone City | 1200 | |
| Adept Guild of Earth | Tularean Forest | 1500 | |
| Paramount Guild of Earth | The Pit | 2500 | |
| Fire | Initiate Guild of Fire | Emerald Island | 950 |
| Adept Guild of Fire | Harmondale | 1350 | |
| Master Guild of Fire | Tularean Forest | 2000 | |
| Paramount Guild of Fire | Mount Nighon | 2375 | |
| Water | Initiate Guild of Water | Harmondale | 900 |
| Adept Guild of Water | Tularean Forest | 1500 | |
| Master Guild of Water | Bracada Desert | 2000 | |
| Paramount Guild of Water | Evenmorn Island | 2500 | |
| Body | Initiate Guild of Body | Emerald Island | 950 |
| Adept Guild of Body | Harmondale | 1350 | |
| Master Guild of Body | Erathia | 2000 | |
| Paramount Guild of Body | Avlee | 2500 | |
| Mind | Initiate Guild of Mind | Harmondale | 900 |
| Adept Guild of Mind | Erathia | 1500 | |
| Master Guild of Mind | Tatalia | 2000 | |
| Paramount Guild of Mind | Avlee | 2500 | |
| Spirit | Initiate Guild of Spirit | Emerald Island | 950 |
| Adept Guild of Spirit | Harmondale | 1350 | |
| Master Guild of Spirit | Dejya | 2000 | |
| Paramount Guild of Spirit | Erathia | 2500 | |
| Light | Guild of Illumination | Bracada Desert | 2000 |
| Guild of Enlightenment | Celeste | 2500 | |
| Dark | Guild of Twilight | Deyja | 2000 |
| Guild of Night | The Pit | 2500 | |
| Alchemy | Alchemist | Stone City | 300 |
| Harmondale | 450 | ||
| Emerald Island | 475 | ||
| Castle Harmondale | 500 | ||
| Erathia | 500 | ||
| Tularean Forest | 500 | ||
| Bracada Desert | 750 | ||
| Deyja | 750 | ||
| Celeste | 1000 | ||
| The Pit | 1000 | ||
| Armsmaster | Training Hall | Harmondale | 450 |
| Stone City | 450 | ||
| Emerald Island | 475 | ||
| Erathia | 500 | ||
| Tularean Forest | 500 | ||
| Celeste | 750 | ||
| The Pit | 750 | ||
| Avlee | 1000 | ||
| Tatalia | 1000 | ||
| Mount Nighon | 1187 | ||
| Body Building | Training Hall | Harmondale | 450 |
| Stone City | 450 | ||
| Emerald Island | 475 | ||
| Erathia | 500 | ||
| Tularean Forest | 500 | ||
| Celeste | 750 | ||
| The Pit | 750 | ||
| Avlee | 1000 | ||
| Tatalia | 1000 | ||
| Mount Nighon | 1187 | ||
| Disarm Traps | Inn | Harmondale | 450 |
| Stone City | 450 | ||
| Emerald Island | 475 | ||
| Barrow Downs | 500 | ||
| Bracada Desert | 500 | ||
| Deyja | 500 | ||
| Erathia | 500 | ||
| Evenmorn Island | 500 | ||
| Tularean Forest | 500 | ||
| Avlee | 750 | ||
| Celeste | 750 | ||
| Tatalia | 750 | ||
| The Pit | 750 | ||
| Mount Nighon | 950 | ||
| ID Item | Magic Store | Harmondale | 450 |
| Stone City | 450 | ||
| Emerald Island | 475 | ||
| Erathia | 500 | ||
| Tularean Forest | 500 | ||
| Mount Nighon | 712 | ||
| Bracada Desert | 750 | ||
| Deyja | 750 | ||
| Celeste | 1000 | ||
| The Pit | 750 | ||
| ID Monster | Alchemist | Stone City | 300 |
| Harmondale | 450 | ||
| Emerald Island | 475 | ||
| Castle Harmondale | 500 | ||
| Erathia | 500 | ||
| Tularean Forest | 500 | ||
| Bracada Desert | 750 | ||
| Deyja | 750 | ||
| Celeste | 1000 | ||
| The Pit | 750 | ||
| Learning | Initiate Guild of Earth | Harmondale | 900 |
| Initiate Guild of Water | Harmondale | 900 | |
| Initiate Guild of Air | Emerald Island | 950 | |
| Initiate Guild of Fire | Emerald Island | 950 | |
| Master Guild of Earth | Stone City | 1200 | |
| Adept Guild of Air | Harmondale | 1350 | |
| Adept Guild of Fire | Harmondale | 1350 | |
| Adept Guild of Earth | Tularean Forest | 1500 | |
| Adept Guild of Water | Tularean Forest | 1500 | |
| Master Guild of Air | Tularean Forest | 2000 | |
| Master Guild of Fire | Tularean Forest | 2000 | |
| Master Guild of Water | Bracada Desert | 2000 | |
| Paramount Guild of Fire | Mount Nighon | 2375 | |
| Paramount Guild of Air | Celeste | 2500 | |
| Paramount Guild of Earth | The Pit | 2500 | |
| Paramount Guild of Water | Evenmorn Island | 2500 | |
| Meditation | Initiate Guild of Mind | Harmondale | 900 |
| Initiate Guild of Body | Emerald Island | 950 | |
| Initiate Guild of Spirit | Emerald Island | 950 | |
| Adept Guild of Body | Harmondale | 1350 | |
| Adept Guild of Spirit | Harmondale | 1350 | |
| Adept Guild of Mind | Erathia | 1500 | |
| Master Guild of Body | Erathia | 2000 | |
| Master Guild of Mind | Tatalia | 2000 | |
| Master Guild of Spirit | Deyja | 2000 | |
| Paramount Guild of Body | Avlee | 2500 | |
| Paramount Guild of Mind | Avlee | 2500 | |
| Paramount Guild of Spirit | Erathia | 2500 | |
| Merchant | Temple | Harmondale | 450 |
| Stone City | 450 | ||
| Emerald Island | 475 | ||
| Castle Harmondale | 500 | ||
| Avlee | 750 | ||
| Bracada Desert | 750 | ||
| Deyja | 750 | ||
| Erathia | 750 | ||
| Tatalia | 750 | ||
| Tularean Forest | 750 | ||
| Celeste | 1000 | ||
| The Pit | 1000 | ||
| Mount Nighon | 1187 | ||
| Perception | Inn | Harmondale | 450 |
| Stone City | 450 | ||
| Emerald Island | 475 | ||
| Barrow Downs | 500 | ||
| Bracada Desert | 500 | ||
| Deyja | 500 | ||
| Erathia | 500 | ||
| Evenmorn Island | 500 | ||
| Tularean Forest | 500 | ||
| Avlee | 750 | ||
| Celeste | 750 | ||
| Tatalia | 750 | ||
| The Pit | 750 | ||
| Mount Nighon | 950 | ||
| Repair Item | Magic Store | Harmondale | 450 |
| Stone City | 450 | ||
| Emerald Island | 475 | ||
| Erathia | 500 | ||
| Tularean Forest | 500 | ||
| Mount Nighon | 712 | ||
| Bracada Desert | 750 | ||
| Deyja | 750 | ||
| Celeste | 1000 | ||
| The Pit | 1000 | ||
| Stealing | Inn | Harmondale | 450 |
| Stone City | 450 | ||
| Emerald Island | 475 | ||
| Barrow Downs | 500 | ||
| Bracada Desert | 500 | ||
| Deyja | 500 | ||
| Erathia | 500 | ||
| Evenmorn Island | 500 | ||
| Tularean Forest | 500 | ||
| Avlee | 750 | ||
| Celeste | 750 | ||
| Tatalia | 750 | ||
| The Pit | 750 | ||
| Mount Nighon | 950 |
To become an Expert in the skill, you need to have at least rank 4 in that skill. To become a Master in the skill, you must be an Expert and be rank 7. To become a grandmaster, you must be a Master and be rank 10. Sometimes additional requirements also apply.
| Skill | Expert Trainer (Location) | Fee (gp) | Master Trainer (Location) | Fee (gp) | Grandmaster Trainer (Location) | Fee (gp) |
|---|---|---|---|---|---|---|
| Axe | Turgen Woodsplitter (Harmondale) | 2000 | Dalin Keenedge (Stone City) | 5000 | Karn Stonecleaver (Tatalia) | 8000 |
| Wort Goblinreaver (Avlee) | 2000 | |||||
| Blaster | Resurectra (Castle Lambent) | 0 | ||||
| Kastore (Castle Gloaming) | 0 | |||||
| Bow | Wil Rudyman (Bracada Desert) | 2000 | Lanshee Ravensight (Mount Nighon) | 5000 | Cardrick the Steady (Harmondale) | 8000 |
| Jaycin Suretraail (Tularean Forest) | 2000 | |||||
| Dagger | Smiling Jack (Bracada Desert) | 2000 | Aznog Slasher (Mount Nighon) | 5000 | William Lasker (Erathian Sewers) | 8000 |
| Mortie Ottin (Tularean Forest) | 2000 | Tonken Fist (Tatalia) | 8000 | |||
| Mace | Aldrin Tamloc (Stone City) | 2000 | Brother Rothham (Tatalia) | 5000 | Patwin Felburn (Deyja) | 8000 |
| Norbert Harvest (Erathia) | 2000 | |||||
| Spear | Karin Greydown (Tatalia) | 2000 | Claderin Silverpoint (Tularean Forest) | 5000 | Seline Falconeye (Stone City) | 8000 |
| Cassandra Holden (Avlee) | 2000 | |||||
| Staff | Tom Withersmythe (Harmondale) | 2000 | Elsie Penderton (Bracada Desert) | 5000 | Jillian Mithrit (Avlee) | 8000 |
| Garic Hawthorne (Mount Nighon) | 2000 | |||||
| Sword | Payge Ravenhill (Erathia) | 2000 | Tugar Slicer (Deyja) | 5000 | Chadrick Townsaver (Harmondale) | 8000 |
| Flynn Arin (Tatalia) | 2000 | |||||
| Unarmed | Kira Steeleye (Harmondale) | 2000 | Ulbrecht the Brawler (Evenmorn Island) | 5000 | Norris (Erathia) | 8000 10 Dodge |
| Puddle Stone (Bracada Desert) | 2000 | |||||
| Leather | Douglass Iverson (Harmondale) | 1000 | Rabida Nedlon (Mount Nighon) | 3000 | Miyon the Quick (Tularean Forest) | 7000 |
| Mikel Deerhunter (Avlee) | 1000 | |||||
| Chain | Tricia Steelcoif (Tatalia) | 1000 | Medwari Dragontracker (Avlee) | 3000 | Halian Nevermore (Deyja) | 7000 |
| Gilad Bith (Tularean Forest) | 1000 | |||||
| Plate | Critias Burnkindle (Stone City) | 1000 | Dekian Forgewright (Erathia) | 3000 | Brand the Maker (Bracada Desert) | 7000 |
| Weldik Lotts (Tatalia) | 1000 | |||||
| Shield | Randel Wolverton (Erathia) | 1000 | Isram Gallowswell (Tatalia) | 3000 | Fedwin Smithson (Evenmorn Island) | 7000 |
| Dodge | Sheldon Mist (Harmondale) | 2000 | Oberic Crane (Evenmorn Island) | 5000 | Kenneth Wain (Erathia) | 8000 10 Unarmed |
| Spyder (Bracada Desert) | 2000 | |||||
| Air | Kyra Stormeye (Tatalia) | 1000 | Rislyn Greenstorm (Avlee) | 4000 | Gayle (Bracada Desert) | 8000 |
| Sethrik Windsong (Tularean Forest) | 1000 | |||||
| Earth | Johanson Kern (Harmondale) | 1000 | Lara Stonewright (Tularean Forest) | 4000 | Avalanche (Deyja) | 8000 |
| Jasper Welman (Stone City) | 1000 | |||||
| Fire | Lisha Redding (Tatalia) | 1000 | Ashen Temper (Harmondale) | 4000 | Blayze (Erathia) | 8000 |
| Kindle Treasurestone (Tularean Forest) | 1000 | |||||
| Water | Karla Ravenhair (Avlee) | 1000 | Tobern Rainshield (Mount Nighon) | 4000 | Torrent (Harmondale) | 8000 |
| Herald Whitecap (Tularean Forest) | 1000 | |||||
| Body | Straton Hillsman (Harmondale) | 1000 | Brother Bombah (Tatalia) | 4000 | Tempus (Avlee) | 8000 |
| Tristen Hearthswarm (Erathia) | 1000 | |||||
| Mind | Julian the Delver (Erathia) | 1000 | Myles Featherwind (Avlee) | 4000 | Xavier Bremen (Tatalia) | 8000 |
| Helga Whitesky (Mount Nighon) | 1000 | |||||
| Spirit | Bertram Stillwater (Harmondale) | 1000 | Heather Dreamwright (Erathia) | 4000 | Benjamin the Balanced (Tularean Forest) | 8000 |
| Solomon Riverstone (Tatalia) | 1000 | |||||
| Light | Ethan Lightsworn (Bracada Desert) | 2000 | Helena Morningstar (Celeste) | 5000 | Gavin Mangus (Castle Lambent) | 8000 |
| Dark | Jasp the Nightcrawler (Deyja) | 2000 | Seth Darkenmore (The Pit) | 5000 | Archibald Ironfist (Castle Gloaming) | 8000 |
| Kastore (Castle Gloaming) | 8000 | |||||
| Alchemy | Bryce Watershed (Bracada Desert) | 500 | Elzbert Witherspoon (Mount Nighon) | 2500 | Lucid Apple (Avlee) | 6000 |
| Edgar Willowbark (Tularean Forest) | 500 | |||||
| Armsmaster | Trent Steele (Tatalia) | 2000 | Paula Brightspear (Avlee) | 5000 | Lasiter the Slayer (Land of the Giants) | 8000 |
| Edgar Botham (Deyja) | 2000 | |||||
| Body Building | Trip Thorinson (Stone City) | 500 | Wanda Foestryke (Deyja) | 2500 50 Endr | Evandor Thomas (Mount Nighon) | 6000 50 Endr |
| Kelli Hollyfield (Bracada Desert) | 500 | |||||
| Disarm Trap | William Lasker (Erathian Sewers) | 500 | Lenord Skinner (Harmondale) | 2500 | Silk Quicktongue (Mount Nighon) | 6000 |
| Taran the Lifter (Tatalia) | 500 | |||||
| Gretchin Fiddlebown (Tularean Forest) | 500 | |||||
| ID Item | Fenton Krewlen (Harmondale) | 500 | Samuel Benson (Bracada Desert) | 2500 | Payge Blueswan (Tularean Forest) | 6000 |
| Hollis the True (Mount Nighon) | 500 | |||||
| ID Monster | Alton Black (Tularean Forest) | 500 | Jeni Swiftfoot (Avlee) | 2500 | Raven the Hunter (Harmondale) | 6000 |
| Christie Nosewirt (Mount Nighon) | 500 | |||||
| Learning | Isaac Applebee (Bracada Desert) | 2000 | Dorothy Senjac (Mount Nighon) | 5000 50 Int | William Smithson (Evenmorn Island) | 8000 50 Int |
| Agatha Putnam (Deyja) | 2000 | |||||
| Meditation | Barbara Wiseman (Deyja) | 500 | Tessa Greensward (Bracada Desert) | 2500 | Kaine (Avlee) | 6000 |
| Stuart Whitesky (Mount Nighon | 500 | |||||
| Merchant | Jobber Thain (Stone City) | 2000 | Bethold Caverhill (Evenmorn Island) | 5000 50 Per | Brigham the Frugal (Bracada Desert) | 8000 |
| Matric Weatherson (Tularean Forest) | 2000 | |||||
| Perception | Gregory Weider (Harmondale) | 500 | Garet Dotes (Tularean Forest) | 2500 | Petra Cleareye (Deyja) | 6000 |
| Kethric Otterton (Avlee) | 500 | |||||
| Repair Item | Shane Thomas (Harmondale) | 500 | Thomas More (Tatalia) | 2500 | Gareth the Fixer (Erathia) | 6000 |
| Balan Gizmo (Stone City) | 500 | |||||
| Stealing | William Lasker (Erathian Sewers) | 500 | Leane Shadowrunner (Deyja) | 2500 | Everil Nightwalker (Tatalia) | 6000 |
| Peryn Lightfingers (Harmondale) | 500 | |||||
| Elmo the Pincher (Mount Nighon) | 500 | |||||
This table is just a cross-reference to make it easier to find out who and where the various promotion quests are being offered.
| Class | Basic Promotion (Location) | Quest | Good Promotion (Location) | Quest | Evil Promotion (Location) | Quest |
|---|---|---|---|---|---|---|
| Archer | Stegal Snick (Avlee) | 23 | Lawrence Mark (Harmondale) | 48 | Stegal Snick (Avlee) | 70 |
| Cleric | Deadalus Falk (Deyja) | 30 | Rebecca Devine (Celeste) | 43 | Daedalus Falk (Deyja) | 65 |
| Druid | Anthony Green (Tularean Forest) | 28 | Anthony Green (Tularean Forest) | 50 | Tor Anwyn (Mount Nighon) | 71 |
| Knight | Frederick Org (Erathia) | 16 | Leda Rowan (Bracada Desert) | 45 | Frederick Org (Erathia) | 68 |
| Monk | Bartholemew Hume (Harmondale) | 13 | Bartholemew Hume (Harmondale) | 49 | Stephen Sand (The Pit) | 64 |
| Paladin | Sir Charles Quixote (Erathia) | 17 | Sir Charles Quixote (Erathia) | 51 | William Setag (Deyja) | 67 |
| Ranger | Ebednezer Sower (Tularean Forest) | 26 | Lysander Sweet (Bracada Desert) | 46 | Ebednezer Sower (Tularean Forest) | 69 |
| Sorcerer | Thomas Grey (School of Sorcery) | 24 | Thomas Grey (School of Sorcery) | 47 | Hafgild Wynac (The Pit) | 63 |
| Thief | William Lasker (Erathian Sewers) | 20 | William Lasker (Erathian Sewers) | 52 | Seknit Undershadow (Deyja) | 66 |
The Arbiter will give you advice as to what you should do next in the game. These hints are listed below.
Good Path
Evil Path
This is a list of all of the messages that you find on the Obelisks. Note that they spell out their message when you read vertically down the column.
pohuwwba
ininhil_
redditoh
a_eetcoa
ts_rehmu
eut__i_n
srhtfnut
_vehlgpe
fi_eo_od
ivg_whn_
veoseo_l
e_laru_a
__dn_r_n
___d___d
When read vertically, they reveal the following message:
The flower can be found in Evenmorn Island in the circle of stones and appears only from midnight to 1am.
There are six different individuals scattered around the game that offer to buy and sell commodities. Here is a list of where each one of them is located and how much they will pay.
| Commodity | Seller | Location | Cost | Buyer | Location | Cost |
|---|---|---|---|---|---|---|
| Tularean Wood | Robert Bellknop | Tularean Forest | 200 | Rydric | Harmondale | 237 |
| Arrowheads | Rydric | Harmondale | 200 | Pip Hillier | Erathia | 286 |
| Griffin Feathers | Pip Hillier | Erathia | 200 | Robert Bellknop | Tularean Forest | 244 |
| Enrothian Wine | Infernon | Avlee | 2000 | Calindra Goldensight | Tatalia | 3000 |
| Sand | Calindra Goldensight | Tatalia | 2000 | Arvin Beneclowd | Barrow Downs | 3000 |
| Glass Bottles | Arvin Beneclowd | Barrow Downs | 2000 | Infernon | Avlee | 3000 |
All of the items in the game are listed here, along with their base stats and value. The value determines the buy and sell price, although this is adjusted by the store's "markup" value, and your Merchant skill.
Items are sorted by the skill that you need to use them with; weapons (Ancient, Axe, Bow, etc); armor (leather, chain, plate, sheields); then all miscellaneous equipable items, and then all other items.
Enchantments on an item add the value of the enchantment to the item. If there is an "X" in the effect of an enchantment, then the value is "per X". Eg, an item "of Charm" has a listed value of 100. Its effect is "+X to Personality", so the value increases by 100gp per point of Personality that it adds.
|
| ||||||||||||||||||||||||||||||||||||||||||||||||||||||||||||||||||||||||||||||||||||||||||||||||||||||||||||||||||||||||||||||||||||||||||||||||||||||||||||||||||||||||||||||||||||||||||||||||||||||||||||||||||||||||||||||||||||||||||||||||||||||||||||||||||||||||||||||||||||||||||||||||||||||||||||||||||||||||||||||||||||||||||||||||||||||||||||||||||||||||||||||||||||||||||||||||||||||||||||||||||||||||||||||||||||||||||||||||||||||||||||||||||||||||||||||||||||||||||||||||||||||||||||||||||||||||||||||||||||||||||||||||||||||||||||||||||||||||||||||||||||||||||||||||||||||||||||||||||||||||||||||||||||||||||||||||||||||||||||||||||||||||||||||||||||||||||||||||||||||||||||||||||||||||||||||||||||||||||||||||||||||||||||||||||||||||||||||||||||||||||||||||||||||||||||||||||||||||||||||||||||||||||||||||||||||||||||||||||||||||||||||||||||||||||||||||||||||||||||||||||||||||||||||||||||||||
Restrictions on who can use certain artifacts are listed in bold in the Abilities column.
| Artifact Name | Item Type | Damg/AC | Value | Abilities |
|---|---|---|---|---|
| Amuck | Poleaxe | 3d7+11 | 30000 | Might +100, Endurance +100, Armor Class -15 |
| Ania Selving | Bow | 4d2+9 | 30000 | Accuracy +150, Bow skill +5, Armor Class -25 |
| Charele | Spear | 3d9+18 | 20000 | |
| Cloak of the Sheep | Cloak | 10 | 15000 | Immunity to disease, insanity, paralysis, poison, sleep, and petrification, Intellect -20, Personality -20 |
| Corsair | Cutlass | 2d4+13 | 20000 | Stealing skill +5, Disarm skill +5, Luck +40 |
| Elfbane | 2H Sword | 4d6+12 | 15000 | Goblin, of Shielding, Elf Slayer |
| Elven Chainmail | Chain Mail | 30 | 15000 | Elven, of Recovery, Speed +15, Accuracy +15 |
| Ethric's Staff | Staff | 2d4+9 | 30000 | Evil, of Dark Magic, Meditation skill +15, Negative Regeneration |
| Faerie Ring | Ring | 2500 | Of Air Magic | |
| Forge Gauntlets | Gauntlets | 10 | 15000 | Dwarven, Fire Resistance +30, Might +15, Endurance +15 |
| Ghost Ring | Ring | 2500 | Of Spirit Magic | |
| Ghoulsbane | Spear | 1d9+15 | 20000 | Undead slaying, Immunity to paralysis, 3-8 points fire damage |
| Gibbet | Halbard | 3d6+12 | 20000 | Undead slaying, Dragon slaying, Demon slaying |
| Glory Shield | Shield | 24 | 30000 | of Spirit Magic, Shield skill +5, Body Resistance -10, Mind Resistance -10 |
| Grognar's Cutlass | Cutlass | 3d4+6 | Elf Slaying | |
| Governor's Armor | Chain Mail | 36 | 20000 | Half damage from missiles, +10 to all statistics |
| Hands of the Master | Gauntlets | 12 | 20000 | Unarmed skill +10, Dodge skill +10 |
| Hareck's Leather | Leather | 30 | 30000 | Stealing skill +5, Disarm skill +5, Water Walking, Luck +50, All Resistances -10 |
| Hermes' Sandals | Boots | 20 | 15000 | Speed +100, Accuracy +50, Air Resistance +50, Regenerate HP, Regenerate SP, Feather Falling |
| Hero's Belt | Belt | 15000 | Male, Armsmaster skill +5, Might +15, Regenerate HP | |
| Iron Feather | 2H Sword | 4d5+10 | 20000 | Might +40, 6-15 points electrical damage |
| Justice | Mace | 2d4+14 | 30000 | Good, Undead Slaying, of Mind Magic, of Body Magic, Speed -40 |
| Kelebrium | Shield | 20 | 30000 | Immunity to petrification, Half damage from missiles, Endurance +50, Earth Resistance -30 |
| Lady Carmine's Dagger | Dagger | 2d2+4 | 1500 | 5 points of body damage, +2 Disarm |
| Lady's Escort | Ring | 15000 | Female, Water Walking, Feather Falling, of Protection | |
| Lieutenant's Cutlass | Cutlass | 3d5+10 | 1500 | 10-20 points of fire damage, +25 Might |
| Mash | Club | 30000 | 1d3+15 | Might +150, Intellect -40, Personality -40, Speed -40 |
| Medusa's Mirror | Amulet | 5000 | Immunity to petrification | |
| Mekorig's Hammer | Hammer | 2d5+13 | 30000 | of Spirit Magic, Might +75, Air Resistance -50 |
| Mind's Eye | Helm | 10 | 15000 | Human, Intellect +15, Personality +15, Regenerate SP |
| Mintoaur's Axe | Axe | 4d3+12 | 2500 | +25 Might |
| Moon Cloak | Cloak | 11 | 2500 | Of Dark Magic |
| Old Nick | Dagger | 2d2+8 | 30000 | Evil, Disarm skill +5, 8 points of poison damage, Elf Slaying |
| The Perfect Bow | Bow | 5d2+12 | 4000 | |
| Phynaxian Crown | Hat | 30000 | of Fire Magic, Water Resistance +50, Personality +30, Armor Class -20 | |
| Puck | Longsword | 3d3+14 | 20000 | Speed +40, Swift |
| Ruler's Ring | Ring | 20000 | of Mind Magic, of Dark Magic | |
| Scholar's Cap | Helm | 2 | 30000 | Learning Skill +15, Endurance -50 |
| Seven League Boots | Boots | 15 | 20000 | Speed +40, of Water Magic |
| Shadow's Mask | Helm | 12 | 2000 | +3 Stealing and Disarm |
| Splitter | Axe | 4d2+11 | 20000 | Explosive impact, Fire Resistance +50 |
| Sun Cloak | Cloak | 11 | 2500 | Of Light Magic |
| Taledon's Helm | Helm | 14 | 30000 | Good, of Light Magic, Personality +15, Might +15, Luck -40 |
| Titan's Belt | Belt | 30000 | Might +75, Speed -40 | |
| Twilight | Cloak | 13 | 30000 | Evil, Speed +50, Luck 50, All Resistances -15 |
| Ullyses | Bow | 5d2+10 | 20000 | Accuracy +50, 9-12 points water damage |
| Vampire's Cape | Cloak | 9 | 2500 | +10 Intellect and Luck |
| Villain's Blade | Sword | 3d4+12 | 2000 | Vampiric |
| Wallace | Broadsword | 3d4+12 | 20000 | Armsmaster skill +10, Personality +40 |
| Yoruba | Plate Armor | 60 | 20000 | Immunity to disease, insanity, paralysis, poison, sleep, and pertification |
| Zorkarr's Axe | Poleaxe | 3d7+13 | 2500 | Of Earth Magic |
Potions in Might and Magic VI are created by mixing two herbs or existing potions together. While the simpler potions are very weak, and mostly useless in the game except at the very beginning; the more potent potions are well worth mixing.
| Potion | Color | Effect | Ingredients | |
|---|---|---|---|---|
| Catalyst | Grey | Mix to add 1 to potion power. | Mushroom | Empty Bottle |
| Catalyst | Grey | Mix to add 5 to potion power. | Obsidian | Empty Bottle |
| Catalyst | Grey | Mix to add 10 to potion power. | Vial of Ooze Endoplasm | Empty Bottle |
| Catalyst | Grey | Mix to add 20 to potion power. | Mercury | Empty Bottle |
| Catalyst | Grey | Mix to add 75 to potion power. | Philosopher's Stone | Empty Bottle |
| Cure Weakness | Yellow | Cure Weakness (Power 1). | Poppysnaps | Empty Bottle |
| Cure Weakness | Yellow | Cure Weakness (Power 5). | Fae Dust | Empty Bottle |
| Cure Weakness | Yellow | Cure Weakness (Power 10). | Sulfur | Empty Bottle |
| Cure Weakness | Yellow | Cure Weakness (Power 20). | Garnet | Empty Bottle |
| Cure Weakness | Yellow | Cure Weakness (Power 50). | Vial of Devil Ichor | Empty Bottle |
| Cure Wounds | Red | Heal 11 HP (Power 1). | Widoweeps Berries | Empty Bottle |
| Cure Woulds | Red | Heal 16 HP (Power 5). | Crushed Rose Petals | Empty Bottle |
| Cure Woulds | Red | Heal 20 HP (Power 10). | Vial of Troll Blood | Empty Bottle |
| Cure Woulds | Red | Heal 30 HP (Power 20). | Ruby | Empty Bottle |
| Cure Woulds | Red | Heal 60 HP (Power 50). | Dragon's Eye | Empty Bottle |
| Magic Potion | Blue | Restores 11 SP (Power 1). | Phirna Root | Empty Bottle |
| Magic Potion | Blue | Restores 16 SP (Power 5). | Meteorite Fragment | Empty Bottle |
| Magic Potion | Blue | Restores 20 SP (Power 10). | Harpy Feather | Empty Bottle |
| Magic Potion | Blue | Restores 30 SP (Power 20). | Moonstone | Empty Bottle |
| Magic Potion | Blue | Restores 60 SP (Power 50). | Elvish Toadstool | Empty Bottle |
| Awaken | Green | Cures Sleep. | Yellow | Blue |
| Cure Disease | Orange | Cures Disease. | Red | Yellow |
| Cure Poison | Purple | Cures Poison. | Red | Blue |
| Bless | Red/Green | Bless (as the spell) for 30*power minutes. | Red | Green |
| Cure Insanity | Orange/Green | Cures insanity. | Orange | Green |
| Harden Item | Yellow/Green | Makes an item much harder to break. | Yellow | Green |
| Haste | Red/Orange | Haste (as the spell) for 30*power minutes. | Red | Orange |
| Heroism | Red/Purple | Heroism (as the spell) for 30*power minutes. | Red | Purple |
| Preservation | Blue/Orange | Perservation (as the spell) for 30*power minutes. | Orange | Blue |
| Recharge Item | Blue/Green | Recharges an item. Item loses 70-power% of its charges permanently. | Green | Blue |
| Remove Curse | Purple/Green | Removes a curse. | Green | Purple |
| Remove Fear | Orange/Purple | Cures fear. | Orange | Purple |
| Shield | Blue/Purple | Shield (as the spell) for 30*power minutes. | Blue | Purple |
| Stoneskin | Yellow/Orange | Stoneskin (as the spell) for 30*power minutes. | Orange | Yellow |
| Water Breathing | Yellow/Purple | Prevents all drowning damage for 30*power minutes. | Yellow | Purple |
| Accuracy Boost | White | Adds 3*power to accuracy for 30*power minutes. | Orange | Orange/Yellow |
| Air Resistance | White | Adds 3*power to air resistance for 30*power minutes. | Red/Orange | Blue/Purple |
| Body Resistance | White | Adds 3*power to body resistance for 30*power minutes. | Orange/Yellow | Green/Blue |
| Cure Paralysis | White | Cures paralysis. | Orange | Yellow/Green |
| Green | Orange/Yellow | |||
| Divine Cure | White | Heals 5*power HP | Red/Orange | Orange/Yellow |
| Divine Power | White | Restores 5*power SP | Yellow/Green | Green/Blue |
| Divine Restoration | White | Cures all conditions except death, stone, and erradication. | Red/Orange | Green/Blue |
| Red/Purple | Yellow/Green | |||
| Blue/Purple | Orange/Yellow | |||
| Earth Resistance | White | Adds 3*power to earth resistance for 30*power minutes. | Red/Purple | Orange/Yellow |
| Endurance Boost | White | Adds 3*power to endurance for 30*power minutes. | Purple | Blue/Purple |
| Fire Resistance | White | Adds 3*power to fire resistance for 30*power minutes. | Red/Orange | Yellow/Green |
| Flaming Potion | White | Adds "of flame" to a nonmagic weapon for 30*power minutes. | Green | Red/Orange |
| Purple | Orange/Yellow | |||
| Freezing Potion | White | Adds "of frost" to a nonmagic weapon for 30*power minutes. | Orange | Blue/Purple |
| Green | Red/Purple | |||
| Intellect Boost | White | Adds 3*power to intellect for 30*power minutes. | Green | Yellow/Green |
| Luck Boost | White | Adds 3*power to luck for 30*power minutes. | Red/Purple | Blue/Purple |
| Might Boost | White | Adds 3*power to might for 30*power minutes. | Purple | Red/Purple |
| Mind Resistance | White | Adds 3*power to mind resistance for 30*power minutes. | Red/Purple | Green/Blue |
| Noxious Potion | White | Adds "of poison" to a nonmagic weapon for 30*power minutes. | Orange | Green/Blue |
| Purple | Yellow/Green | |||
| Personality Boost | White | Adds 3*power to personality for 30*power minutes. | Green | Green/Blue |
| Speed Boost | White | Adds 3*power to speed for 30*power minutes. | Orange | Red/Orange |
| Shocking Potion | White | Adds "of sparks" to a nonmagic weapon for 30*power minutes. | Orange | Red/Purple |
| Purple | Red/Orange | |||
| Swift Potion | White | Adds "of quickness" to a nonmagic weapon for 30*power minutes. | Green | Blue/Purple |
| Purple | Green/Blue | |||
| Water Resistance | White | Adds 3*power to water resistance for 30*power minutes. | Yellow/Green | Blue/Purple |
| Pure Accuracy | Black | Once only, adds 50 to accuracy permanently. | Green | Accuracy Boost |
| Pure Endurance | Black | Once only, adds 50 to endurance permanently. | Green | Endurance Boost |
| Pure Intellect | Black | Once only, adds 50 to intellect permanently. | Orange | Intellect Boost |
| Pure Luck | Black | Once only, adds 50 to luck permanently. | Orange/Yellow | Swift Potion |
| Pure Might | Black | Once only, adds 50 to might permanently. | Orange | Might Boost |
| Pure Personality | Black | Once only, adds 50 to personality permanently. | Purple | Personality Boost |
| Pure Speed | Black | Once only, adds 50 to speed permanently. | Purple | Speed Boost |
| Rejuvenation | Black | Cures all magical aging. | Red/Green | Divine Restoration |
| Orange/Blue | Divine Restoration | |||
| Yellow/Purple | Divine Restoration | |||
| Slaying Potion | Black | Adds "of dragon slaying" to a nonmagic weapon permanently. | Blue/Purple | Flaming Potion |
| Stone to Flesh | Black | Cures petrification. | Red/Purple | Cure Paralysis |
This table of information about monsters was gleaned from an internal data structure in the game. Any extra abilities that an attack can have are listed in bold in the attacks column. The attacks are listed by the type of damage that they do: If a "-R" follows the attack type, it means that the attack is a ranged attack. For spells, if an "E" follows the skill level, it means that the spell is cast at Expert level of ability, "M" for Master, "G" for Grandmaster. "Imm" means "immune".
In the game, creatures always come in a set of about three types. This table is sorted by the "common name" of the group. When it is unclear what the common name is, I used the name of the weakest member of the group. Sometimes the abilities of a particular monster type will vary. That is why there are some duplicate entries in the table. Many "named" creatures are also just ordinary monster types with a special name.
| Resistances | |||||||||||||||
|---|---|---|---|---|---|---|---|---|---|---|---|---|---|---|---|
| Name | HP | AC | XP | Attacks | Spells | Fir | Air | Wat | Ear | Min | Spir | Bdy | Lt | Dk | Phy |
| Tempest | 73 | 10 | 0 | Air-R (3D6+0) | Sparks (4E) | 10 | Imm | 10 | 10 | Imm | Imm | Imm | 5 | 5 | 10 |
| Cyclone | 114 | 12 | 0 | Air-R (5D6+0) | Sparks (8M) Lightning Bolt (8M) | 15 | Imm | 15 | 15 | Imm | Imm | Imm | 5 | 5 | 15 |
| Air Elemental | 207 | 14 | 0 | Air-R (8D6+0) | Sparks (12G) Lightning Bolt (12G) | 20 | Imm | 20 | 20 | Imm | Imm | Imm | 5 | 5 | 20 |
| Angel | 180 | 25 | 1200 | Phys (2D8+10) | Light Bolt (8M) Dispel Magic (8M) | 20 | 20 | 20 | 20 | 30 | 15 | 30 | Imm | 10 | 20 |
| Angel Lord | 400 | 35 | 3000 | Phys (2D8+15) | Light Bolt (12M) Day of Protection (12M) | 30 | 30 | 30 | 30 | 40 | 15 | 40 | Imm | 10 | 20 |
| Archangel | 700 | 45 | 5600 | Phys (2D8+20) | Light Bolt (16G) Hour of Power (16G) | 40 | 40 | 40 | 40 | 50 | 15 | 50 | Imm | 10 | 20 |
| Archer | 35 | 14 | 171 | Phys-R (2D6+2) Fire (3D6+2) | Shield (4) | 5 | 5 | 5 | 5 | 10 | 10 | 10 | 0 | 0 | 5 |
| Archer | 93 | 16 | 551 | Phys-R (3D6+3) Fire (4D6+3) | Lightning Bolt (4E) Shield (8E) | 10 | 10 | 10 | 10 | 10 | 10 | 15 | 0 | 0 | 10 |
| Archer | 93 | 16 | 551 | Phys-R (3D6+3) Fire (4D6+3) | Lightning Bolt (4E) Shield (8E) | 10 | 10 | 10 | 10 | 15 | 10 | 15 | 0 | 0 | 10 |
| Bowman | 93 | 16 | 551 | Phys-R (3D6+3) Fire (4D6+3) | Lightning Bolt (4E) Shield (8E) | 10 | 10 | 10 | 10 | 10 | 10 | 15 | 0 | 0 | 10 |
| Bowman | 93 | 16 | 551 | Phys-R (3D6+3) Fire (4D6+3) | Lightning Bolt (4E) Shield (8E) | 10 | 10 | 10 | 10 | 15 | 10 | 15 | 0 | 0 | 10 |
| Elite Archer | 171 | 22 | 1131 | Phys-R (3D7+3) Fire (4D7+3) | Lightning Bolt (8M) Shield (12M) | 15 | 15 | 15 | 15 | 20 | 10 | 20 | 0 | 0 | 15 |
| Name | HP | AC | XP | Attacks | Spells | Fir | Air | Wat | Ear | Min | Spir | Bdy | Lt | Dk | Phy |
| Giant Bat | 9 | 5 | 39 | Phys (1D3+0) Disease | 0 | 0 | 0 | 0 | 0 | 0 | 0 | 0 | 0 | 0 | |
| Inferno Bat | 35 | 10 | 171 | Phys (2D3+2) Fire-R (3D2+0) Disease | 0 | 0 | 0 | 0 | 0 | 0 | 0 | 0 | 0 | 0 | |
| Vampire Bat | 21 | 8 | 96 | Phys (1D3+2) Disease | 0 | 0 | 0 | 0 | 0 | 0 | 0 | 0 | 0 | 0 | |
| Young Behemoth | 337 | 35 | 2475 | Phys (3D10+20) Break Armor | 30 | 30 | 30 | 30 | Imm | 0 | 30 | 15 | 15 | 20 | |
| Behemoth | 540 | 50 | 4200 | Phys (4D10+30) Break Armor | 40 | 40 | 40 | 40 | Imm | 0 | 40 | 15 | 15 | 25 | |
| Ancient Behemoth | 977 | 80 | 8075 | Phys (5D10+40) Break Armor | 50 | 50 | 50 | 50 | Imm | 0 | 50 | 15 | 15 | 30 | |
| Conscript | 61 | 18 | 336 | Phys (3D3+6) | 10 | 10 | 10 | 10 | 15 | 10 | 15 | 0 | 0 | 10 | |
| Soldier | 129 | 24 | 816 | Phys (3D3+10) | 20 | 20 | 20 | 20 | 25 | 10 | 25 | 0 | 0 | 20 | |
| Fighter | 227 | 30 | 1575 | Phys (3D3+14) Break Weapon | 30 | 30 | 30 | 30 | 35 | 10 | 35 | 0 | 0 | 30 | |
| Name | HP | AC | XP | Attacks | Spells | Fir | Air | Wat | Ear | Min | Spir | Bdy | Lt | Dk | Phy |
| Devil Worker | 180 | 25 | 1200 | Phys-R (2D6+8) Disease | Fireball (6E) | Imm | 20 | 20 | 20 | Imm | 25 | 20 | 20 | 20 | 20 |
| Devil Warrior | 400 | 35 | 3000 | Phys-R (2D6+14) Disease | Fireball (8E) Meteor Shower (8M) | Imm | 30 | 30 | 30 | Imm | 25 | 30 | 30 | 30 | 30 |
| Devil Captain | 700 | 45 | 5600 | Phys-R (2D6+20) Drain SP | Incinerate (12M) Meteor Shower (12M) | Imm | 40 | 40 | 40 | Imm | 25 | 40 | 40 | 40 | 40 |
| Djinni | 207 | 35 | 0 | Water-R (8D4+8) | Acid Burst (8M) | 30 | 30 | Imm | 30 | 50 | 0 | 50 | 10 | 10 | 30 |
| Genie | 325 | 45 | 0 | Fire-R (10D4+10) Sleep | Fireball (8M) | Imm | 30 | 30 | 30 | 50 | 0 | 50 | 10 | 10 | 30 |
| Efreet | 467 | 55 | 0 | Air-R (12D4+12) Fear | Lightning Bolt (0) | 50 | Imm | 50 | 50 | 50 | 0 | 50 | 10 | 10 | 50 |
| Green Dragon | 880 | 60 | 7200 | Air-R (12D8+0) | 50 | Imm | 50 | 50 | 50 | 15 | Imm | 30 | 30 | 50 | |
| Blue Dragon | 1080 | 80 | 9000 | Water-R (14D8+0) | 50 | 50 | Imm | 50 | 50 | 15 | Imm | 30 | 30 | 50 | |
| Red Dragon | 1300 | 100 | 11000 | Fire-R (16D8+0) Break Armor | 0 | 0 | 0 | 0 | 0 | 0 | 0 | 0 | 0 | 0 | |
| Red Dragon | 1300 | 100 | 11000 | Fire-R (16D8+0) Break Armor | Imm | 70 | 70 | 70 | 70 | 15 | Imm | 30 | 30 | 70 | |
| Mega Dragon | 1300 | 100 | 11000 | Fire-R (16D8+0) Break Armor | 0 | 0 | 0 | 0 | 0 | 0 | 0 | 0 | 0 | 0 | |
| Name | HP | AC | XP | Attacks | Spells | Fir | Air | Wat | Ear | Min | Spir | Bdy | Lt | Dk | Phy |
| Dragonfly | 6 | 4 | 24 | Phys (2D2+0) | 10 | 0 | 0 | 0 | 0 | 0 | 0 | 0 | 0 | 0 | |
| Fire Dragonfly | 13 | 8 | 56 | Phys (3D2+1) | Fire Bolt (2) | 20 | 0 | 0 | 0 | 0 | 0 | 0 | 0 | 0 | 0 |
| Queen Dragonfly | 30 | 12 | 144 | Phys (4D2+2) | Fire Bolt (4) | 30 | 0 | 0 | 0 | 0 | 0 | 0 | 0 | 0 | 0 |
| Seeker Droid | 400 | 60 | 3000 | Earth-R (10D5+10) | 30 | 10 | 10 | 30 | Imm | Imm | Imm | 25 | 25 | 20 | |
| Sentinel Droid | 700 | 80 | 5600 | Earth-R (12D5+15) | 40 | 20 | 20 | 40 | Imm | Imm | Imm | 25 | 25 | 30 | |
| Assassin Droid | 1080 | 100 | 9000 | Earth-R (20D5+20) | 60 | 30 | 30 | 60 | Imm | Imm | Imm | 25 | 25 | 50 | |
| Dwarven Soldier | 40 | 6 | 200 | Phys (4D2+4) | 10 | 20 | 20 | 30 | 30 | 0 | 10 | 0 | 0 | 30 | |
| Dwarven Soldier | 40 | 6 | 200 | Phys (4D2+4) | 10 | 20 | 20 | 30 | 5 | 0 | 10 | 0 | 0 | 30 | |
| Dwarven Lieutenant | 100 | 12 | 600 | Phys (4D2+8) | 20 | 30 | 30 | 40 | 30 | 0 | 20 | 0 | 0 | 40 | |
| Dwarven Lieutenant | 100 | 12 | 600 | Phys (4D2+8) | 20 | 30 | 30 | 40 | 40 | 0 | 20 | 0 | 0 | 40 | |
| Dwarven Lieutenant | 100 | 12 | 600 | Phys (4D2+8) | 20 | 30 | 30 | 40 | 5 | 0 | 20 | 0 | 0 | 40 | |
| Dwarven Commander | 180 | 20 | 1200 | Phys (4D2+16) Break Armor | 30 | 40 | 40 | 50 | 5 | 0 | 30 | 0 | 0 | 50 | |
| Dwarven Commander | 180 | 20 | 1200 | Phys (4D2+16) Break Armor | 30 | 40 | 40 | 50 | 40 | 0 | 30 | 0 | 0 | 50 | |
| Dwarven Commander | 180 | 20 | 1200 | Phys (4D2+16) Break Armor | 30 | 40 | 40 | 50 | 50 | 0 | 30 | 0 | 0 | 50 | |
| Name | HP | AC | XP | Attacks | Spells | Fir | Air | Wat | Ear | Min | Spir | Bdy | Lt | Dk | Phy |
| Clay Elemental | 137 | 20 | 875 | Phys-R (10D3+0) | Blades (6E) Stone Skin (4E) | 10 | 10 | 10 | Imm | Imm | Imm | Imm | 5 | 5 | 10 |
| Stone Elemental | 180 | 25 | 1200 | Phys-R (15D3+0) Break Armor | Rock Blast (8M) Stone Skin (8M) | 15 | 15 | 15 | Imm | Imm | Imm | Imm | 5 | 5 | 15 |
| Earth Elemental | 280 | 30 | 2000 | Phys-R (25D3+0) KO | Blades (12G) Stone Skin (12G) | 20 | 20 | 20 | Imm | Imm | Imm | Imm | 5 | 5 | 20 |
| Elven Archer | 45 | 12 | 231 | Phys-R (4D2+2) | 10 | 10 | 10 | 10 | 5 | 5 | 5 | 0 | 0 | 5 | |
| Elven Scout | 121 | 14 | 759 | Phys-R (6D2+4) | 15 | 15 | 15 | 15 | 10 | 5 | 10 | 0 | 0 | 10 | |
| Forester | 121 | 14 | 759 | Phys-R (6D2+4) | 15 | 15 | 15 | 15 | 10 | 5 | 10 | 0 | 0 | 10 | |
| Elven Ranger | 227 | 20 | 1575 | Phys-R (8D2+6) | 20 | 20 | 20 | 20 | 15 | 5 | 15 | 0 | 0 | 15 | |
| Elven Warrior | 61 | 15 | 336 | Phys (2D4+4) | 10 | 10 | 10 | 10 | 5 | 5 | 5 | 0 | 0 | 5 | |
| Defender | 114 | 20 | 704 | Phys (3D4+6) | 0 | 0 | 0 | 0 | 0 | 0 | 0 | 0 | 0 | 0 | |
| Elf Spearman | 114 | 20 | 704 | Phys (3D4+6) | 0 | 0 | 0 | 0 | 0 | 0 | 0 | 0 | 0 | 0 | |
| Elven Defender | 114 | 20 | 704 | Phys (3D4+6) | 15 | 15 | 15 | 15 | 10 | 5 | 10 | 0 | 0 | 10 | |
| Elven Lancer | 180 | 28 | 1200 | Phys (4D4+8) | 20 | 20 | 20 | 20 | 15 | 5 | 15 | 0 | 0 | 15 | |
| Name | HP | AC | XP | Attacks | Spells | Fir | Air | Wat | Ear | Min | Spir | Bdy | Lt | Dk | Phy |
| Floating Eye | 180 | 20 | 1200 | Water-R (5D6+0) Sleep | 30 | 30 | Imm | 30 | Imm | 15 | Imm | 10 | 15 | 30 | |
| Gazer | 280 | 30 | 2000 | Fire-R (6D6+0) Fear | Imm | 40 | 30 | 40 | Imm | 15 | Imm | 10 | 15 | 40 | |
| Evil Eye | 400 | 40 | 3000 | Air-R (7D6+0) Insanity | 40 | Imm | 40 | 50 | Imm | 15 | Imm | 10 | 15 | 50 | |
| Evil Eye | 800 | 50 | 5000 | Air-R (12D8+0) Insanity | 40 | Imm | 40 | 50 | 100 | 15 | Imm | 10 | 50 | 100 | |
| Warden of Fire | 55 | 12 | 0 | Fire-R (2D8+0) | Fire Bolt (6E) Haste (4E) | Imm | 10 | 10 | 10 | Imm | Imm | Imm | 5 | 5 | 10 |
| Guardian of Flame | 145 | 15 | 0 | Fire-R (5D8+0) | Fireball (8M) Haste (8M) | Imm | 15 | 15 | 15 | Imm | Imm | Imm | 5 | 5 | 15 |
| Fire Elemental | 269 | 18 | 0 | Fire-R (8D8+0) | Incinerate (12G) Haste (12G) | Imm | 20 | 20 | 20 | Imm | Imm | Imm | 5 | 5 | 20 |
| Stone Gargoyle | 73 | 18 | 416 | Phys (2D12+0) Weakness | 20 | 20 | 20 | 40 | Imm | Imm | Imm | 0 | 0 | 20 | |
| Marble Gargoyle | 114 | 22 | 704 | Phys (2D12+4) Paralyze | 30 | 30 | 30 | 50 | Imm | Imm | Imm | 0 | 0 | 40 | |
| Obsidian Gargoyle | 207 | 26 | 1419 | Phys (2D12+8) Paralyze | 50 | 50 | 50 | 70 | Imm | Imm | Imm | 0 | 0 | Imm | |
| Name | HP | AC | XP | Attacks | Spells | Fir | Air | Wat | Ear | Min | Spir | Bdy | Lt | Dk | Phy |
| Ghast | 35 | 8 | 171 | Phys (1D7+0) Disease | 0 | 0 | Imm | 0 | Imm | 0 | Imm | 0 | 30 | 0 | |
| Ghoul | 55 | 14 | 299 | Phys (2D7+2) Paralyze | 0 | 0 | Imm | 0 | Imm | 0 | Imm | 0 | 30 | 0 | |
| Revenant | 79 | 20 | 459 | Phys (3D7+4) Paralyze | 0 | 0 | Imm | 0 | Imm | 0 | Imm | 0 | 30 | 0 | |
| Goblin | 13 | 6 | 56 | Phys (1D9+0) Phys-R (4D2+0) | 0 | 0 | 0 | 0 | 0 | 0 | 0 | 0 | 0 | 0 | |
| Hobgoblin | 21 | 10 | 96 | Phys (1D9+2) Phys-R (4D2+1) | 0 | 0 | 0 | 0 | 0 | 0 | 0 | 0 | 0 | 0 | |
| Goblin Lord | 40 | 14 | 200 | Phys (1D9+4) Fire-R (4D2+4) | 10 | 10 | 10 | 10 | 10 | 0 | 10 | 0 | 0 | 10 | |
| Goblin Lord | 40 | 14 | 200 | Phys (1D9+4) Phys-R (4D2+4) | 10 | 10 | 10 | 10 | 10 | 0 | 10 | 0 | 0 | 10 | |
| Gogling | 25 | 6 | 119 | Fire-R (1D10+2) | Explodes | Imm | 10 | 10 | 10 | 10 | 5 | 10 | 0 | 0 | 10 |
| Gog | 45 | 10 | 231 | Fire-R (1D10+6) | Explodes | Imm | 15 | 15 | 15 | 15 | 5 | 15 | 0 | 0 | 15 |
| Magog | 86 | 14 | 504 | Fire-R (2D10+8) | Explodes | Imm | 20 | 20 | 20 | 20 | 5 | 20 | 0 | 0 | 20 |
| Name | HP | AC | XP | Attacks | Spells | Fir | Air | Wat | Ear | Min | Spir | Bdy | Lt | Dk | Phy |
| Bronze Golem | 114 | 40 | 704 | Phys (5D6+20) Phys-R (5D4+0) Break Armor | 20 | 20 | 20 | Imm | Imm | Imm | Imm | 30 | 0 | 30 | |
| Brass Golem | 227 | 60 | 1575 | Phys (7D6+25) Phys-R (5D4+4) Break Weapon | Explodes | 30 | 30 | 30 | Imm | Imm | Imm | Imm | 30 | 0 | 30 |
| Brass Golem | 227 | 60 | 1575 | Phys (7D6+25) Phys-R (5D4+4) Break Weapon | Explodes | 30 | 30 | 30 | Imm | 30 | Imm | Imm | 30 | 0 | 30 |
| Gold Golem | 400 | 80 | 3000 | Phys (9D6+30) Phys-R (5D4+8) Break Item | Explodes | 40 | 40 | 40 | Imm | Imm | Imm | Imm | 30 | 0 | 50 |
| Warrior Golem | 400 | 80 | 0 | Phys (9D6+30) Fire-R (5D4+8) Break Item | Explodes | 40 | 40 | 40 | Imm | 50 | Imm | Imm | 30 | 0 | 50 |
| Griffin | 67 | 15 | 375 | Phys (2D8+2) | 5 | 5 | 5 | 5 | 5 | 5 | 5 | 30 | 0 | 5 | |
| Hunting Griffin | 121 | 22 | 759 | Phys (2D8+6) | 5 | 5 | 5 | 5 | 5 | 5 | 5 | 30 | 0 | 10 | |
| Royal Griffin | 180 | 30 | 1200 | Phys (3D8+10) | 10 | 10 | 10 | 10 | 10 | 10 | 10 | 30 | 0 | 15 | |
| Royal Griffin | 180 | 30 | 1200 | Phys (3D8+10) | 10 | 10 | 10 | 10 | 15 | 10 | 10 | 30 | 0 | 15 | |
| Harpy | 61 | 12 | 336 | Phys (2D7+2) Drunk | 5 | 5 | 5 | 5 | 5 | 5 | 5 | 0 | 0 | 5 | |
| Harpy Hag | 79 | 14 | 459 | Phys (2D7+5) Cursed | 5 | 5 | 5 | 5 | 5 | 5 | 5 | 0 | 0 | 10 | |
| Harpy Queen | 93 | 16 | 551 | Phys (2D7+10) Age | 10 | 10 | 10 | 10 | 10 | 10 | 10 | 0 | 0 | 15 | |
| Name | HP | AC | XP | Attacks | Spells | Fir | Air | Wat | Ear | Min | Spir | Bdy | Lt | Dk | Phy |
| Fire Hydra | 337 | 22 | 2475 | Fire-R (15D5+0) | 20 | 20 | 20 | 20 | 10 | 10 | 10 | 5 | 5 | 20 | |
| Air Hydra | 467 | 44 | 3575 | Air-R (20D5+0) | 30 | 30 | 30 | 30 | 20 | 20 | 20 | 5 | 5 | 30 | |
| Chaos Hydra | 617 | 66 | 4875 | Earth-R (20D5+0) Break Armor | 40 | 40 | 40 | 40 | 30 | 30 | 30 | 5 | 5 | 40 | |
| Lich | 100 | 15 | 600 | Fire-R (3D8+6) | Toxic Cloud (4E) | 20 | 20 | 20 | 20 | Imm | 0 | Imm | 0 | 30 | 20 |
| Power Lich | 180 | 20 | 1200 | Air-R (4D8+12) | Shrapmetal (8M) | 25 | 25 | 25 | 25 | Imm | 0 | Imm | 0 | 30 | 25 |
| Lich King | 280 | 25 | 2000 | Dark-R (5D8+20) Insanity | Dragon Breath (12M) Pain Reflection (12M) | 30 | 30 | 30 | 30 | Imm | 0 | Imm | 0 | 30 | 30 |
| Lesser Light Elemental | 67 | 11 | 0 | Light-R (4D4+0) | Explodes | 10 | 10 | 10 | 10 | Imm | Imm | Imm | Imm | 5 | 10 |
| Light Elemental | 121 | 14 | 0 | Light-R (9D4+0) | Explodes | 15 | 15 | 15 | 15 | Imm | Imm | Imm | Imm | 5 | 15 |
| Greater Light Elemental | 258 | 19 | 0 | Light-R (14D4+0) | Explodes | 20 | 20 | 20 | 20 | Imm | Imm | Imm | Imm | 5 | 20 |
| Name | HP | AC | XP | Attacks | Spells | Fir | Air | Wat | Ear | Min | Spir | Bdy | Lt | Dk | Phy |
| Medusa | 227 | 20 | 1575 | Phys-R (4D4+8) Paralyze | Imm | Imm | Imm | Imm | Imm | Imm | Imm | Imm | Imm | 0 | |
| Queen Medusa | 280 | 25 | 2000 | Phys-R (5D4+10) Stone | Imm | Imm | Imm | Imm | Imm | Imm | Imm | Imm | Imm | 0 | |
| Empress Medusa | 337 | 30 | 2475 | Phys-R (6D4+12) Stone | Imm | Imm | Imm | Imm | 0 | Imm | Imm | Imm | Imm | 0 | |
| Empress Medusa | 337 | 30 | 2475 | Phys-R (6D4+12) Stone | Imm | Imm | Imm | Imm | Imm | Imm | Imm | Imm | Imm | 0 | |
| Minotaur | 269 | 30 | 1911 | Phys (3D7+25) | 10 | 10 | 10 | 10 | 10 | 5 | 10 | 5 | 5 | 10 | |
| Minotaur Headsman | 525 | 35 | 4071 | Phys (3D7+40) Insanity | 20 | 20 | 20 | 20 | 20 | 10 | 20 | 10 | 10 | 20 | |
| Minotaur Lord | 861 | 40 | 7031 | Phys (3D7+60) Kill | 30 | 30 | 30 | 30 | 30 | 15 | 30 | 15 | 15 | 30 | |
| Monk | 30 | 16 | 144 | Phys (2D8+4) | Fate (3) Hammerhands (3E) | 5 | 5 | 5 | 5 | 10 | 5 | 10 | 30 | 0 | 5 |
| Initiate | 73 | 19 | 416 | Phys (2D8+12) | Harm (6E) Hammerhands (6E) | 10 | 10 | 10 | 10 | 15 | 10 | 15 | 30 | 0 | 10 |
| Master | 153 | 28 | 999 | Phys (2D8+20) | Mind Blast (9E) Hammerhands (9E) | 15 | 15 | 15 | 15 | 25 | 15 | 25 | 30 | 0 | 15 |
| Name | HP | AC | XP | Attacks | Spells | Fir | Air | Wat | Ear | Min | Spir | Bdy | Lt | Dk | Phy |
| Acolyte of the Moon | 40 | 10 | 200 | Phys-R (2D4+0) | Toxic Cloud (4) | 5 | 5 | 5 | 5 | 5 | 0 | 5 | 0 | Imm | 10 |
| Cleric of the Moon | 100 | 15 | 600 | Phys-R (2D4+4) | Toxic Cloud (7E) Bless (7E) | 10 | 10 | 10 | 10 | 10 | 0 | 10 | 0 | Imm | 15 |
| Cleric of the Moon | 100 | 15 | 600 | Phys-R (2D4+4) | Toxic Cloud (7E) Spirit Lash (7E) | 10 | 10 | 10 | 10 | 10 | 0 | 10 | 0 | Imm | 15 |
| Priest of the Moon | 180 | 25 | 1200 | Phys-R (2D4+8) | Shrapmetal (10M) Power Cure (10G) | 15 | 15 | 15 | 15 | 15 | 0 | 15 | 0 | Imm | 20 |
| Necromancer | 137 | 14 | 875 | Dark-R (9D4+0) | Toxic Cloud (4E) Summon Zombies | 20 | 20 | 20 | 20 | 15 | 5 | 15 | 0 | Imm | 10 |
| Speaker for the Dead | 227 | 18 | 1575 | Dark-R (12D4+0) | Shrapmetal (8M) Summon Zombies | 30 | 30 | 30 | 30 | 20 | 10 | 20 | 0 | Imm | 20 |
| Queen of the Dead | 400 | 30 | 3000 | Dark-R (16D4+0) | Dragon Breath (10M) Pain Reflection (10M) Summon Zombies | 40 | 40 | 40 | 40 | 25 | 15 | 25 | 0 | Imm | 30 |
| Emerald Ooze | 50 | 8 | 264 | Water (1D6+0) Break Weapon | 0 | 0 | 0 | 0 | Imm | Imm | Imm | 0 | 0 | Imm | |
| Sapphire Ooze | 86 | 10 | 504 | Water (3D6+0) Break Armor | Toxic Cloud (1E) | 0 | 0 | 0 | 0 | Imm | Imm | Imm | 0 | 0 | Imm |
| Bloodstone Ooze | 137 | 12 | 875 | Water (5D6+0) Break Item | Toxic Cloud (2E) | 0 | 0 | 0 | 0 | Imm | Imm | Imm | 0 | 0 | Imm |
| Name | HP | AC | XP | Attacks | Spells | Fir | Air | Wat | Ear | Min | Spir | Bdy | Lt | Dk | Phy |
| Peasant | 3 | 3 | 11 | Phys (2D2+0) | 0 | 0 | 0 | 0 | 0 | 0 | 0 | 0 | 0 | 0 | |
| Peasant | 6 | 5 | 24 | Phys (2D2+0) | 0 | 0 | 0 | 0 | 0 | 0 | 0 | 0 | 0 | 0 | |
| Peasant | 9 | 6 | 39 | Phys (2D2+0) | 0 | 0 | 0 | 0 | 0 | 0 | 0 | 0 | 0 | 0 | |
| Giant Rat | 6 | 4 | 24 | Phys (1D8+0) Disease | 0 | 0 | 0 | 0 | 0 | 0 | 0 | 0 | 0 | 0 | |
| Lightning Rat | 13 | 5 | 56 | Phys (1D8+2) Air-R (2D4+0) Disease | 0 | 0 | 0 | 0 | 0 | 0 | 0 | 0 | 0 | 0 | |
| Fire Rat | 21 | 8 | 96 | Phys (1D8+6) Fire-R (2D5+0) Disease | 0 | 0 | 0 | 0 | 0 | 0 | 0 | 0 | 0 | 0 | |
| Robber | 30 | 12 | 144 | Phys (2D4+1) | 5 | 5 | 5 | 5 | 10 | 10 | 10 | 0 | 0 | 5 | |
| Raider | 61 | 14 | 336 | Phys (2D4+5) | 10 | 10 | 10 | 10 | 15 | 10 | 15 | 0 | 0 | 10 | |
| Warrior | 61 | 14 | 336 | Phys (2D4+5) | 10 | 10 | 10 | 10 | 10 | 10 | 15 | 0 | 0 | 10 | |
| Bandit | 114 | 16 | 704 | Phys (2D4+10) | 15 | 15 | 15 | 15 | 20 | 10 | 20 | 0 | 0 | 15 | |
| Name | HP | AC | XP | Attacks | Spells | Fir | Air | Wat | Ear | Min | Spir | Bdy | Lt | Dk | Phy |
| Robert the Wise | 880 | 80 | 7200 | Earth-R (5D5+0) Erradicate | Power Cure (15G) Hour of Power (15G) | 60 | 60 | 60 | 60 | Imm | 60 | 60 | Imm | Imm | 60 |
| Tolberti | 880 | 80 | 7200 | Earth-R (5D5+0) Erradicate | Power Cure (15G) Hour of Power (15G) | 60 | 60 | 60 | 60 | Imm | 60 | 60 | Imm | Imm | 60 |
| Roc | 153 | 20 | 999 | Phys (3D10+20) | 10 | 10 | 10 | 10 | 10 | 5 | 10 | 0 | 0 | 20 | |
| Greater Roc | 269 | 30 | 1911 | Phys (4D10+25) | 20 | 20 | 20 | 20 | 20 | 5 | 20 | 5 | 5 | 30 | |
| Thunderbird | 413 | 40 | 3111 | Phys (5D10+30) Break Armor | 30 | Imm | 30 | 30 | 30 | 5 | 30 | 10 | 10 | 40 | |
| Shade | 35 | 25 | 171 | Phys (1D6+6) Fear | 10 | 10 | Imm | 10 | Imm | 10 | Imm | 0 | 30 | 10 | |
| Specter | 55 | 30 | 299 | Phys (2D6+6) Age | 15 | 15 | Imm | 15 | Imm | 15 | Imm | 0 | 30 | 15 | |
| Ghost | 93 | 35 | 551 | Phys (3D6+6) KO | 20 | 20 | Imm | 20 | Imm | 20 | Imm | 0 | 30 | 20 | |
| Name | HP | AC | XP | Attacks | Spells | Fir | Air | Wat | Ear | Min | Spir | Bdy | Lt | Dk | Phy |
| Giant Shark | 162 | 30 | 1064 | Water-R (1D20+25) | 0 | 0 | Imm | 0 | 0 | 0 | 0 | 0 | 0 | 30 | |
| Piranha Shark | 237 | 35 | 1656 | Water-R (1D20+35) | 0 | 0 | Imm | 0 | 0 | 0 | 0 | 0 | 0 | 40 | |
| Dragon Shark | 374 | 40 | 2784 | Water-R (1D20+45) Fear | 0 | 0 | Imm | 0 | 0 | 0 | 0 | 0 | 0 | 50 | |
| Skeleton | 21 | 8 | 96 | Phys (3D4+0) | 0 | 0 | 0 | 0 | Imm | 0 | Imm | 0 | 30 | 5 | |
| Skeleton Lord | 61 | 14 | 336 | Phys (3D4+4) Cursed | 0 | 0 | 0 | 0 | Imm | 0 | Imm | 0 | 30 | 5 | |
| Skeleton Warrior | 40 | 10 | 200 | Phys (3D4+2) Fear | 0 | 0 | 0 | 0 | Imm | 0 | Imm | 0 | 30 | 5 | |
| Sorcerer | 137 | 14 | 875 | Light-R (9D4+0) | Dispel Magic (4E) Summon Light Elem. | 20 | 20 | 20 | 20 | 15 | 5 | 15 | Imm | 5 | 10 |
| Wizard | 227 | 18 | 1575 | Light-R (12D4+0) | Dispel Magic (8M) Hour of Power (8M) Summon Light Elem. | 30 | 30 | 30 | 30 | 20 | 10 | 20 | Imm | 5 | 20 |
| Wizard | 227 | 18 | 1575 | Light-R (12D4+0) | Paralyze (8M) Hour of Power (8M) Summon Light Elem. | 30 | 30 | 30 | 30 | 20 | 10 | 20 | Imm | 5 | 20 |
| Archmage | 400 | 30 | 3000 | Earth-R (16D4+0) | Hour of Power (12M) Day of Protection (12M) Summon Light Elem. | 40 | 40 | 40 | 40 | 25 | 15 | 25 | Imm | 5 | 30 |
| Name | HP | AC | XP | Attacks | Spells | Fir | Air | Wat | Ear | Min | Spir | Bdy | Lt | Dk | Phy |
| Giant Spider | 17 | 10 | 75 | Phys (3D2+0) Poison | 0 | 0 | 0 | 0 | 0 | 0 | 0 | 0 | 0 | 0 | |
| Venemous Spider | 30 | 12 | 144 | Phys (3D2+3) Poison | 0 | 0 | 0 | 0 | 0 | 0 | 0 | 0 | 0 | 0 | |
| Acolyte of the Sun | 40 | 10 | 200 | Phys-R (2D4+0) | Light Bolt (4) | 5 | 5 | 5 | 5 | 5 | 0 | 5 | Imm | 0 | 10 |
| Cleric of the Sun | 100 | 15 | 600 | Phys-R (2D4+4) | Mind Blast (7E) Bless (7E) | 10 | 10 | 10 | 10 | 10 | 0 | 10 | Imm | 0 | 15 |
| Priest of the Sun | 180 | 25 | 1200 | Phys-R (2D4+8) | Light Bolt (10) Power Cure (10G) | 15 | 15 | 15 | 15 | 15 | 0 | 15 | Imm | 0 | 20 |
| Priest of the Sun | 180 | 25 | 1200 | Phys-R (2D4+8) | Light Bolt (10) Power Cure (10G) | 15 | 15 | 15 | 15 | 20 | 0 | 15 | Imm | 0 | 20 |
| Initiate of the Sword | 280 | 45 | 2000 | Phys (4D5+20) | Bless (3) Heroism (3) | 20 | 20 | 20 | 20 | 30 | 10 | 30 | 5 | 5 | 20 |
| Champion of the Sword | 540 | 65 | 4200 | Phys (4D5+30) | Bless (6E) Heroism (6E) | 30 | 30 | 30 | 30 | 30 | 10 | 40 | 5 | 5 | 30 |
| Champion of the Sword | 540 | 65 | 4200 | Phys (4D5+30) | Bless (6E) Heroism (6E) | 30 | 30 | 30 | 30 | 40 | 10 | 40 | 5 | 5 | 30 |
| Master of the Sword | 880 | 85 | 7200 | Phys (4D5+40) | Bless (9M) Heroism (9M) | 50 | 50 | 50 | 50 | 50 | 10 | 60 | 5 | 5 | 50 |
| Master of the Sword | 880 | 85 | 7200 | Phys (4D5+40) | Bless (9M) Heroism (9M) | 50 | 50 | 50 | 50 | 60 | 10 | 60 | 5 | 5 | 50 |
| William Setag | 880 | 85 | 7200 | Phys (4D5+40) | Bless (9M) Heroism (9M) | 0 | 0 | 0 | 0 | 0 | 0 | 0 | 0 | 0 | 0 |
| Name | HP | AC | XP | Attacks | Spells | Fir | Air | Wat | Ear | Min | Spir | Bdy | Lt | Dk | Phy |
| Swordsman | 40 | 10 | 200 | Phys (3D7+4) | 0 | 0 | 0 | 0 | 0 | 0 | 0 | 0 | 0 | 0 | |
| Swordsman | 40 | 10 | 200 | Phys (3D7+4) | 5 | 5 | 5 | 5 | 5 | 5 | 5 | 0 | 0 | 5 | |
| Guard | 79 | 15 | 459 | Phys (3D7+6) | 0 | 0 | 0 | 0 | 0 | 0 | 0 | 0 | 0 | 0 | |
| Guard | 79 | 15 | 459 | Phys (3D7+6) | 10 | 10 | 10 | 10 | 10 | 5 | 10 | 0 | 0 | 10 | |
| Sal Sharktooth | 79 | 15 | 459 | Phys (3D7+6) | 10 | 10 | 10 | 10 | 10 | 5 | 10 | 0 | 0 | 10 | |
| Adventurer | 129 | 20 | 816 | Phys (3D7+8) Break Weapon | 0 | 0 | 0 | 0 | 0 | 0 | 0 | 0 | 0 | 0 | |
| Adventurer | 129 | 20 | 816 | Phys (3D7+8) Break Weapon | 15 | 15 | 15 | 15 | 15 | 5 | 15 | 0 | 0 | 15 | |
| Titan | 617 | 60 | 4875 | Air-R (2D20+60) Break Armor | Psychic Shock (8M) Sparks (8M) | 30 | Imm | 30 | 30 | Imm | 15 | 30 | 30 | 30 | 30 |
| Storm Titan | 787 | 70 | 6375 | Air-R (2D20+80) Break Weapon | Psychic Shock (12M) Sparks (12M) | 50 | Imm | 50 | 50 | Imm | 15 | 50 | 30 | 30 | 50 |
| Blood Titan | 1187 | 80 | 9975 | Air-R (2D20+120) Kill | Psychic Shock (16G) Sparks (16G) | 80 | Imm | 80 | 80 | Imm | 15 | 80 | 30 | 30 | 80 |
| Thief | 30 | 10 | 144 | Phys (3D4+3) Steal | 0 | 0 | 0 | 0 | 0 | 0 | 0 | 0 | 0 | 0 | |
| Rogue | 50 | 14 | 264 | Phys (3D4+6) Steal | 0 | 0 | 0 | 0 | 0 | 0 | 0 | 0 | 0 | 0 | |
| Master Thief | 86 | 20 | 504 | Phys (3D4+12) Steal | 0 | 0 | 0 | 0 | 0 | 0 | 0 | 0 | 0 | 0 | |
| Name | HP | AC | XP | Attacks | Spells | Fir | Air | Wat | Ear | Min | Spir | Bdy | Lt | Dk | Phy |
| Tree | 50 | 8 | 264 | Phys (2D10+0) Earth-R (2D6+0) | 0 | 20 | 20 | Imm | Imm | 10 | Imm | 5 | 5 | 20 | |
| Tree | 86 | 10 | 504 | Phys (4D10+0) Earth-R (4D6+0) | 0 | 30 | 30 | Imm | Imm | 10 | Imm | 5 | 5 | 30 | |
| Troglodyte Drone | 35 | 5 | 171 | Phys (2D4+0) | 5 | 10 | 10 | 10 | 0 | 0 | 0 | 0 | 5 | 5 | |
| Troglodyte Soldier | 61 | 9 | 336 | Phys (2D4+2) | 10 | 20 | 20 | 20 | 0 | 0 | 0 | 0 | 5 | 10 | |
| Troglodyte Queen | 93 | 14 | 551 | Phys (2D4+6) Poison | 15 | 30 | 30 | 30 | 0 | 0 | 0 | 0 | 5 | 15 | |
| Swamp Troll | 86 | 18 | 504 | Phys (2D10+4) | 5 | 10 | 10 | Imm | 5 | 5 | 5 | 0 | 5 | 10 | |
| River Troll | 162 | 28 | 1064 | Phys (3D10+6) | 10 | 20 | 20 | Imm | 10 | 5 | 10 | 0 | 5 | 20 | |
| Mountain Troll | 258 | 38 | 1824 | Phys (4D10+10) | 15 | 30 | 30 | Imm | 15 | 5 | 15 | 0 | 5 | 30 | |
| Name | HP | AC | XP | Attacks | Spells | Fir | Air | Wat | Ear | Min | Spir | Bdy | Lt | Dk | Phy |
| Minion Vampire | 100 | 25 | 600 | Phys (3D8+15) Disease | 5 | 10 | Imm | 10 | Imm | 0 | Imm | 0 | 30 | 10 | |
| Vampire | 207 | 35 | 1419 | Phys (3D8+25) Drain SP | 10 | 20 | Imm | 20 | Imm | 0 | Imm | 0 | 30 | 20 | |
| Elder Vampire | 374 | 45 | 2784 | Phys (3D8+35) Drain SP | 15 | 30 | Imm | 30 | Imm | 0 | Imm | 0 | 30 | 30 | |
| Elder Vampire | 374 | 45 | 2784 | Phys (3D8+35) Drain SP | 15 | 30 | Imm | 30 | 30 | 0 | Imm | 0 | 30 | 30 | |
| Fire Warlock | 137 | 14 | 875 | Fire-R (9D4+0) | Fireball (6E) | 30 | 30 | 30 | 30 | 10 | 10 | 10 | 0 | 10 | 10 |
| Water Warlock | 227 | 18 | 1575 | Water-R (12D4+0) | Acid Burst (9M) | 0 | 0 | 0 | 0 | 0 | 0 | 0 | 0 | 0 | 0 |
| Water Warlock | 227 | 18 | 1575 | Water-R (12D4+0) | Acid Burst (9M) | 40 | 40 | 40 | 40 | 20 | 10 | 20 | 0 | 10 | 20 |
| Air Warlock | 400 | 30 | 3000 | Air-R (16D4+0) | Lightning Bolt (12M) | 50 | 50 | 50 | 50 | 30 | 10 | 30 | 0 | 10 | 30 |
| Sprite | 61 | 10 | 336 | Water-R (3D12+0) | Ice Bolt (4E) | 10 | 10 | Imm | 10 | Imm | Imm | Imm | 5 | 5 | 10 |
| Sylph | 129 | 13 | 816 | Water-R (4D12+0) | Acid Burst (8M) | 15 | 15 | Imm | 15 | Imm | Imm | Imm | 5 | 5 | 15 |
| Water Elemental | 237 | 16 | 1656 | Water-R (6D12+0) | Ice Bolt (12G) | 20 | 20 | Imm | 20 | Imm | Imm | Imm | 5 | 5 | 20 |
| Name | HP | AC | XP | Attacks | Spells | Fir | Air | Wat | Ear | Min | Spir | Bdy | Lt | Dk | Phy |
| Wight | 61 | 15 | 336 | Phys (2D5+6) Fear | 10 | 10 | Imm | 10 | Imm | 0 | Imm | 0 | 30 | 10 | |
| Wraith | 93 | 20 | 551 | Phys (2D5+12) Drain SP | 20 | 20 | Imm | 20 | Imm | 0 | Imm | 0 | 30 | 20 | |
| Barrow Wight | 145 | 25 | 936 | Phys (4D5+12) Age | 30 | 30 | Imm | 30 | Imm | 0 | Imm | 0 | 30 | 30 | |
| Wyvern | 93 | 14 | 551 | Phys (7D6+0) Poison | 10 | 10 | 10 | 10 | 10 | 5 | 10 | 5 | 5 | 10 | |
| Horned Wyvern | 162 | 28 | 1064 | Phys (9D6+0) Poison | 20 | 20 | 20 | 20 | 20 | 5 | 20 | 5 | 5 | 20 | |
| Ancient Wyvern | 247 | 42 | 1739 | Phys (12D6+0) Kill | 30 | 30 | 30 | 30 | 30 | 5 | 30 | 5 | 5 | 30 | |
| Rotted Corpse | 35 | 8 | 171 | Phys (1D7+0) Disease | 5 | 5 | 5 | 5 | Imm | 0 | Imm | 0 | 30 | 10 | |
| Walking Dead | 55 | 14 | 299 | Phys (2D7+2) Disease | 10 | 10 | 10 | 10 | Imm | 0 | Imm | 0 | 30 | 20 | |
| Zombie | 79 | 20 | 459 | Phys (3D7+4) Disease | 15 | 15 | 15 | 15 | Imm | 0 | Imm | 0 | 30 | 30 | |
| Name | HP | AC | XP | Attacks | Spells | Fir | Air | Wat | Ear | Min | Spir | Bdy | Lt | Dk | Phy |