
Blue Ice is a unique game, or, in reality two games. The main game is traditional adventure fare, rather quirky, often lyrical and quite beautiful, which with patience and experimentation can be solved by any reasonably experienced player. The real challenge only begins after the adventure game ends and the search for the Ultimate Solution begins. This challenge is definitely not for the faint hearted or those who like quick answers and the reward of a pat on the back end sequence heaping on the congratulations. Nothing in the deeper game tells you that you are even working along the right lines and the only way we could confirm that we had indeed found the Ultimate Solution (U.S.) - after literally hundreds of hours of communal work - was to check it out with the author himself. The U.S. comprises two words and two not very exciting words at that. Whether the tortuous route to find them is worth the hours of research, trial and error, hair tearing and frustration is a matter of opinion. We were frequently ready to throw in the towel on this incredibly difficult game (we defy anyone to name a harder one) but something about it kept drawing us back and we are glad we persevered. An explanation is called for before the walkthrough proper begins ...
When the authors, Rik Yapp and Carol Nudds conceived the game they planned to launch it as a competition. They designed it to be played on two levels -the adventure game and the deeper game. They envisaged that a lot of players would solve the adventure and that those who moved on to the deeper game would be helped by a series of staged clues to reach the U.S. and a hefty prize. To prevent hacking into a final screen and illegitimate claims to the proposed prize, they did the obvious thing - they didn't put one in. Instead players were to be invited to submit their U.S. to a competition address and await a big cheque or a letter of regret.
Unfortunately the hoped for competition didn't materialise but Rik kindly issued his cryptic clues via e-mail and phone to an ever-decreasing group of BI afficionados. Even so, a few of the game's minor mysteries have still to be solved as the author himself has forgotten the minutiae! These minor mysteries largely involve the many red herrings inserted by Rik to further confuse the poor adventurer and to make the prize all the more elusive to reach.
We have divided this walkthrough into three sections:
a) The Adventure Game
b) The Path to the Ultimate Solution
c) The Red Herrings and the Numbers Grid Problem
THE ADVENTURE GAME
There are several ways to play the game and the following is just one suggested route. We have taken what we think is probably the most direct route but it is worth taking time to absorb the lyricism and atmosphere of the game. Enjoy the music that fits in seamlessly and adds to the magic, and look out for Orseppro and her daughter Hope. One or both of them is present in every screen, guiding the player to free Icia from its oppressive laws. Remember to save the game often as some clues disappear in the course of the game.
You start the game in the Eye screen. Right click on the mouse and find three icons - a magnifying glass for inspecting things and for clicking on characters to read their thoughts, a hand for picking up and moving things, and an arrow for movement. Have a look around, take the crown from the King's head and try to give it to Edward- he refuses it in no uncertain terms. You will notice three things that are common to every other room in the game. The first is a grid to the top left of the screen. Click the hand icon on it to expose four lines of four numbers. Numbers grids appear in every room, sometimes well disguised, and form a problem that is explained at the very end of this walkthrough. It is not essential to solve it for the adventure part of the game, but make a note of the numbers as you find them (hints on the more obscure ones appear on the final page of this walkthrough)
The second common feature is a Law scroll and storyboard at the top of the screen (read them all) and the third is a question mark, also often well hidden. Click on them as you enter each room to get an audio clue This one says, "At twice midnight I give you life" so use the hand icon to change the two clocks to show midnight and move through the now open eye into the
House screen. The ? here says "A key cannot unlock a door that is blocked by ice."
Grab the sun from the sky and use it on the pond to melt it. You can also grab the paper plane from the sky (it will fly in several of the locations and eventually forms a parchment piece in a puzzle that is not essential to the adventure game). Enter the
Pond (? Clue "A warm maggot helps catch a cold fish"). Pick up the five coins and the key in the tail of the fish. There is a parchment piece in the clam but leave it for now. Leave the Pond and use the key on the front door, entering
The Hall (? "In time you will find the right door. Be patient, think about it.") This indicates that reading characters' thoughts will give keys and that a glance at the grandfather clock will give a clue as to which door the keys will unlock. You are only allowed to carry one key at a time so it is a good idea to use the keys as you find them. So we'll start by collecting and using all the available keys. Click on Mrs Scraggend to receive the Pantry key and see a picture of the Pantry door appear on the face of the clock. Enter The Pantry (door to the right of the hall). The Pantry contains salt, sugar and pickled onions that you will need later in the game. At the moment you have nothing to carry powders in but take a pickled onion. Clicking on Mrs Scraggend gets you another key (hear the clock chime) so reenter the hall and unlock the door to the
Dining room. Glance at the menu to find out what's for breakfast. Click on Mrs Scraggend to get the Kitchen key. Unlock the left-hand door and enter
The Kitchen. There's lots here you need. First try to get the bottle. Mrs S. will stop you so use the hand icon to drag the bottle towards her. A quick drink satisfies her so the bottle is now yours. This will be your container for liquids during the rest of the game, just as the salt cellar is your container for powders, so pick that up as well. Get the knife and use it on the bread to take a slice to toast later. Check out the recipe book to find you need to make blackberry jam. Take a match from the box and strike it (you can carry the lit match with you until you need to use it.) Finally, clicking on Mrs S. gains you the key to the Bedroom. Go back to the hall and take the stairs (to the right of the screen) to the Bedroom (you can also travel from location to location via the thumbnail pictures at the bottom of the screen, which appear after you've entered a room once.)
In the Bedroom use the hand icon on Mrs S to grab her hairnet. While her mouth is open enter it and take her gold tooth. Clicking the arrow on to the spider door gets you into the Attic but it's too dark to see anything yet. Return to the bedroom and read Mrs S.' thoughts to gain the Garden Key. The door is in the kitchen so return there and open it up. Reading Olly's thoughts in the Garden gives you the Loo key but leave it for a little while. Return to the Hall, click on Edward to get the Library key, unlock the door (left side of Hall), enter and click on him as he sits at his table to get the key to open up the Music room, also off the hall. Once you've unlocked this door, get the Loo key from Olly in the Garden and open that room up too. The door to the Loo is in the Music Room.
The Loo is in darkness but the ? audio clue -"A golden opportunity laid open for you"- and the writing on the law scroll give hints for lighting it up. Use the gold tooth to power up the generator. The ? audio clue on the mirror and the pickled onion in your inventory point to the method of getting wind. Feed the onion to Olly. Notice the icon becomes a hand? Use it on Olly's bottom to get some wind (get another onion if you fail first time). Now squeeze the toothpaste tube, get the toothbrush and click it on the toothpaste. Clean Olly's teeth with it and you'll keep the brush for later use. Go back to the Music room and get the Drawing room key from Edward's thoughts. After unlocking that room, click on Pollyanna in the Garden to get the Bathroom key. The door to it is in the Bedroom and, after unlocking it, click on Mrs S. in the Library for the Laboratory key. Find this room off the Stairs and unlock it too. While on the Stairs have a good look at the map - more about that later.
Now its time to start educating Edward about the joys of life to free the kingdom of Icia from the thousands of meaningless laws that have frozen the land. As each of the five joys are discovered you can check your progress in two ways. The books in the Library turn colour from red (Laws) to green (Joys), while a dove appears in the Chimney to indicate the end of each task. Edward needs to discover the joy of food (a special breakfast does the trick), the joy of love (uniting Olly and Pollyanna), the joy of music (learning to play forbidden instruments), the joy of nature (fishing, smoking fish and fly catching) and the joy of colour (brightening up his paintings).
We'll start with breakfast. Empty the wine bottle in the Pond or sink in the Loo. Go to the front of the house, fill the bottle with water from the Pond and click the sun on the bud to turn it into a flower. Pour the bottle over the flower to produce a green berry then click the sun on it to ripen it. Pick the berry. Unfortunately you need three and the only way to collect three at once is to bring a mouse in on the act. Return to the Library and place the berry on the floor in front of the Mousehole for the mouse to carry off. Repeat this procedure twice more, refill the bottle with water then enter the Mousehole and scoop up the three ripe berries. Pick up a piece of cheese while you are there. Call in at the pantry to get some sugar then place the blackberries, water and sugar in the saucepan in the Kitchen to make blackberry jam.
Now to make toast. Enter the Drawing room and use the lit match to light the candle. Take the candle. Drag the coalscuttle into the hearth then use the lit candle to light the fire. It needs a good draught to keep it alight so use the wind on the fire. Click the arrow on to the fire to enter the Chimney. Notice the small star at the top? This grows in size and brightness as you complete the quests. The five doves also congregate here. Back in the Drawing room, click the slice of bread on the fire to toast it, then place the toast on the small plate in the Dining room. Go to the Garden and milk the cow by placing the hand icon on the udder and dragging it down. Three squirts of milk fill the bucket. Collect the milk in the bottle and pour it into the butter churn in the Kitchen. Use the knife on the churn to get butter for the toast. Spread it on then use the knife on the pan to get jam. Put this on the toast too, then put the toast on the plate in the Dining room.
While in the Dining Room, check out the door to the right (no key needed for this one). It leads to the Cellar. You'll spot a parchment piece among the cobwebs. Leave it for now, then go look at the recipe book in the Kitchen again to find you now need to make Cheese of Edam Sauce.
Go back to the Garden to milk the cow again and collect a bottle of milk, collect some salt from the Pantry, then put the cheese, milk and salt into the saucepan in the Kitchen to make the sauce. Use the knife to scoop it up and click the knife on the jug in the dining room to fill it with the sauce. You can't yet make the smoked eel but can make the prince's tea.
Go to the House and take the moon from the sky (you lose your sun icon but gain a sickle for cutting). Fill your bottle with water and stop by the pantry to get some more sugar. Use the sickle moon to cut a leaf on the left of the Garden near Olly's shoulder. Checking the flashing book in the library tells you the leaf is to make tea and the addition of milk and sugar turns it into Royal Yerba Mate. Put the bottle into the fire in the Drawing room to boil the water and place the leaf and water into the teapot in the Dining room. Drag the pot to the cup to fill it with tea. Milk the cow again and collect a bottleful. Pour the milk into the cup then add the sugar. Another task completed.
It's still not time to prepare the smoked eel so turn to uniting the young lovers. First step is to get Mrs. S. to go to sleep. Fill the salt cellar with sleeping powder from the box marked Zzz in the Bedroom then sprinkle the powder into the wineglass she is holding in the Library. Drag the bottle from the floor by her feet towards the glass. She will drink the drugged wine so the way will be clear to enter the Secret Garden. Next we need to find a way into the Secret Garden and for this we need the pig-shaped sponge from the Bathroom. Get the sponge and first try clicking it on the steamed up bathroom mirror. The mirror clears for a moment only so something more permanent is needed. Now go to the Garden and click the sponge on Olly's arm. It opens the Secret Garden, which can now by entered by clicking on Pollyanna. Pick up the stick lying on the grass and use the sickle moon to cut a lavender leaf from the top left corner of the screen. Go to the Bathroom and drop the lavender leaf into Pollyanna's bathwater, then fill the bottle with the lavender water it creates. Pour this lavender water over Olly in the Loo. He now smells good and his teeth are clean (remember cleaning them earlier?) so return to the Bathroom to find a love note to him from Pollyanna. Click on it to read it, then click again to pick it up. Give it to Olly in the Loo.
Next we need to get him to reply. Fill the bottle with acid by clicking it on to the battery in the Loo and then go to the Lab. Turn the gas on to power the Bunsen burner (the tap is on the top left of the screen behind the moving bottle) and light it with the candle or a match. Pour the acid into the beaker and add the copper coins. They melt and boiling produces blue crystals. Leave these crystals a while longer till they become white crystals capable of absorbing water (you can check this in the Library). Collect them in the salt cellar. Click the salt cellar in the Bathroom to clear the condensation and reveal a smiling Olly. Go back to the Loo to find a love note from him to Pollyanna. Click on it twice (once to read it, once to pick it up) and deliver it to Pollyanna in her bath. Return to the Secret garden and look at the row of poppies at the back. There is a fly buzzing about. Click on it to move it, repeat, and, when it settles on the second flower from the right, click the arrow icon on to it to enter the Flower. There you will see the lovers about to share their first kiss. You have completed the Love challenge - check out the Library and the Chimney for a green book and a red dove with a bigger star above.
Before leaving the Flower use the net on the fly to catch it. Take the fly to the Pantry and drop it on to the meat. Immediately the meat becomes alive with maggots so pick up one. The audio clue earlier mentioned a warm maggot helps to catch a cold fish so warm it up by clicking it on Olly's lips in the Hall to get him to blow on it. Enter the pond and, when the upper fish has its mouth open, click the maggot on it to catch it. A live fish is no use so go to the House screen and put the fish on the earth beside the pond. When it dies, pick it up, go back into the Pond and click it on the eel at the bottom. When the eel moves out a bit, repeat and you will have an eel. Smoke it by clicking it on the Chimney, then place it on the plate in front of Edward. Drag the cheese sauce jug to the plate to cover the eel with sauce, then use the hand icon to drag both the eel dish and the teacup to Edward to sample. Look again at the menu and see you have created marshmallows in chocolate sauce, the very thing to give the prince A Feast of Food and solve the second challenge. An orange dove has joined the red one in the Chimney and the book Edward is reading is now green.
Now for the Music challenge. Check out the instruments in the Music room. The trumpet is jammed, the violin lacks strings, and the clarinet needs a reed. Use the knife on the butter in the Kitchen then use the butter on the trumpet to free it. Cut a reed in the pond and click it on the clarinet to repair that. The mouse comes in handy again for the violin problem as he helps you catch the cat hiding in the tuba. Get some more cheese from the Mousehole and, in the Library, place the cheese in front of the hole. When the mouse appears, catch it and place it on the small shelf in the Music room. Use the wind to extend the trumpet then blow on the tuba. When the cat appears he will be distracted by the mouse and won't notice he is in the curve of the trumpet tube. Blow the trumpet again to retract the tube and take the cat. Place the cat on the right end of the violin and drag it all the way across. You now have cat gut strings for the violin and have completed the Music Challenge. There is now a green dove in the Chimney and a green book, The Joy of Music in the Library.
Edward needs some colour brought into his life so you need to produce the three primary colours. In the Loo, use the net to catch a fly on the cactus and place it in the pestle and mortar in the Lab. You now have the red pigment so click the toothbrush on it to pick it up. Next click the toothbrush on the blank canvas in the Drawing Room and notice the picture above the fire come to life. Use the stick to get a walnut from the tree outside the House, repeat the pestle\mortar\toothbrush procedure to obtain yellow and bring the sunflower picture in the Drawing Room to life. The final colour, blue, is obtained by the same method, using a leaf cut from the top right side of the Secret garden. Watch Edward smile when the three colours are in place and find a blue dove in the Chimney, and a green book, the Joy of Colour in the Library.
During these four challenges you have also done most of the nature challenge but there is one thing left to do - you must feed a fly to a spider. Using the same method as earlier grow a ripe berry in the House screen but don't pick it. Wait a short time and it will become overripe and a fly will appear. Catch the fly with the net and take it to the Attic, the room you entered at the start of the game before you had a light source. Place the fly at the top right side of the web and, when the spider emerges, guide it to the fly along a route that avoids strands with sticky drops. To navigate, place the hand icon on the junction you want the spider to go to, then move along to the next junction and repeat until the spider reaches its quarry. If you are too slow, the spider retreats to its previous junction so it's a good idea to map out a route before you start. This completes the last challenge and there are now five doves waiting to take Edward and Icia into a bright future, and the last book in the Library is now green and entitled The Joy of Nature.
Strictly speaking the adventure game ends here. You have solved the five challenges and can take Edward up the Chimney to the Win room, then back to the Eye where he will now accept the crown. But don't do that yet. Hang on and do the next part, the enhanced adventure game so to speak. Once Edward goes up the Chimney, all the law scrolls disappear, leaving blanks for the player to replace with sayings, quotations and homilies. There are four more locations to find and their scrolls will remain blank for the rest of the game if you've been to the Win room first. Also there are some fun things to find and try so wait a short time in the Attic till a piece of parchment appears in the web. This is for a non-essential problem but fun to do so pick it up and burn it in the fire in the Drawing room. There are another five pieces to find but you can only carry one at a time so burn them as you find them.
THE NEW LOCATIONS, HOLES AND THE PARCHMENT PIECES
After burning the piece of parchment go to the House screen and click the arrow icon on the smoke coming out of the chimney. This takes you to the Sky. Here make the Plough Constellation by using the hand icon to drag a connecting line from the bright star at the top left down through the other bright stars (if two stars won't connect, you've chosen the wrong one so drag the hand to another till it works). When it is drawn, the planet it holds turns on its axis. This opens up the Drink in the Bedroom. Before entering the Drink, enter the Mouth and click on the flashing picture. This takes you into the Video room with its flashing TV sets, needed by the deeper game. Leave and enter the Drink and pick up the ice cube. Melt the ice cube in the Lab beaker to produce another piece of parchment. Pick it up fairly quickly before it disappears from the game forever and burn it.
Have the paper plane with you when you return to the Drawing room where you can now enter the small Painting. Once inside, fly the plane and retrieve it to find it has become another parchment piece. Burn it. This opens the access to the Sun. Firstly go to the pantry and get some sugar, then go to the Sky. From here enter through the bright star in the top right hand quarter to the Sun. Sprinkle the sugar on the sun and sweets will appear. You can now go up the Chimney into the Win Room. Here click on the wooden post and see a half-assembled parchment.
Check out the Library, Drawing room and Video rooms again and you'll find large holes have appeared in all of them. Going through the holes leads you to bewildering screens of hex code, lines and interference, each pair of screens with a keyboard underneath. These locations come into play in the deeper game only and can be ignored if you are only interested in the adventure game. The solution follows in part 2.
Next return to the Cellar to retrieve the parchment piece noted earlier and burn that as well. Go to the Pond and when the clam is slightly open, use the hand icon to prise it fully open. Take the parchment piece and burn it. Finally go to the Library where you will find the sixth piece has appeared. It is lying on the shelf under Edward's reading table. Pick it up and burn it too. (We found that if the Library piece were taken anytime before this, the puzzle could not be completed as the last piece would never show up). If you check out the Win Room post now you'll see the completed parchment - see below for the solution.
SCROLLS AND SPARKLIES
The way to fill in the now blank law scrolls is explained cryptically in the audio clue in the Win room, which says, "Nothing is as it first appears, to look is not to see. The beginning is carried by the moon and your journey follows through tears". We must spread Edward's tears into every screen then tease them into letters of the alphabet. These letters fill the scrolls. Firstly, to make Edward cry, go to the Mousehole. Use the hand icon on the bunch of onions and drag it down to Edward's eye (left picture) to release fumes. A tear will appear on Edward's cheek. Collect this in the bottle, then click the bottle in any screen to release the tear. The tear becomes a group of dancing sparklies that needs to be captured and turned into a letter. Collect more tears and pour them out in every location - this is a bit tedious because you can only collect one tear at a time so you have to keep returning to the Mousehole. Now to catch them. Carefully watch the swirling sparklies to see which letter they are tracing, then click the sickle moon on the exact spot where the letter starts and then click it on the precise spot where the letter ends. The letters appear on the relevant scrolls when caught. This lets you know if you have been successful - no letter on scroll, no capture. A and Y (Mousehole and Lab) form without being caught but you must catch all the rest. Here is a list of the letters, the rooms they are caught in and the final scroll message:
A) Mousehole, Mehr Licht
B) Kitchen, One should eat to live not live to eat
C) Sky, So many worlds so much to do
D) Painting, It is clever but is it art
E) Chimney, After all tomorrow is another day
F) Pond, Everything flows and nothing stops
G) Attic, Man fears only the stroke of death
H) Loo, She is Venus when she smiles
I) Music room, Silence is the virtue of fools
J) Cellar, Birth and copulation and death (J does not appear in any of the quotations)
K) Garden, Oh she is the antidote to desire
L) Hall, Why this is hell nor am I out of it
M) Drawing room, Time quietly kills them
N) House, Some stars fell like a falling tear
O) Eye, The child is father of the man
P) Bathroom, She walks in beauty like the night
Q) Pantry, Doth not the appetite alter
R) Drink, Drink to me only with thine eyes
S) Stairs, Oderint dum metuant
T) Library, Why art thou silent
U) Bedroom, Dream your dreams away
V) Flower, My love is like a red red rose
W) Dining room, O tempora o mores, Video room, Think too little talk too much and Sun, Stolen sweets are best
X) Mouth, Into the mouth of hell
Y) Lab, Falser than vows made in wine
Z) Secret Garden, And a heaven in a wild flower
Just for fun you can also release a tear in the Win room and find it acts differently from all the others. This one forms itself into several separate little groups that swirl around independently. There is no need to try to catch these sparklies.
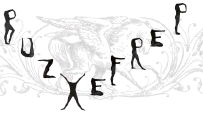
The scroll in the Win room now reads BUZXEFREP, the Ultimate Solution in code.
THE DEEPER GAME - BUZXEFREP, the path to the ultimate solution
As stated earlier the ultimate solution to Blue Ice comprises two words and the means of finding them starts with the coded scroll in the Win room. Crack the code and two words will emerge. Each of the letters represents one letter of the U.S. and their positioning on the scroll provides a visual clue to the composition of the U.S.
 Notice BUZ slopes downwards while XEFREP moves upwards? BUZ becomes the first word and XEFREP the second, so we are looking for a three letter word and a six letter word. We need to find 9 "letters" from within the game to apply to BUZXEFREP and crack the code. The first stage consists of finding keywords for all the screens, except the Win room, deducing the order in which they should be listed, and then listing them. After we have that list of 28, we need to find a way of shortening it to nine and, finally, from that shorter list we need to extract the correct "letters". Obviously all the elements needed can be found from within the game, but from this point on we needed the author Rik's further clues and hints to progress.
Finding the list of 28
Playing the adventure part of the game you will have noticed lots of extraneous images in the room screens and counted 28 rooms (excluding the Win room), both facts which are needed for the next part of the journey towards the U.S. Those whacking great holes that appeared in the Video room, Drawing room and Library walls also now come into play.
As pointed out above, there are 28 rooms in the game, plus the Win room. As we'll discover when we solve the keywords, the Flower keyword is Valentine. St Valentine's Day falls on 14th February so this fact and the 28 rooms point us towards the month of February with its 28 days. But there's more. Each room needs to be linked to a specific date in February - now to find which room relates to which date. Turn on all the TVs (two will be fuzzy), then scour each room screen for an image that doesn't seem to fit. Margaret Thatcher's face appears on the House screen and Scout founder Robert Baden-Powell's photo is on the Cow garden screen, for instance. Try typing in Margaret in one of the keyholes. Nothing meaningful happens, so try typing in other words relating to the former British Prime minister. Type in the word "Hilda" in the Library hole and bingo, you strike pay dirt - the meaningless jumble of machine code on the right hand screen turns into meaningful prose. The same goes for Baden-Powell. "Gilwell" (home of British Scouting) typed into the Library hole brings up more prose. Only 26 more to go! In all seven of the keywords must be typed in the Library hole, seven in the Drawing room hole and 14 in the Video room hole. Unfortunately, typing in the right keyword in the wrong hole doesn't work so you need to try out your ideas in all the holes. The keywords must all be capitalised and comprise one, two or three words, with a total length of no more than 17 characters. The only punctuation used is the full stop (used in only one keyword, which is comprised of a name abbreviated into three letters) and no numbers are used. Sometimes, but by no means always, typing in the correct keyword in the wrong hole changes the right hand screen jumble into something slightly more meaningful - a good hint to try the same word elsewhere. You will be in no doubt when the correct word is entered in the correct hole. As stated the Library hole generates prose, while the Drawing room hole produces stylised drawings and the Video room hole gives 14 pieces of a face. The typing and turning of the key affects the top left hand TV so, when you type in the correct keyword, re-enter the Video room and move the piece to another TV. When the 14 pieces are present the final two TVs become lips. Arrange the pieces into a face and you'll see its lips move.
This part of the game was great fun - very frustrating at times but fun nevertheless.
So, when we have found the 28 keywords, how do we know which fits which date? There is one date in February that is of particular significance to each of the people\places\objects in the keywords. The complete list follows:
February
1 1901 Rhett Butler, Loo, (birth of Clark Gable, Rhett in the film))
2 1913 Grand Central, Bedroom, (New York station opened)
3 1959 Buddy Holly, Pantry (date died)
4 1953 Sweets, Sun (date sweets came off ration in the UK)
5 1917 Dogbrain, Lab (US surgeon transplanted dog brain into a man, this in fact never happened and is a dreadful clue))
6 1952 Elizabeth, Drink (British Queen ascended the throne)
7 1943 Shoes, Sec. Garden (Shoes rationed in the US)
8 1924 Cyanide, Video (HCN. Date gas chamber was first used for execution in the U.S.A.)
9 1922 Jim Laker, Dining (Date this famous cricketer was born. Scores are on the wall)
10 1950 Munich, Cellar (Mark Spitz, winner 7 gold medals at Munich Olympics, born.)
11 1975 Hilda, House (Mrs Margaret Hilda Thatcher became leader of the Conservative Party.)
12 1809 Abraham Lincoln, Drawing (his death)
13 1988 Calgary Eye ( opening of Olympics there)
14 Valentine Flower (no year date needed )
15 1928 O.E.D. Library (date Oxford English dictionary completed)
16 1959 McEnroe, Pond (tennis player John McEnroe born)
17 1909 or 1907.Could be either as both years are given. Skeleton Canyon, Sky (Geronimo appears in one planet and General Miles in another. They signed a treaty here. This is the date of Geronimo`s death)
18 1564 Buonarroti. Attic (Surname of Michaelangelo, died this day
19 1928 Daytona, Bathroom (Malcolm Campbell broke land speed record here)
21 1965 Malcolm Little, Mouth (aka Malcolm X, assassinated this day)
22 1857 Gilwell, Garden (Baden-Powell born)
23 1914 La Divine Sarah Painting (Sarah Bernhardt's leg amputated)
24 1786 Rapunzel, Kitchen (clue is Tom Thumb by author Wm. Grimm, born this day)
25th 1917 Joseph Kell, Hall (Clue here is the orange with a wind up key on the cook's belt. i.e. A Clockwork Orange. The author's nom de plume is Anthony Burgess.)
26 1936 Volkswagen, Music room (Hitler introduced the VW car on this day.)
27th 1902 Cannery Row, Stairs (Clue on Radiator is Of Mice and Men. Author of both of these books John Steinbeck was born on this day.)
28 1912 Missouri, Chimney (Clue berry on a parachute. Captain Albert Berry performed the first parachute jump from a plane over Missouri on this date).
Shortening the list
At this point we meet one of the game's most devious little surprises - the mystery of what the mouth is saying. Unless you have the facility to photograph each frame one by one and then reverse the whole lot, you are almost certain to be unable to decipher what is being said. He is speaking backwards and is saying PERFECT ICE CUBE.
These three words provide a key and a clue to the way to shorten the list from 28 to nine. More about the key later but first the clue. Perfect relates to perfect numbers, ice of course relates to the game and its name but also hints at the ultimate solution, and cube is a pointer to the number three. We are looking for the first three perfect numbers (6,28 and 496), found in three separate screens (one not yet seen), each of which provides a piece of the pattern needed to shorten the list.
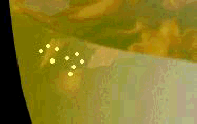 The first perfect number is 6 so we need to look at the Drink (February 6). In the top left corner of the glass are some dots and the pattern piece we need is among them.
(These dots have been enlarged slightly for ease of display)
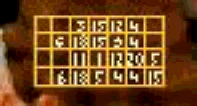 The Chimney (February 28, the second perfect number) contains the second pattern piece, the small 7 x 4 grid chalked on the chimneybreast to Edward's left. It is the grid that is important, not the numbers in it. Ignore the numbers it contains at present because we will be replacing them with our own. These two pieces need to be combined and the third pattern piece will both help confirm how to combine them and how to move on to the final stage.
The third pattern piece, the 496 element, is by far the most difficult to find, and we need the key mentioned earlier to find it. Rik himself admitted this stage was "fiendish " and involved "a lot, and I mean a lot, of trial and error". He told us that the words Perfect Ice Cube were a key to be typed in in one of the keyrooms. When they were entered correctly we would need to be sharp eyed to work out what was going on. After months of fruitless effort, we eventually deduced the right method and found the right room. Here it is in case you want to work out the pattern for yourself:
The three words need to be entered for one of the thumbnails in the Drawing room hole. Select the correct thumbnail, type in Perfect (with the capital), twist the key to enter the word. From that new screen, clear the word Perfect, type in Ice, twist to enter, and from that screen, clear the word Ice, type in Cube, and twist to enter. If you started from the correct thumbnail,(The Flower) this last screen will contain a compact and precise pattern relating to the number 496. The code on the screen is hexadecimal and, although the pattern can be seen in the hex to those familiar with the code, it is probably much easier to see in decimal and worth the effort of translation. It is well worth getting hold of or compiling a hex to decimal conversion chart because the hex code and an understanding of it is essential in the game. Or you may choose to use the calculator that comes with Windows Accessories if you have it loaded.
The pattern is in the Flower grid produced after entering Perfect, Ice, and Cube, by the method explained above.
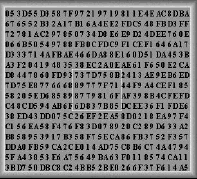 See the 4 x 4 magic square slap bang in the middle of the grid, a magic square which totals 496 in every direction when translated from hex into decimal . (There is a clue that this is the correct grid, but it is a difficult clue to spot. If you blank out all the even numbers you should see an unusual concentration of odd numbers just below the centre of the grid i.e. a group of 4 on one line, 9 on the line below and 6 on the line below that).
This magic square contains the last of the three pattern pieces needed to get to the final stage of the game.
Now to combine the pieces. Trace the drink dots from the screen and superimpose them on to the Chimney grid.
1 |
2 |
3 |
4 |
5 |
6 |
7 |
8 |
9 |
10 |
11 |
12 |
13 |
14 |
15 |
16 |
17 |
18 |
19 |
20 |
21 |
22 |
23 |
24 |
25 |
26 |
27 |
28 |
Now number the spaces on the Chimney grid from 1 to 28 (top line 1 -7, second line 8-14 etc). You should find that the Drink dots cover space numbers 2,3,6,8,12,14,17,20 and 27. These numbers indicate which keywords from the longer list we need to use to make the shorter list and the 496 magic square provides a double check.
Now, turn to the magic square. The 16 numbers in it need to be reduced to 9 and the way to do this is to eliminate those whose first digit is higher than the second. This leaves 7D, 8B, 89, 77 7F, 79, 6F, 6D and 7B. The second digits are the means of cross checking that we have the correct 9 keywords on our shorter list. Take the first remaining magic square number: it is 7D, the second digit D=13 in decimal. The first keyword by date to have 13 letters (including the space) is Feb.2 Grand Central. Next take 8B, whose second digit 11 in decimal, and the first keyword by date to have 11 letters is Buddy Holly, Feb. 3. Continue through all the remaining numbers and you will find the 9 keywords they point to are the 9 exposed by combining the Drink and Chimney patterns.
Our list now reads:
2 Grand Central
3 Buddy Holly
6 Elizabeth
8 Cyanide
12 Abraham Lincoln
14 Valentine
17 Skeleton Canyon
20 Marie Rambert
27 Cannery Row
So we have confirmed our short list of 9 keywords. Next we have to find the way to select one "letter" from each of them and we use the 496 magic square again. This time we use the first digit of the 9 hex pairs i.e. 7,8,8,7,7,7,6, 6 and 7. Apply the numbers in that order to the shorter keyword list to select a letter, starting with the 7th letter of Grand Central which is C (remember we take the spaces into account), 8th letter of Buddy Holly = O etc. Finally ending up with COTEMIT (space)Y.
Decoding BUZXEFREP
We're on the last lap now as we finally have all the elements needed to decode BUZXEFREP. The code used is a straightforward alphabet wheel with the usual
alphabetical values for all the letters and a value of zero for the space. Thus:
0=space, 1=A, 2=B, through to 26=Z. Pair up the BUZXEFREP letters with the 9 found from the keywords and add them together, remembering to include the zero in your calculations. So we have
B U Z X E F R E P
C O T E M I T () Y +
Using your alphabet wheel, add B and C (=E), U and O (=I for, when you count on from U round the wheel 15 places you need to include the zero as one of the places), etc
And that is it, no fanfares, no flashing screens of congratulations, as finally the ultimate solution emerges in the form of just two short words, one German for "ice", one English- we have EIS BROKEN.
THE RED HERRINGS AND THE NUMBER GRID PROBLEMS
The Hope Colours: (There seem to be two errors in this puzzle.) Hope calls out colours in nine rooms, as follows:
Dining room yellow-violet; Cellar orange-yellow; Library orange-yellow; Pond red-green; Mouth red-blue; Hall red-orange; Music room red-indigo; Chimney orange-indigo. In the Drawing room, she calls out violet-orange but this is a mistake and should be orange-violet. The colours are a code that can be cracked by using Base 7 maths. List the colours of the rainbow in order and assign them Base 7 numbers, thus
Red=0, Orange=1, Yellow=2, Green=3, Blue=4, Indigo=5 and Violet = 6.
Base seven and decimal number equivalents are
0 1 2 3 4 5 6 these numbers are the same in base seven and ten.
10 11 12 13 14 15 16 Base seven
7 8 9 10 11 12 13 Base ten
20 21 22 23 24 25 26 Base seven
14 15 16 17 18 19 20 Base ten
Then list the colours thus:
Room Colours Base seven Base ten Alphabet
Equivalent Value Letter
Dining Yellow/ Violet 26 20 T
Cellar Orange/Yellow 12 9 I
Drawing Orange/Violet 16 13 M
Library Orange/Yellow 12 9 I
Pond Red/Green 3 3 C
Mouth Red/Blue 4 4 D
Hall Red/Orange 1 1 A
Music Red/Indigo 5 5 E
Chimney Orange/Indigo 15 12 L
(Red-orange = 0,1, red-green = 0,3; red-blue =0,4; red-indigo =0,5
Orange - yellow = 1,2 or 9 in decimal; orange-indigo = 1,5= 12 decimal
Yellow-violet = 2,6 =20 decimal
Orange-violet = 1,6 =13 decimal)
Now we come to the second error - the missing letter. There should be another E to give us 10 letters of an anagram of the solution - ICIA MELTED.
 THE PARCHMENT
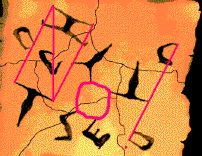
This is another blind alley. The letters on the parchment are meaningless in themselves; it is the position of the hands that are important. Join the hands of the figures on the left to form the letter N. Joining the hands of the remaining figures produce a small O and the line of an exclamation mark. Follow the line of the fist of the E and draw in a point (see screen shot) to produce the solution - No! in other words another red herring and not the U.S.
THE MAP
Countless hours have been spent on the map, which seemed significant because most of the place names are anagrams of facial features, because it looks like a face, and because it appears to transpose east and west. However Rik assures us that the map should be taken at face value only i.e. it is another red herring and of no further significance.
THE PAPER PLANE
Yet another red herring, this was Rik's own favourite problem in the game but he admits it is impossible to solve. When flown in the Chimney, the Win Room and the
Sky, circular markings and dots can be seen. The circles represent a dartboard and the dots numbers on the board. The idea was to work out which numbers the dots represented then translate the numbers into letters. An anagram of these letters would give a word that would indicate this was another dead end. Rik realised that it would be impossible to work out the positions from the angles shown so the plane is merely a diversion whose only use is to produce a parchment piece.
THE NUMBER GRID PROBLEM
Every screen contains a 4 x 4 number grid. Some are easy to read, some very difficult, some are difficult to spot in the first place and some even disappear as the game progresses. Here are some pointers to the trickier ones:
Mousehole: the numbers are on the cheeses; Secret garden: numbers flash in sequence on the flowers - if you draw the layout of the flowers you can record the numbers as they flash; Bedroom: switch on the lamp to expose the numbers; Video: reverse the numbers; Bathroom: the numbers disappear when you clear the condensation; Dining room: numbers are on the menu but disappear when you complete the food challenge; Cellar: look at the markings on the floor - you don't count the dots but join them up to make 4 sets of 4 numbers; Mouth: numbers flash in sequence in the picture that later accesses the Video room: Painting: count the markings on the edge of the picture frame; Drawing room: translate the Roman numerals along the mantelpiece; Chimney: the numbers to use are the 4x4 block in the grid on the wall and Music room: the numbers are on the piano keys.
To attempt to solve this section your first step must be to write out all the quotations, etc. which appear on the scrolls after you have successfully identified all the Sparklies and number each letter in sequence, ignoring the spaces.
E.g.: 1 2 3 4 5 6 7 8 9 10 11 12 13 14 15 16 17 18 19 20 21 22 23
Loo (01) S H E I S V E N U S WH E N S H E S M I L E S Bedroom D R E A M Y O U R D R E A M S A W A Y
(Feb 02)
ETC. ETC
Now put all the grid numbers you found into February date order, keeping each line separate: e.g.
Room Loo (Feb 01) Bedroom (Feb 02) Pantry (Feb 03)
First grid line 17 12 4 9 12 10 3 19 4 12 13 16
Next use the letters in the following day's quotation that corresponds to these numbers. I.e. W E A R P E T A L S A B
Follow the same procedure with the second and third lines of the grids and you should end up with three pieces of prose. However these are not essential to the game. Our joint efforts plus those of a wider group of players, failed to find the ends of these pieces so there would appear to be errors in some of the numbers. Below are the translations as far as the Mousehole where sense seems to have disappeared into the skirting board along with the mouse...
Wear petals above thy head while taste and clear sky lie heavy in thy heart. Say not the bitter...
Say drop a star that shone down like so much desire, quiet and lovely with a shower of glitter to...
Read the parts that do throw lite o'er man and all the kindness lost inside thy wan design. Meet ...
After the Mousehole, Mouth and Picture some of the numbers begin to make sense again.
The fourth line of numbers completely baffles us still, in spite of the joint efforts of many people. Rik said this line should be handled differently from the others. The room's year date should be subtracted from the last line of numbers in each room's grid and the translation made from these new numbers. The words that should appear give a clue to what the mouth in the Video Room is saying and is another way of arriving at the words Perfect Ice Cube.
copyright © The Three Jays. 2000
Any queries regarding this walkthrough should be addressed to :-
Jill [email protected] Joan [email protected]
Joyce & Peter [email protected]