| Initially the only place you can go is through the door on your left at the end of a short walkway. Talk to the man sitting at the desk and he tells you to find Armagast. |
| |
| |
SWITCHING THE BRIDGE |
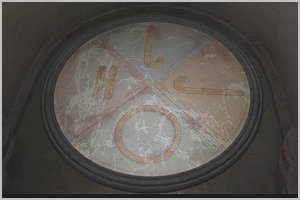
| After talking to the man, the walkway to the right will be accessible. The control panel used to switch the bridge is at the end of the walkway. After examining the panel, return to the man and speak to him again. He tells you the sequences needed to switch the bridge are behind the door, and that you must input them 'from the bottom part'. Close the door to see the three strange symbols. The symbols will also be entered into your Journal. Note that you must have examined the control panel to get this response. |
| |
| Talk to the man a third time and he asks you to bring him any puzzle pieces that you may find. |
| |
|
| |
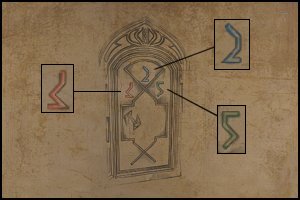
| Study the symbols behind the door (they're much clearer in your Journal) to find an association with the control panel. The three symbols are all constructed from a combination of four lines: |
| |
|
| |
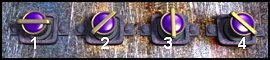
| These same four lines also appear on the knobs on the control panel. |
| |
|
| |
| Begin by turning each knob once to set all the buttons to red. Push the green handle (bottom of the panel) inwards to activate the panel. Note that the handle cannot be pushed unless all the buttons are set to one colour. Next, replicate the red symbol by pressing the knobs in sequence, remembering you were told that you must input them 'from the bottom part'. |
| |
|
| |
| If done correctly the red symbol should appear on the left screen on the panel. |
| |
| The two remaining symbols must be similarly entered. Pull the green handle to de-activate the panel, then set the buttons to blue and repeat the process. Do the same to enter the green symbol. The sequences for the blue and green symbols are: |
| |
|
| |
| Once all the symbols are entered, the bridge is switched by clicking the screen with the relevant symbol. |
| |
| |
| |
FINDING ARMAGAST |
| Move the bridge to the structure on the right by clicking the right screen on the panel. On the other side, make your way up the stairs and around the building. At the point where it appears as though the walkway ends, continue forward to find another walkway that leads to the tram. Enter the tram and take a ride to Armagast's office. |
| |
| Armagast gives you access to Dragast and tells you to return to him after finding what you're looking for. A further four pages of diagrams are added to your Journal. |
| |
| |
| |
STATUE ROOM |
| Take the return trip on the tram from Armagast's office. As you start making your way round the building another bridge leads off to the right. Cross this bridge and enter the statue room. |
| |
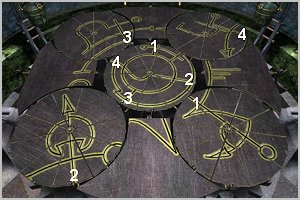
| Examine the mechanism in the centre of the room. The metal cogs must be rotated so that the yellow lines form a specific pattern. The exact pattern to be formed can be seen on the vertical wooden slats hanging on the wall to the left. Study the pattern carefully noting that each of the four outer sections are joined to the inner section by a single line. |
| |
| Clicking the middle cog rotates all five cogs. Clicking any of the outer cogs alternates between switching the yellow lines on and off. A 'switched off' cog remains stationary when the middle cog is clicked. |
| |
|
| |
| The points where the outer cogs join the middle one are indicated by the numbers 1 - 4 in the graphic. To reset the cogs to their original positions, exit from the mechanism and then re-enter. |
| |
| There are a number of possible ways to complete the pattern, but the shortest number of moves is: |
| |
| 01) Switch off the bottom right cog | | 02) Click the middle cog TWICE - the numbers marked 1 and 2 should both be aligned | | 03) Switch the bottom right cog on again | | 04) Click the middle cog ONCE - the top left cog will be in position (3) | | 05) Switch off the top left cog | | 06) Click the middle cog TWICE - the numbers marked 3 should be aligned | | 07) Switch the top left cog on again | | 08) Click the middle cog TWICE - the top right cog will be in position (4) | | 09) Switch off the top right cog | | 10) Click the middle cog ONCE to complete the pattern |
|
| |
| During the brief cut scene that follows the lever left, and in front, of the large statue is pulled down. Do likewise and the statue swivels round to reveal a tunnel. |
| |
| |
| |
LOCK MECHANISM |
| Go down the tunnel in front of the statue to get to a locked cell. Study the lock mechanism very carefully. |
| |
| The three knobs on the left are fixed onto round metal plates, and the ones on the right are on triangular plates. The brackets above and below the knobs on the right are designed to fit round objects, while the ones above and below the left knobs are designed to fit triangular objects. |
| |
| Therefore, logically, the left (round) and right (triangular) knobs must be switched to the opposite sides. |
| |
| After correctly positioning the knobs press the gold button to open the cell door. |
| |

|
| |
| Although there's no indication where you got it (possibly given to you by Arkampus) an Unknown Amulet is in your inventory. |
| |
| |
| |
STATUE ROOM II |
| After releasing Arkampus, he shows you a second pattern on the wooden slats. Again, this pattern must be formed on the mechanism in the centre of the room. |
| |
| Rotate the cogs in the exact same sequence as before to correctly form the second pattern. |
| |
| Pull the lever to the left, and in front, of the large statue twice - once to return it to its original position, and then to get it to tilt over backwards. A secret passage is accessible by climbing up the tilted statue. |
| |
| |
| |
MIRROR PUZZLE |
| The secret passage, above the tilted statue, leads into a room with a number of mirrors on the sides. First examine the table on the left. Move the book on the right to reveal some Puzzle Pieces. |
| |
| Do you remember the man you met when you arrived asking you to bring him any missing puzzle pieces you find? Take the Puzzle Pieces from the table to him. Note that to switch the bridge to the correct position, click the middle screen on the bridge control panel. The missing pieces complete his puzzle and you get a glimpse of it during the cut scene. The symbols are also entered on the twelfth page of your Journal. |
| |
| Return to the mirror room and examine all the mirrors. The furthest one along the right wall can be taken. Climb the ladder in the alcove at the far end of the room to get onto the roof. The five bands on the large pillar each have a number of symbols, some of which you should recognize from the completed puzzle. At this point the bands cannot be rotated. To activate the pillar first walk to the right of it, and then turn to your left. Place the Mirror on the small gold mirror stand on the ground to activate the pillar. Note that if you haven't taken the Puzzle Pieces to the man, the pillar also won't be activated. |
| |

|
| |
| Did you notice the strange device with the revolving weathervane? The five bands must be rotated so that the 'puzzle' symbols face towards the strange device. Unfortunately you cannot get to the pillar from the other side, but the symbols facing the device are visible in the mirror. Also, you need to rotate the bands in two stages - after correctly setting the top two, pan down to the bottom three. |
| |
| The symbols in the mirror, i.e. facing the strange device, must correspond to the diagram in your Journal. |
| |
| |
| |
SUNKEN BRIDGE PARTS |
| During the cut scene after solving the mirror puzzle you again see the lever in front of the statue. By now you should know the drill - pull the lever twice to reveal another secret passage below the statue. At the end of the passage there's another ladder. Before climbing the ladder, study the walls very carefully and make a note of the four drawings. Each drawing consists of two interlocking symbols. |
| |
|
| |
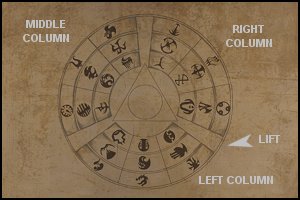
| There are four columns, comprising four circles, inside the barrel-shaped object. Turn the large wheel at the top (either left or right) to rotate to an adjoining column. The circles each have four symbols on them. Other than the top circle on the first column, the circles can all be rotated. Note that the symbols on the circles are identical to those making up the four drawings on the wall. The symbols are therefore divided into four pairs of two symbols each. |
| |
| The circles must be rotated so that adjacent symbols form a pair. In other words, the right symbol on the top circle (first column) and the left symbol on the top circle (second column) must form a pair. Similarly, the bottom symbol on any circle and the top symbol on the circle below it must also form a pair. |
| |
| Begin with the top circle on the first column as this is the only one that can't be rotated. Work through all the circles until all the adjacent symbols are paired up. |
| |
| COLUMN 1 | COLUMN 2 | COLUMN 3 | COLUMN 4 | 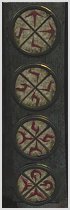 | 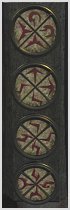 | 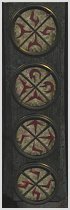 | 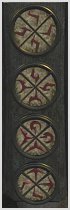 |
|
| |
| After setting all the circles correctly the sunken bridge parts rise and form a solid bridge. Cross over the bridge and take the Tetrahedron Of Dragast. |
| |
| Having found what you were looking for, head back to Armagast's office. |
| |
| |
| |
THE LIFT IN ARMAGAST'S OFFICE |
| Show the Tetrahedron Of Dragast to Armagast and he tells you to unite it with the sphere. To do this, you must activate the lift. |
| |
| Study the design on the floor inside the lift shaft, noting the four symbols. |
| |
|
| |
| Next, go to the device on the left of Armagast's desk. The design on the cube in the centre is very similar to that on the lift shaft floor. Press the button in the centre to rotate the cube until the design is exactly the same - this should happen after pressing the button twice. |
| |
| Each of the sixteen oblong buttons on the side extends a different shaped rod over the symbols. Four of the rods match the symbols on the cube: |
First column - fourth button | | Second column - second button | | Third column - third button | | Fourth column - third button |
|
| |
| The sequence of buttons is the key to operating the control panel next to the lift. Set the round sliders to correspond with the buttons pushed for the matching rods: |
First slider - fourth position | | Second slider - second position | | Third slider - third position | | Fourth slider - third position |
|
| |
| |
| |
SPHERE PUZZLE |
| Initially you can't get out of the lift at the first level, so go up to the second level. Place the Tetrahedron Of Dragast on the device in the centre. The first level is now be accessible, but you don't have sufficient information to complete the puzzle. Return to Armagast and ask him for help. He transforms the floor into an intricate array of symbols that are also entered into your Journal. |
| |
|
| |
| The array of symbols are identical to those on the three columns on the first level. Adjust the positions of the symbols to correspond with the drawing in your Journal. Note that the positions of the symbols on the diagram must be viewed from the centre outwards. In other words, the 'left' symbols (left column) in the diagram are actually the 'right' symbols when viewed from the centre. It may help to note that the middle symbol is always the one that cannot be seen on the actual column. |
| |
| When the symbols are correctly positioned the sphere is inserted in the Tetrahedron Of Dragast and can be taken from the device on the second level. |
| |
| Armagast tells you that the Sacred Rings and Tetrahedron must be combined, and this can only be done in the dungeon in the centre of Dragast. |
| |
| |
| |
BOILER PUZZLE |
| Return to the main bridge and switch it to the left (red) bridge by pressing the left screen on the control panel. Cross the bridge and enter the underground area. Begin by going through the large round door. The boiler puzzle (through the round door) must be solved first. |
| |
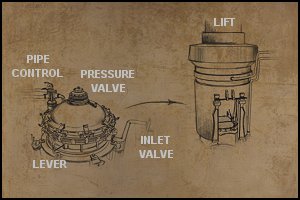
| The large boiler and the green structure to its left are drawn in your Journal. You'll need to experiment with the various controls to figure out how the boiler works. |
| |
|
| |
| When you open the inlet valve on the right a short burst of steam is released through the pressure valve at the top, but the valve closes again. Next, pull the lever in front of the boiler to align the clamps. Note that to access the lever, you must approach the boiler from the left. Adjust the valve on top to set the pressure correctly. Again open the inlet valve on the right and it should now stay open. Lastly, trace the path of the pipes leading off to the left at the pipe control. The pipe nearest to you leads into the green structure, so set the pipe control to the nearest pipe to provide power to the structure. |
| |
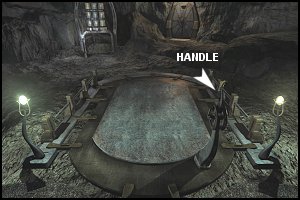
| Pull the handle on the floor inside the green structure. If all the boiler settings have been done correctly the lift takes you down to the lower level. |
| |
| The pipe from the boiler can be seen coming out the wall on the extreme right. From there it runs through a generator to a mill in the distance. There are two inlet valves between the wall and the generator. Open these two valves and then push the lever on the generator to provide power to the mill. |
| |
| |
| |
BATTERY PUZZLE |
| Go back through the large round door and along the walkway to the tunnel. Although the machine with the metal platform is presently not functioning, examine it so that you recognize it in a later cut scene. While standing on the metal platform, pull the lever at the bottom (on your left) to get to the top of the machine. Take note of the four gold squares in the centre. |
| |
| Continue along the walkway and enter the tunnel. About halfway through the tunnel (you'll hear the sound of metal being hammered) is a room with a blacksmith inside. For now, ignore the blacksmith and continue along the tunnel to an open cavern. |
| |
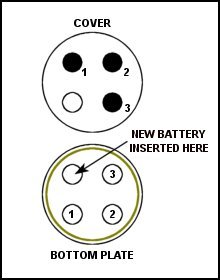
| Examine the three battery holders, noting that the middle (blue) and right (green) holders each have four batteries (three in the top cover and one on the bottom plate) but the left (gold) holder only has three. To try close the holders pull the handle in front of them. The handle is not easy to find, but is clearly visible when standing at the holders and facing away from them. To actually pull the handle you must be one step away from the holders, then face the holders and it should be to your left . |
| |
|
| |
| The first time you pull the handle the mechanic opens the locked door, tells you a battery is missing, gives you the Broken Battery and orders you to get a replacement from the blacksmith. Take the Broken Battery to the blacksmith and after giving it to him you can take a Battery from the shelf inside the storage room. |
| |
| Return to the holders and insert the Battery into left (gold) holder. The Battery is automatically inserted into the slot that aligns with the empty slot on the cover. |
| |
|
| |
| Pull the handle again and watch closely what happens. The left (gold) holder closes, but the bottom plate on the middle (blue) holder turns, and as the batteries are no longer aligned, the holder won't close. |
| |
| The plates can be rotated so that the battery in a plate starts in a different position. For example, in the diagram above, if the battery starts in positions 1, 2 or 3 it will be correctly aligned after the plate turns once, twice or three times respectively. Unfortunately, the bottom plates always turn a different number of times whenever you pull the handle. |
| |
| Knock on the locked door to get help from the mechanic. He tells you the device with nine cylinders shows how the plates turn. The device consists of three columns of three cylinders each. It makes no difference whether you use columns or rows, the first cylinder is gold, the second is blue and the third is green. The position and colour of these three cylinders correspond with the battery holders. |
| |
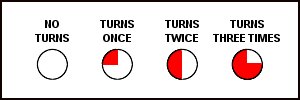
| Each cylinder has pattern in the centre. Make a note of the patterns on the three coloured cylinders, then try closing the holders again. By doing this a few times you can work out that every red quarter-circle on the pattern represents one turn. Note that each time you pull the handle, the patterns change. |
| |
|
| |
| Make a note of the pattern (i.e. the number of turns) on each of the three coloured cylinders, then rotate the corresponding bottom plate so its battery is that number of turns away from where it should be. |
| |
| Pull the handle, and if the batteries are correctly positioned the holders should all close. In the cut scene that follows you see the machine with four gold squares being activated. |
| |
| |
| |
COMBINING THE SACRED RINGS AND THE TETRAHEDRON |
| Go back to the machine with four gold squares that you passed on your way to the tunnel. While standing on the metal platform, pull the lever on the left to get to the top of the machine. Pull the switch out of the opening in the middle of the squares, then twist it to open a large round door. Do you recognize the door? You should have seen it in the area accessed when the main bridge was set to the right. |
| |
| Again switch the main bridge to the right, cross over, make your way up the stairs and you should find an opening where the large round door was. Through the opening you find yet another lift. Pull the handle to go down to a device with large pincers. Insert the Sphere within the Tetrahedron in the ring in the centre of the pincers. Next, insert the Sacred Rings into the same ring and the two will be combined. |
| |
| Return to the journey ship (switch the main bridge to the centre setting) and head off to Na-Tiexu. |