SERPENTHEAD Revisited
WALKTHROUGH (Demo & Full Game)
8th April 2003 Len Green [email protected]
PREFACE
Although you never get ‘killed’, it’s worth
while saving frequently to conserve time.
There are an unlimited number of save-slots and all saves are
*extremely* small and quick loading.
There is quite a bit of non linearity and hence
flexibility in “SerpentHead Revisited”.
In the full game you must work through until you reach a single and evident end-sequence. You can do this in many different orders, certainly not necessarily that (below) which I took. However, there are frequent actions which you cannot perform until they are ‘triggered’ by certain previous actions (generally logical) which are prerequisites.
In the demo there are various entrances, well
labeled, which you can’t enter and hence some locations are blocked off. There are 2 places in the demo-walkthru
where the full game differs somewhat … see [015A] etc. and [053A] etc.
Furthermore in the demo ONLY, there are 3 somewhat different sequences which you MUST finish in order to complete it (… You have to finish ALL these 3 in the full game also, but this ALONE is far from sufficient to finish it!). Different players are likely to complete these 3 in different orders. When you have completed ALL THREE, you obtain a clear full page notification that you have finished the demo. This notification will appear when the last of the 3 is completed … in whichever of the 3 locations this occurs. I have described here ONLY the particular order in which I personally played the game. The 3 possible ending points are marked in the demo-walkthru with a triple asterisk thus ………. {{***}}.
DEMO
[001] Approach Castle SerpentHead. Look at the loose brick close to the left side of the arched entrance.
[002] Take the silver key from under the loose brick.
[003] Enter the castle and turn E. Look at the sheet of paper pinned to the wall with a dagger.
[004] Read the contents of the sheet of paper, and note its hints.
[005] Take the dagger and the sheet crumbles to dust.
[006] Look at the wall approximately where the dagger was.
[007] Copy down the symbol there (the Greek upper case letter ‘Tau’) and note roughly where you found it.
[008] Walk N. Look at the tapestry. Look VERY HARD ALL OVER the close-up of the tapestry.
[009] Look at the top right hand corner of the close-up of the tapestry and see the loose corner.
[010] Take the golden key.
[011] Go N. Look at the wall slightly to the left of the plume on the helmet of the left hand knight in armor.
[012] Copy down the symbol there (the Greek upper case letter ‘Phi’) and note roughly where you found it.
[013] Look at (approximately) the left armpit of the (same) plumed knight. A small piece of the shiny metal armor is apparently loose.
[014] Take the shiny piece of metal.
[015] Proceed N through the open rectangular door.
[015A] *In the full game only*, there is NO open door here …………….
[015B] …………….. Look at the torch on the right hand wall …………….
[015C] ……………. Twist it around …………….
[015D] ……………. Look at the back wall (to the N). There is a hidden door there …………….
[015E] ……………. Open it and enter, N.
[016] Try to open the heavy wooden door. You can’t because there’s no latch or whatever.
[017] Look VERY HARD ALL OVER the patterns in the stained glass of the windows which frame the chapel door.
[018] Look at the middle of the right hand side, and particularly at the red/orange colored pane which is loose.
[019] Remove the pane, stick your hand through the hole and unlatch the door.
[020] Enter the chapel.
[021] Look at the closed tabernacle. It won’t open!
[022] Rotate the golden cross once only.
[023] Look VERY HARD ALL OVER the left hand stained glass window and find the active position (about at the same level as the center of the cross).
[024] Get a reflected beam of light and heat which lights the left hand candle.
[025] Rotate the golden cross twice more.
[026] Repeat [023] for the right hand stained glass window.
[027] Get a reflected beam of light and heat which lights the right hand candle.
[028] Rotate the golden cross once more only, which returns it to its initial position.
[029] Open the tabernacle and take the golden Cross.
[030] Return to where the dagger was and continue one more frame W.
[031] Look N and see the locked door.
[032] Open this locked door with the silver key and enter.
[033] Ignore the spider and its web (for now anyway). Climb the stairs (NW). At the top you can go forward or W. In the demo you cannot go E. In the full game you can go E … but you can’t make any progress there (at present).
[034] Go forward twice. Look at the golden throne and LOOK VERY HARD ALL OVER the heavy red drapes.
[035] Look particularly a little way along from the left hand edge side and you’ll see a darker vertical streak. This is a cord.
[036] Pull this cord and the drapes open.
[037] Go forward once again and you are confronted with the image of Cendric.
[038] Try to go forward again and the image will not allow you to proceed (yet anyway), telling you that “…..……. Only the King may pass”!
[039] Return (once) then take a close-up look at the golden cabinet. There is a single drawer in it which is locked.
[040] Using your golden key, unlock the drawer and open it.
[041] Pick up the royal ring from inside the drawer.
[042] Look at the sheet of paper in the drawer. It gives you some important instructions concerning a future puzzle involving symbols. You can’t take the paper or use the instructions now, but you can copy them or else return to them whenever you DO need them.
[043] Close the drawer and exit the close-up.
[044] Return twice (to the top of the stairs … where you were before) and go W.
[045] You are in a location that has a metallic looking door with Greek letters engraved on it, and a gold cat statue.
[046] You can arbitrarily press on symbols and hear noises. You can also press on a slit in the middle of the left side of the entrance. You’ll hear a growl, the cat turns black with fury, and you get a warning that “ …………… The wizard’s cat is ready to attack!”). But there is nothing USEFUL you can do there at the moment.
[047] Go W. You will find yourself at the bottom of another set of ‘stairs without a spider’. Look VERY HARD ALL OVER the walls.
[048] If you haven’t found it, look just to the left of the flame of the torch. Copy down the symbol there (the Greek lower case letter ‘delta’) and note roughly where you found it.
[049] Go up these stairs. Here, at the top you can go forward or E or W.
[050] Go forward. Your passage is blocked (at present) by a dragon who “…….. doesn’t look very friendly”!
[051] Return to the top of the stairs and go E.
[052] Go forward once and then E once. You are in a library. The books you are able to read give substantial clues for the continuation of the game.
[053] Read the book … “History of SerpentHead”.
[053A] *In the full game only*, you should also read the other book next to it --- “History of the Land” …………….
[053B] ………. …… Cross over to the other side of the library and read 2 more books “The Royal Mages” and “The Line of Ethorian Kings”.
[054] Look at the corner stone on the wall to the left of the 2 History books and at about the same height as them.
[055] Copy down the symbol there (the Greek upper case letter ‘Theta’) and note roughly where you found it.
[056] Return to the top of the stairs. Go W. Look VERY HARD ALL OVER the walls.
[057] If you haven’t found it, look just to the left of the right elbow of King Ethor’s statue. Copy down the symbol there (an upside-down English letter ‘A’) and note roughly where you found it. This is the last of the 5 symbols that you need to view and recognize.
[058] Look at the left hand of King Ethor’s statue.
[059] Put the royal ring on its finger. After having been turned into stone by the ‘Dark Sorcerer’, he returns to life, Queen Sophia also. King Ethor gives you his crown “ ………..to appease the ghost of Cendric”, and the King and Queen accompany you onwards in your quest!
[060] Take the wrench from the wall behind where King Ethor’s statue stood.
[061] Try to open the door to the right of where the 2 statues stood. No good! There is some sort of locking mechanism bolting it shut.
[062] There is a somewhat gold colored circle on the door with a cross on it. Maybe your cross will fit it? But no again! “It looks like it would fit except there is some sort of locking device blocking it”!
[063] Unblock the locking mechanism using your wrench.
[064] You can NOW fit your (gold) cross onto the cross on the door.
[065] There is a switch on the right hand wall. Press the cross and then the switch. Repeat this another 4 times (N.B. You may have to press the switch again), and the door opens.
[066] Enter the room with a bookcase.
[067] Look at and read the 2 spell books (some of the info will be helpful later on!). There is nothing else to do in that room, so you can leave! ………. {{***}}.
[068] Return to the top of the stairs and go down … no spider there! Go E and you’re in the ‘cat-room’.
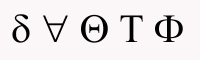
[069] Hopefully you noted down all 5 of the symbols and (roughly) where you found them, and also the list you found in the drawer of the throne room! If so, it should be easy to press the *5* appropriate symbols on the metal door, once each only, and in their *correct order*.
If however you’re stuck for any reason, the graphic at the end of this demo-walkthru shows you how to do it. Press the symbols once (only) each, in the order of the graphic from left to right.
[070] The metal door opens. You cannot enter in the demo but you can in the full game. Notice, that at the same time the door opened, the golden cat statue collapsed.
[071] Use the collapsed cat statue to open the lid of the chest.
[072] Take the 3 bottles on the left. You can’t actually use them in the demo … but you will need all or some of them in the full game.
[073] Take the other 3 bottles. No go! “You can’t carry any more bottles”.
[074] But you can replace those 3 bottles, and THEN take the other 3 bottles on the right. Whenever you like you can always swap one or more bottles, but you can’t carry more than 3 at any one time!
[075] Go W. You are at the bottom of the set of ‘stairs without a spider’. Go up the stairs and forward again to the dragon. IT’S WORTH WHILE SAVING HERE.
[076] Try to kill him with your dagger. You can’t! You’ll have to distract him.
[077] *In your inventory* use the potent asp venom on your piece of stained glass. It quickly dissolves the softer glass coating revealing the harder legendary Eye of Xanaria embedded inside.
[078] Put the Eye of Xanaria on the dragon. Now’s your chance, *but you must act QUICKLY*!
[079] Stab the dragon in the chest with your dagger and it collapses … dead.
[080] Look at the dragon and you get a close-up.
[081] Take his still beating heart … Ugh!! (You get your dagger back as well).
[082] You are facing a brick wall. You cannot go forward … so return.
[083] The wall has disappeared and so has the dragon’s body. There is now just a black empty opening to the N, and entrances to the E and W. The demo won’t allow you to proceed through any of them! … but in the full game you can enter them all! ………. {{***}}.
[084] Return to the top of the stairs and go down to the bottom. Go E to the ‘cat-room’ and then E again to the top of the stairs. Then go forward into the throne room and forward twice to the image of Cendric.
[085] Put the crown on Cendric’s image and it now allows you to go forward and enter --- The demo won’t allow you to proceed! … But in the full game you can! ………. {{***}}.
If you have completed all 3 actions marked ………. {{***}}, no matter in which order, you should obtain a clear full page notification that you have COMPLETED THE DEMO at whichever location you finished the third and last action.
FULL GAME
Carry out ALL the steps described in the above demo-walkthrough. Ignore the 3 markings of ………. {{***}}. They are irrelevant in the full game. Note the abovementioned places where it was mentioned that you cannot access in the demo but CAN in the full game.
In the full game, there are only
2 short sequences which are somewhat different from the demo … see [015A]
etc. and [053A] etc.
[086] Check that you have ALL of the following in your inventory :- (i) toenail of bat (ii) liver of toad (iii) pureed wasp.
[087] Did you notice a spell (in one of the spell books) that requires these? If you haven’t got them all, go to the ‘cat chest’ { see [072] } and swap bottles until you have all these particular three.
[088] Go to the throne room and where Cendric’s image was situated { see [037] }.
[089] Go forward twice and you’re in a laboratory.
[090] Take the colored test tubes.
[091] Go to the place where the dragon’s body disappeared { see [083] }.
[092] Go E (onto the balcony) and then forward.
[093] Look at the top of the balcony wall and notice the flies buzzing around there. You have to catch one.
[094] The green test tube apparently contains sweet liquid which attracts flies.
[095] Put the green test tube near to the top of the balcony wall and catch a fly with your cupped hand!
[096] Return to the spider in the center of its web { see [033] }.
[097] IT’S WORTH WHILE SAVING HERE. Put the fly onto the top of the web. The spider moves up to get it. *QUICKLY* grab some spider’s web before it returns to the center.
[098] Return towards the laboratory. Note the mouse hole at the bottom of the dark left hand column at the entrance to the laboratory.
[099] Enter the laboratory.
[100] Pour the contents of your red & blue test tubes (the order is unimportant) into the lab jar … obtaining a permanent purple foam at the top of it.
[101] Put the 5 ingredients needed for the ‘shrinking spell’ into the bowl (the order is unimportant) … you get a small purple froth as you add each one.
[102] When you have put all 5 correct ingredients in, you obtain a permanent purple foam at the top of the bowl.
[103] If you don’t get this purple foam, you haven’t put in the correct items which are … (i) Toenail of bat (ii) dragon heart (iii) spider web (iv) Liver of toad (v) Pureed wasp.
[104] Grab the handle of the lab jar and the purple foam from the lab jar will be poured over the mixture in the bowl. This will make you shrink, and transport you to outside the mouse hole. You won’t stay that way very long, but you can always easily return using the same method as when you arrived!
[105] Enter the mouse hole. The rat inside (as big or bigger than you are) snarls ferociously at you and won’t let you pass.
[106] Feed the vicious rat some sweet liquid from the green test tube … it puts the rat into a deep trance.
[107] Take the gauntlet.
[108] Exit the mouse hole and automatically return to normal size.
[109] Go to the crystal room which you reach by entering the (now) open ‘symbols door’ in the ‘cat room’ { see [045] }.
[110] Pick up the crystal. Impossible … it is radiating some sort of energy.
[111] So use the gauntlet to pick it up.
[112] Go to the place where the dragon’s body disappeared and go W.
[113] You are in a room with an illuminated book. Read the book.
[114] It’s impossible to read. It is illegible since it is written in some sort of hieroglyphics.
[115] Use the (magic) crystal on the hieroglyphics in the book.
[116] You can now read it … and should do so *very carefully*.
[117] Return to the balcony and approach the wall.
[118] Look at the wall close up. One stone is soft and porous.
[119] Use your dagger and begin etching letters in the soft stone.
[120] Continue until you have 6 letters “A” in one row.
[121] Now what was that riddle in the illuminated book ?
[122] Left hand page … third letter of each of the 6 names … A; L; D; H; E; N.
[123] “Not in order” i.e. an anagram.
[124] It would appear to be “handle”.
[125] Using your dagger at the top of each letter changes it to the next letter in the alphabet and using it at the bottom of each letter changes it to the previous letter in the alphabet.
[126] Inscribe the magic word.
[127] Go to the entrance of the laboratory (where you saw the mouse hole). At the top of the arch there is a brownish colored handle.
[128] Pull it (downwards).
[129] Exit the laboratory entrance and go to the top of the stairs there. Now that you have pulled the lever you have triggered access to the observatory by disabling the force field there.
[130] Enter the observatory.
[131] Look through the telescope. It doesn’t seem helpful!
[132] On the right side of the observatory is a book about certain stars.
[133] Read the book … it contains some important info.
[134] Look at the many star systems.
[135] Near the center observe that there is a darker patch.
[136] Each time you look at this dark patch, a group of stars lights up and flickers on and off. It is the constellation called “Serpens”.
[137] Beneath the ‘star book’ is a small telescope. Take it!
[138] Return to the balcony (not too close) and look at the group of stars in the sky near to the right edge of your monitor. Hey! That looks just like “Serpens”!
[139] Look at “Serpens” through your small telescope.
[140] WOW! A clock comes flying down from the sky. Pick it up.
[141] Did you notice a spell (in one of the spell books) that requires (i) scale of fish (ii) adder’s fork? You probably haven’t got both of them in your inventory. If that’s the case, go to the ‘cat chest’ and swap ANY bottles for those 2.
[142] *In your inventory* rub (once only) the scale of fish and then the adder’s fork on your piece of metal.
[143] Look at it … it’s now magnetized!
[144] Go to the place where the dragon’s body disappeared and go forward.
[145] Go forward again. There’s a force field which won’t allow you to advance.
[146] Look at the middle of the horizontal dividing line between the dark floor bricks and the yellow tiles. There’s a crack in the floor there.
[147] Wedge the piece of magnetic metal into the crack and the force field is diverted to the magnet.
[148] Now you can enter. Go forward to a pedestal.
[149] Climb up on the pedestal. You can’t … it’s too tall!
[150] So carve a foothold in the stone of the pedestal with your dagger!
[151] Climb onto the pedestal. You are facing a blue wall.
[152] Press the blue wall and the SerpentScepter appears.
[153] Try to take it … no go! It’s enveloped in a swirling ether cloud.
[154] Put your clock on it. You get a sort of a timepiece with 3 clock faces.
[155] Remember the threesomes in the riddle? Dial 3 on each of the 3 faces.
[156] Now take the SerpentScepter.
[157] Go to outside the mouse hole.
[158] Set the crystal down on the (uneven stone) floor beside the large mouse hole … so that it won’t shrink with the rest of you. It rolls inside the hole.
[159] Enter the laboratory.
[160] As before, grab the handle of the lab jar and the purple foam from the lab jar will be poured over the mixture in the bowl. This will make you shrink, and transport you to outside the mouse hole. You won’t stay that way very long, but you can always easily return using the same method as when you arrived!
[161] Enter the mouse hole. The rat inside is still in a deep trance. The crystal will appear very large, occupying most of the mouse hole.
[162] Place the SerpentScepter on the crystal.
[163] Watch the cut scene and then utilize the end of the SerpentScepter’s beam to enter the crystal.
[164] Read the 3 final texts and view the happy ENDING !