| |
CROSSING THE RIVER |
| You find yourself in a forest, cut off from the train by a large chasm. Walk along the river's edge until you get to a beaver gnawing a large tree. While the youki is preoccupied with the beaver, explore the surrounding area. At the point where a wooden house is visible at the bottom of the falls you'll find a small pile of dry branches. Take the branches to the stack of rocks with a frozen fish you saw along the way. The stack of rocks is referred to in Alexei's journal as a Youkol altar used for offering sacrifices to their Gods. Place the branches at the bottom of the stack of rocks and light them with the box of matches to get the fish 'offering'. |
| |
| Use the fish 'offering' to coax the youki away from the river's edge, allowing the beaver to finish gnawing the tree down. Cross the river by walking along the tree and make your way to the wooden house. |
| |
| |
| |
WOODEN HOUSE |
| Above the fireplace you find a Russian doll, hatchet and a fisherman's guide. Also take the straw fish tank from the ledge next to the stove. |
| |
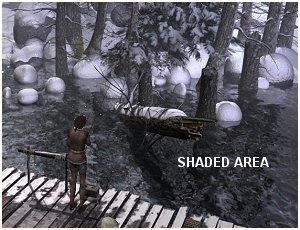
| Exit through the back door to get to the wooden pier, where you'll find a fishing rod and a box of lures. Read the fisherman's guide to learn that the orange salmon's preferred food is green frogs and is usually found in shaded water downstream from waterfalls. Pick up the fishing rod and examine the box of lures for one that resembles a green frog. Attach the green lure (top right corner) to the fishing rod and cast towards the shaded area, which is downstream from the waterfall. Note that if you use any other lure, or cast toward a different area, you catch a different coloured salmon. Also, if you don't have the fish tank, the youki will feast on the fish before you pick it up from the pier. |
| |
|
| |
| After confronting you at the front door the bear will be visible through the window next to the door. Both Alexei's journal and the fisherman's guide contain references to orange salmon being the favourite food of bears, so feed the orange salmon to the bear. Content with his meal, the bear wanders off. |
| |
| |
| |
CROSSING THE CHASM |
| Cut off a piece of the rope from the broken suspension bridge with the hatchet. Toss the rope and plate over the large overhanging tree and then swing across the chasm. The youki follows you with a leap of faith. |
| |
| |
| |
ICE WALL |
| Your rock climbing skills and needed to scale the ice wall. Begin by inserting the hatchet in the wall. At certain points on the wall you can climb either upwards, to the left or to the right. If you reach a dead end go down until you reach a position from where you can try a different route. |
| |
I'm not sure if there are other possible routes, but the following one worked for me:
Grab the hatchet to begin your ascent
Climb 2 positions upwards
Move 2 positions to the right (you should be on the extreme right side of the wall)
Climb up 4 positions
Move 4 positions to the left (you should be on the extreme left side of the wall)
Climb up 2 positions
Move 2 positions to the right
Climb up 2 positions
Move 2 positions to the right (you should again be on the extreme right side of the wall)
Finally climb up 4 positions to reach the top |
| |
| |
| |
WAKING BORIS CHAROV |
| Continue past the flying wing wreckage to find the pilot, Boris Charov, suspended from a tree. When you first met him in Syberia he was drunk - this time he's asleep. The only way to wake him is via radio communication through his earphones. |
| |
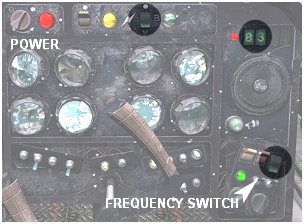
| Although the flying wing's radio is damaged, there's another one you can use at the nearby radar station. Using a bit of logic you can work out what frequency Boris was transmitting on. The large red button at the top of the flying wing's instrument panel turns the power on. The 'flash' symbol between the top yellow and green buttons indicates they are used for radio transmission. Flick the tiny switch under the red button on the bottom right of the panel to activate the LCD frequency display on the right - the digits '8888' should flash. Note that the yellow frequency button (bottom right) is off, i.e. in the down position. Switch off the corresponding radio transmission yellow button at the top. When both yellow buttons are off the last two digits of the frequency (28) appear in the LCD display. Note that both green buttons must be in the up position. To read the first two digits these settings must be reversed. When both green buttons are off (down position) and both yellow buttons are on (up position) the first two digits of the frequency (03) should be visible in the LCD display. |
| |
| |
BOTH YELLOW BUTTONS OFF | BOTH GREEN BUTTONS OFF | 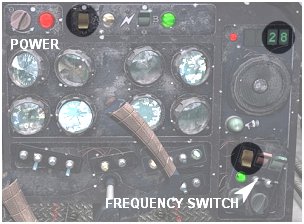
| 
|
|
| |
| |
| Go to the radar station and switch on the radio. Using the red buttons set the frequency to '0328' and press the button on the microphone to communicate with Boris Charov. |
| |
| |
| |
EJECTOR SEAT |
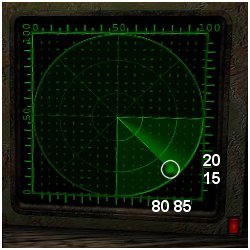
| Before returning to the flying wing wreckage check the radar system. Switch on the radar screen (press the red button on the far right). The radar dish at the top of the tower can be adjusted to face towards the four compass points. The symbols on the dish control probably indicate the compass directions in a foreign language, but are not needed to solve the puzzle. Test the dish in all four directions and check the readings on the screen in the shack. In two of the directions a 'blip' shows on the radar screen. Note the co-ordinates (horizontal and vertical) of both objects. When the dish is facing away from Kate the co-ordinates are 60, 60. If the dish is facing to the right of Kate the co-ordinates are ambiguous - between 80 and 85 (horizontal) and between 15 and 20 (vertical). |
| |
| |
DISH FACING AWAY FROM KATE | DISH FACING TO THE RIGHT OF KATE | 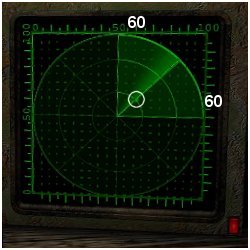
| 
|
|
| |
| |
| Return to the wreckage and talk to Boris about the ejector seats. The ejector seat controls are now accessible on the instrument panel. Boris tells you the first co-ordinates (60, 60) are the flying wing's location therefore the other coordinates must indicate the location of the train. Use any number between 80 and 85 for the horizontal co-ordinate and any number number between 15 and 20 for the vertical co-ordinate. |
| |
| Press the large button to eject the co-pilot's seat... |
| |
| |
| |
AT THE TRAIN |
| Grab Oscar's hand {sticking out the snow) to free him. Take the oil dispenser on the floor in Han's workshop on the train and give it to Oscar. Board the train and note the sparks caused by the wheels - indicating the train is stuck. Go to Oscar who tells you to find the access panel and then call him on your cell phone. |
| |
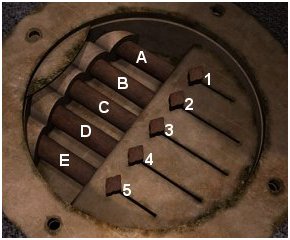
| The plan of the train lying on the floor has a drawing of where the access panel is located. The round gold cover (on which the voice cylinder pillar previously stood) is the access panel. Phone Oscar when you're in the room where it is and he opens it. Test all 5 sliders and make a note of which rods each one controls. All 5 rods must be open to activate the uncoupling system. |
| |
The access panel mechanism works as follows:
Slider 1 - moves rods A and C
Slider 2 - moves rods B and C
Slider 3 - moves rods B, C and D
Slider 4 - moves rods A and D
Slider 5 - moves rods C and E |
| |
|
| |
The following sequence opens all the rods:
Slider 3 - opens rods B, C and D (only A and E are closed)
Slider 1 - opens rod A (closes rod C)
Slider 5 - opens rods C and E |
| |
| |
| |
|
| |