| ||||
RICHARD'S GALLERY | ||||
| Sit back and enjoy Richard's guided tour (and somewhat different interpretations) of Ackerman's paintings. | ||||
| Talk to Mia and learn a bit more about the Red Lantern Club. Ask Richard to get you information on the sellers and persons from the Department of Fine Arts involved in the project. Examine the book of Ackerman's work on the pedestal near the water fountain in the centre of the gallery. | ||||
| Consult Victoria's notes (in your inventory) to find out she wants to check the computers at the office. By doing this you know where to go next. | ||||
THE OFFICE | ||||
| Claire tells you that Todd Browning has a level-4 clearance, so you have to find a way to get into his office. The janitor obviously has a set of keys (on his cleaning trolley) but he won't give them to you. Can you find a way to distract him or get him out the general office? | ||||
| Have you played around with the coffee machine? If used with no cup or mug in place, the coffee pours directly into the drainage area. Take a paper napkin out the dispenser and use it to cover the drainage area. Now press the button and the coffee spills onto the floor. | ||||
| When you tell the janitor about your little accident he rushes off to clean the mess. You can now take his keys from the trolley. Note that you should also take the screwdriver that's on the trolley. | ||||
| Use the janitor's keys to get into Todd's office. Unfortunately his computer is password locked and you need to get the information from the archives downstairs. If you studied the elevator buttons panel you would have noted that the button for the archive section (B3) has to be unlocked before it can be used. | ||||
| Examine Todd's wall safe to learn that it's operated by a print scanner. | ||||
| Time to put your fingerprint lifting skills to work again. Take Todd's coffee mug from his desk (you won't be able to take it before you examine the safe) and go to the fingerprint equipment. The procedure for lifting Todd's print is exactly the same as before - refer to Chapter 3 for the detailed instructions. | ||||
| You can now unlock the wall safe, click the handle to open it and remove the security key. To avoid having to return later, also take the taser from the side cabinet. | ||||
| Unlock the B3 button in the elevator with the security key and head down to the archive section. | ||||
ARCHIVE SECTION | ||||
| The left door leads to the archives room security corridor and the right door to the bomb squad room. Examine the cover on the right of the bomb squad door and unscrew it using the screwdriver. Next, jolt the wires with the taser you got in Todd's office to unlock the door. | ||||
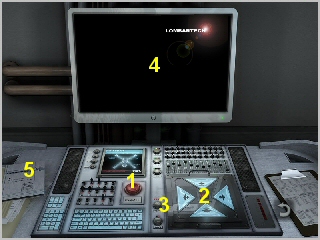
| You need to experiment with the robotic spider control panel to learn what the various buttons and controls do. | ||||
| ||||
| ||||
| Different views of the archive room security corridor are visible in (4) each time (3) is pressed. Scroll through the four different views paying careful attention to the descriptions and what can be seen. You'll see the door to the archives room, the main security panel, the door's security panel and the ventilation shaft. | ||||
| To access the ventilation shaft (in the bomb squad room) you need to remove the cover. Examine the cover and use the screwdriver to remove both screws holding it in place. | ||||
| You can now send a robotic spider through the ventilation shaft to short-circuit the archive room door's security panel. Fortunately the spiders are able to force open the ventilation cover in that room! | ||||
| ||||
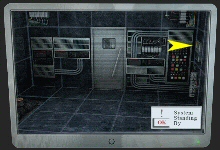
| After the robotic spider short-circuits the door's security panel you can enter the archive room security corridor. From what you saw via the remote monitoring system you know that the main security panel is at the opposite end of the corridor, across the black tiles. | ||||
| ||||
| You can't walk across the black tiles because of the deadly array of 'invisible' lasers sweeping the area. Also, without being able to see the lasers it's also not possible to manoeuvre a robotic spider through them. | ||||
| Movie buffs will recognize the solution immediately - spraying the area with powder or smoke should make the lasers visible. Do you remember seeing anything you could use to do this? Did you notice a fire extinguisher in the parking basement on B1? Although it wasn't possible before, you can now remove the fire extinguisher and use it to fill the archive security corridor with smoke, making the lasers visible. | ||||
| Manoeuvring a robotic spider through the lasers is fairly tricky, but if you follow my detailed solution it shouldn't be too difficult. | ||||
| ||||
| ||||
| You can now cross the black tiled area, enter the archives room and access the computer console. | ||||
| All data on Mark Ackerman and the Perlovka Ripper, barring the file taken by Gus McPherson, appears to have been deleted. If Gus kept this file, it should be somewhere in Pat's house. Other than his chest in the attic, did you notice anything else belonging to Gus? | ||||
PAT'S HOUSE | ||||
| In the study, at the end of the upstairs hallway, there's a painting done by Gus in 1927. You won't see anything unusual about the painting when you look at. If, however, you look at the back of the painting (turn it around the same way as other inventory items, then click the 'eye' icon) a lump is visible. | ||||
| Do you remember seeing Pat's toolbox when he was fixing the jacuzzi? Did you notice the exacto knife on the floor next to it? There was no reason to take the exacto previously, but now you can. Fetch the exacto and use it to cut away the back of Gus' painting. Note that you can't take the exacto unless you've seen the lump at the back of the painting. | ||||
| Despite his personal tragedy, it seems that Gus did find happiness and had the last laugh on the Ackermans! | ||||
| In response to Claire's phone call, you rush off to the campus. | ||||
CAMPUS | ||||
| Your second encounter with the killer has a lot more blood and thunder than the first. | ||||
| In the hope of finding a clue as to where the killer has taken Mia, head off to Richard's gallery. | ||||
RICHARD'S GALLERY | ||||
| Examine all twelve paintings in the gallery. Pay careful attention to each description and note that sometimes 'keywords' are briefly displayed in the top right corner. On certain of the actual paintings there are hotspots that provide additional descriptions and, in some cases, 'keywords' are also displayed. | ||||
| After studying the paintings you need to put your 'googling' expertise to use on Richard's computer. | ||||
| ||||
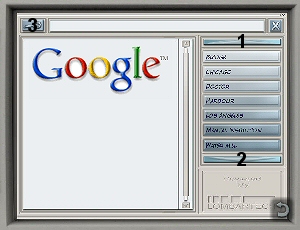
| You should have activated 10 keywords, which are now listed on the right of Richard's computer screen. Only 8 of them are visible, so use the scroll buttons (1 and 2 in the graphic) to access the rest. | ||||
| Enter any three keywords, then press the 'Search' button (3) to find and view the results. You obviously have to work out what three keywords will produce the correct result. | ||||
| ||||
FINAL SHOWDOWN | ||||
| Once you find the location it's added to the NavCom in Victoria's 4X4. Fasten your safety belt and hold tight as you prepare yourself for the Final Showdown. | ||||
KEEP WATCHING AFTER THE CREDITS... THERE'S MORE | ||||
Dunno about you, but I await the sequel with baited breath! | ||||