| ||||||||||||||||
| There's a large tree and some flat rocks in the area where Tika leaves you. Head off to the white grotto remembering Tika's instructions to follow the torches. | ||||||||||||||||
| Along the way collect the juniper berries, juniper twig and spearmint. Also familiarize yourself with the surroundings. | ||||||||||||||||
PALETTE | ||||||||||||||||
| Lharik won't let you into the grotto until you've prepared a palette. He says it must contain a few colours and tools. | ||||||||||||||||
| Take the tuft of hair next to Lharik. About halfway through the tunnel entrance you find some powdered black pigment, a block of ochre pigment and a strap on the ground. You can get a little stick and piece of bark at the tunnel entrance. | ||||||||||||||||
| The two 'combining rocks' in front of the fire outside the grotto are used to prepare a palette. Place the piece of bark on the rock to your right, then put the required items on it. You already have two painting tools, the blowgun and piece of skin used at Tika's dwelling. The powdered black pigment can be put directly on the bark, but the ochre block must first be ground into powder form. Put it in the small indent on the right rock and use the pestle to grind it. Next use the rock on the left to construct a brush. Place the little stick on the rock and attach the tuft of hair to it with the strap. | ||||||||||||||||
| Arok realizes that the pigments must be moistened before showing the palette to Lharik. Pan upward and to the right to see a small rivulet flowing in the rock, from which drops of water can be taken and used to moisten the pigments. | ||||||||||||||||
| Although the palette is not yet complete, you can show it to Lharik. He says the hue of coloured stones can be varied by heating them. Knowing this, collect another block of ochre pigment and toss it into the fire at the 'combining rocks'. The block turns red and can be removed from the fire using the wooden spatula. Put the red block in the small indent on the right 'combining rock', grind it with the pestle, place it on the palette and moisten it with water from the rivulet. | ||||||||||||||||
| Your palette is now complete, so take it to Lharik, who adds a black stone, and allows you to enter the grotto. | ||||||||||||||||
PREPARING TO PAINT | ||||||||||||||||
| Klem tells you about his dream and that you should start painting. He says you must observe the shapes in the cavern and how they react when the light strikes them. | ||||||||||||||||
| Speak to Lharik, who says that in return for finding his bull-roarer he'll give you something that will help. | ||||||||||||||||
| Tika will now be at the fire outside the tunnel entrance. Talk to her and give her the juniper berries and spearmint. | ||||||||||||||||
| Note that if you ask Tika about Lharik's bull-roarer she tells you to look in the large tree where you began this section. However, by not discussing this dialog topic with her, the action sequence in which you must chase wolves away with pinecones and a slingshot can be avoided. | ||||||||||||||||
| In the area with the large tree and rocks you must solve the rock pile puzzle to climb the tree and get the bull-roarer. | ||||||||||||||||
| ||||||||||||||||
| If you elected not to avoid the wolves action sequence, also take the pinecones and slingshot from the tree. You won't be able to leave the area while the wolves are around, so use the pinecones and slingshot to chase them away. | ||||||||||||||||
| There are three dark areas behind the tree where the wolves are visible. Begin at the one on the right and fire away continuously. A wolf occasionally pops its head up behind the rocks, so aim at that. Use the same method at the area in the middle. Finally, click continuously on the wolves in all three areas, you should eventually hit a few of them. | ||||||||||||||||
| Return to Lharik and give him his bull-roarer. As promised, he gives you a figurine of a bull and reminds you to think of light and shadow. | ||||||||||||||||
| Study the wall paintings, noting that they are lit up by candles in the cavern. On the ground (next to a pile of grass) is a flat rock with six candles on it. Put the bull figurine on the flat rock and a shadow of a gigantic bull appears on the wall. Note that you must approach the flat rock with the candles from the entrance side of the cavern to interact with it. | ||||||||||||||||
| You won't be able to reach the bull shadow, so again speak to Lharik who suggests using a branch from a dead tree. Did you notice the dead tree on your way to the grotto? Use your axe to cut the branch on the right of the tree, trim the fallen branch by chopping off the two outer stems and take the gnarly tree. | ||||||||||||||||
| Return to the cavern and place the gnarly tree on the left of the wooden structure below the bull shadow. Now climb up to the shadow and put your artistic talents to work. | ||||||||||||||||
PAINTING THE GIGANTIC BULL | ||||||||||||||||
| The only vague clue you have on how to paint the bull is in the documentary database. There's a drawing of an auroch in the 'Animal World' section under 'Prehistory'. The outlines on this drawing are similar to what you must paint. Other than that, you need to experiment with your art tools on the various hotspots. Note that the portion you paint is directly under the 'action' hotspot, not where the actual tip of the tool is positioned. | ||||||||||||||||
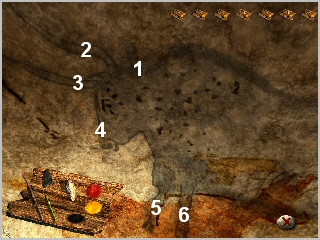
| Begin with the outlines. Dip the brush in the black pigment and click on the six hotspots shown below. | ||||||||||||||||
| ||||||||||||||||
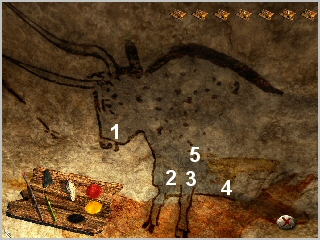
| If you study the shadow you'll see that certain areas are shaded in, so this is what must be done next. The brush is not suitable for this, so use the blowgun after filling it with black pigment. The five hotspots to click on are shown below. | ||||||||||||||||
| ||||||||||||||||
| After painting all the correct outlines and shaded areas the bull's spirit is awakened. | ||||||||||||||||
CREATING ADDITIONAL BULLS | ||||||||||||||||
| When you now click on the bull, the musical stones are activated. As you did previously, click each of the stones while holding the bone and note the reaction of the bull. | ||||||||||||||||
| ||||||||||||||||
| Clearly you must simulate a walking action by moving the bull's legs in the correct sequence. You won't know whether the bull starts on its left or right legs, but if you try its left legs, then right legs and then left legs again, both possibilities will be catered for. | ||||||||||||||||
| The correct sequence is right front leg, right hind leg, left front leg and then left hind leg - 2, 5, 1, 3. Note that the first time you try this sequence the bull may not start walking, but it will do a version of the quick step indicating that you've got the correct sequence. If this happens, repeat the sequence and the second bull should appear. | ||||||||||||||||
| As with the first, you must simulate a walking action with the second bull. Unfortunately the musical stones won't move all the bull's legs. | ||||||||||||||||
| Go to Klem and ask him about the other sacred grotto. He says they're actually the same cavern, only separated by a steep and narrow passage. Ever the inquisitive adventurer, you should investigate. The passage seems to be behind the scaffolding Klem used earlier, so climb up onto it to look for the passage. The bad news is that you can't enter the passage, but the good news is you find another two musical stones on the animal skin. | ||||||||||||||||
| With seven musical stones (instead of five) you can move all four legs. | ||||||||||||||||
| ||||||||||||||||
| The correct sequence to simulate a walking action with the second bull is 5, 2, 1, 7. | ||||||||||||||||
| Note that the first part (first bull) can also be done if you have all seven musical stones. The sequence is 3, 6, 2, 4. | ||||||||||||||||
PRIME SPIRIT | ||||||||||||||||
| Ask Klem about the strange painting next to Lharik and he tells you it's the prime spirit of the cavern. If you pan round to face the opposite wall you see a canvas painting in a wooden frame. This is a sketch of what you must copy. | ||||||||||||||||
| Click the unfinished painting (next to Lharik) to create a grid of fifteen segments with red dots at the intersections. | ||||||||||||||||
| This is actually a slider puzzle with a difference. Clicking the individual segments (except for the 9th one) changes the 'partial' painting on that segment. Some segments change completely, while others only change colour. Clicking on a red dot rotates the four segments around it in a clockwise direction. | ||||||||||||||||
| The grid can be reset to its original display by exiting and stepping away from it. | ||||||||||||||||
| ||||||||||||||||
THREE STAGS | ||||||||||||||||
| Klem tells you that the fresco is not complete in that it still lacks life and colour. Examine the walls closely and look for the incomplete area. The outline of three stags is visible directly opposite the gigantic bull. You again need the gnarly tree to reach the stags. Pick it up, pan round to the opposite wall and put it in place. | ||||||||||||||||
| ||||||||||||||||
| Study the fresco noting the symbol above each stag. The symbols indicate which colours to use, as well as what tools to paint with. This is almost like 'paint-by-symbols', the prehistoric forerunner of 'paint-by-numbers'. | ||||||||||||||||
| The strokes in the symbols represent the outlines and the dots are the colours used to paint the actual stag. Note that the symbol above the top stag and the one on the left consist of two red strokes with an orange dot in the centre. The symbol above the stag on the right has a black stroke with a black dot on the left and a yellow dot on the right. | ||||||||||||||||
| Paint the outline of the top stag with the brush, dipped in red pigment (from the palette) by clicking on the stag's legs. You don't have any orange pigment but mixing red and yellow should do the trick. Change to the blowgun and dip it in both the red and yellow pigments to produce orange pigment, which is applied by clicking on the stag's body. | ||||||||||||||||
| Painting the stag on the left is done in almost the exact same manner. The only difference is that the stag's front legs and antlers are clicked to paint the outline. | ||||||||||||||||
| The symbol above the stag on the right has a black stroke, so do the outline with the brush (dipped in black pigment) by clicking on both the stag's legs. There's a black dot on the left of the stroke, so paint the left half of the stag with the blowgun (dipped in black pigment) by clicking the neck of the stag. Again use the blowgun (dipped in yellow pigment) and click the right part of the stag's body to paint it yellow. Note that you have to replace the blowgun onto the palette after using the black pigment, then pick it up again and dip it in the yellow pigment. | ||||||||||||||||
SHRINE GATE | ||||||||||||||||
| Klem asks you to go to the cave's other entrance, to clear a passage between the branches and fetch the headdress and oil lamp needed for the ceremony. | ||||||||||||||||
| The wooden gate at the other entrance consists of thirteen wooden poles and nine horizontal wooden bars. Each bar is supported by either the top or a short stem of two poles. The strange symbols on the rock above are controls used to slide horizontal bars left or right (arrow symbols) and to rotate (circle symbols) poles or bars left or right. A bar can only be slid left or right if there are poles (or stems) positioned to support it. Poles and bars are rotated to change the direction that their stems face. A pole cannot be rotated while it's supporting a bar, nor can bars be rotated or moved if obstructed by another bar. | ||||||||||||||||
| Clicking on a pole or bar causes it to flash. The selected (flashing) pole or bar can then be rotated or moved with the symbol controls above. | ||||||||||||||||
| ||||||||||||||||
| After clearing a passage between the branches take the sorcerer's headdress and oil lamp. | ||||||||||||||||
CEREMONY | ||||||||||||||||
| Put the sorcerer's headdress and oil lamp on the ground in front of Klem. After donning the headdress Klem instructs you to prepare the oil lamp. If you examined all the items in your inventory, you would've noted that the animal fat from Tika's dwelling is 'often used as fuel in oil lamps' and that juniper twigs 'make excellent wicks for oil lamps'. Place the animal fat in the oil lamp and then insert the juniper twig. | ||||||||||||||||
| Pan round and you find a small stick on the rock with the six candles. Light the stick on the candles, then use it to light the oil lamp. This must be done very slowly or else you lose the flame on the stick, and you need to light it again. | ||||||||||||||||
| For the final part of the ceremony you have to drink Tika's concoction. There is a bug in the program in that she's able to prepare her concoction even if you forgot to get or give her the juniper leaves and spearmint. | ||||||||||||||||
TRAJARH'S STONES | ||||||||||||||||
| Klem says you have to use both your musical stones and Trajarh's stones to awaken the great sorcerer. | ||||||||||||||||
| Each of Trajarh's stones produces a note identical to one of yours. By clicking either one of Trajarh's stones followed by your own corresponding stone, or visa versa, the symbols on Trjarh's stones will be replicated on your stones. | ||||||||||||||||
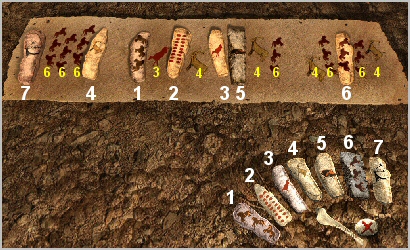
| If you look closely at the skin on which Trajarh's stones are laid out, you notice that some of the symbols on the stones are also painted on the actual skin. Visualize the painted symbols, and those on the stones, as a form of sheet music and you know what 'tune' to play to awaken the great sorcerer. Two of the symbols, each with three tigers on them (on stones 1 and 6) may at first be a bit confusing, but if you look carefully you note the they face different directions. | ||||||||||||||||
| ||||||||||||||||
| Trajarh's corresponding stones are numbered 1 - 7 (in white) on the graphics above. The painted symbols are shown in yellow, also numbered 1 - 7. | ||||||||||||||||
| To reproduce the entire sheet music from the skin, click your stones in the following sequence: | ||||||||||||||||
| ||||||||||||||||
Now sit back, relax and enjoy the ending! | ||||||||||||||||
| ||||||||||||||||