| ||
| After climbing up the slope with the painted hands you reach a third cave. From the mouth of the cave, across a large pool of water, the exit is visible in the distance. | ||
BEAR FRESCO | ||
| A piece of the wall, just below the hunter, is missing from the bear fresco. The missing piece has fallen onto the ledge at the mouth of the cave. Unfortunately, if you climb down onto the ledge the noise wakes the bear sleeping at the far end. While standing above the ledge, pan to your right to find a bundle of grass. Collect and drop two loads of grass onto the ledge. You can now climb down onto the grass, without waking the bear. Pick up the missing wall piece and replace it in the fresco. | ||
| Study the fresco to work out how the hunter can get rid of the bear, armed only with his slingshot and stones. Hurling a stone at the bear will do nothing but make it attack the hunter in a wild rage. The stalactite prevents the hunter trying to dislodge the rocks in the top left corner. Knocking off the stalactite also wakes the bear, with the same fatal results. Take note of the cave behind the bear. You need to coax the bear into the cave then block the entrance. Perhaps this hunter is the one who invented the old trick of diverting someone's attention to where a stone is tossed. | ||
| Note that these are timed sequences, so you must do everything as quick as possible, without hesitation. It may take a few tries to get the timing right, but there's no limit on the number of chances you get, so keep at it. | ||
| Click the stones next to the hunter to get a stone, click the hunter (to load his slingshot) then click the indent in the wall above the bear. Immediately repeat this exact sequence. The bear initially looks up, then thinking that the noise came from inside the cave, it goes to investigate. Next, again as quick as possible, click the stones, the hunter and then the stalactite to knock it down. Lastly, click the stones, the hunter and then the rocks at the top to seal the entrance. | ||
CROSSING THE WATER | ||
| With the bear sealed behind the rocks you can explore the area on the ledge where it was sleeping. You find a pile of stones (you get three at a time) and a rope. Go back into the cave and pick up a second rope and a piece of leather. Place the piece of leather on the 'combining rock' inside the cave, then use the awl to make two holes on the left side of it, in the same positions as the two existing holes. Next attach a rope to either end and make a slingshot. | ||
| Think about the fresco and note that almost everything has been replicated. The bear is sealed in the cave, you're the hunter and you now have a slingshot and stones. All that hasn't happened is knocking down a stalactite. | ||
| If you look up while standing either at the mouth of the cave or where the bear was, you see four stalactites. When you use your slingshot position the little target anywhere on a stalactite to knock it down. You obviously have to take more stones from the pile on the ledge after using the three you already have. | ||
| All four stalactites drop into the water conveniently forming stepping stones. Although it's not easy to see at first, from the point where the bear was you can step on the stalactites and get to a narrow walkway halfway across the water. | ||
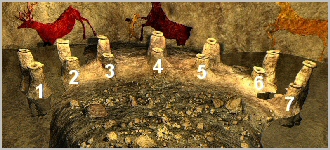
OIL LAMPS | ||
| At the end of the walkway you find a burnt out fire, an aurochs' horn and a long branch. Take the aurochs' horn back to the cave, fill it with embers from the fire and use it to re-kindle the fire on the walkway. | ||
| Light the tip of the long branch from the fire. It must then be used to light all fourteen oil lamps. When a particular lamp is lit, it simultaneously causes certain of the other oil lamps to light up. Similarly, if you use the branch on a lit lamp, it's flame, and those of the lamps linked to it, are doused. | ||
| ||
| If you experiment with the lamps a definite pattern emerges. Think of them as two rows each containing seven lamps. When a lamp is lit (or its flame doused) the lamps on either side of it (same row) as well as the corresponding one in the other row are affected. Once you work this out, the solution is simple. | ||
| Lighting the lamps in either of the following two sequences will work (F = Front row and R = Rear row) | ||
| ||
| After lighting all fourteen lamps, the fresco on the wall comes to life - your clue to getting across to the other side! | ||
STAGS FRESCO | ||
| This is a real fun puzzle, and I enjoyed every minute I spent solving it. Once you've worked out the various controls, it's not that difficult. Think of it as a movie depicting a solitary stag crossing the water. Each painted stag is therefore a separate 'frame' in the movie. You need to co-ordinate each stag (position and colour) to produce a series of smooth movements ...and don't forget to cater for the rider (you) in the middle being able to mount the stag. | ||
| ||
| ||