<div align="center">
The
Ward Walkthrough
Developed
by Fragile Bits
Version 1.0
Walkthrough by Lone Lines
Introduction
You are Walker, you are on a mission on the moon, suddenly
all hell breaks loose, you are now alone, and need to solve many many odd puzzles
(mostly being slider puzzles).
Though I already found a walkthrough for this game, I will add some screenshots
and a few more details to this one, in order to help those stuck in the NORMAL
mode of play in the game. Adventurers playing in EASY mode should also be able
to follow this walkthrough (but expect less puzzles).
I'll be assuming the manual has been read and that you are familiar with all
ways to manipulate objects. Please read the manual if you haven't done so
already, or press the F1 key for help. This walkthrough contains only the
actions needed to finish the game, use it only as last resort since it may
spoil your fun.
The Moonbase
You wake up all dazzled and confused, without a clue of what is going on. Grab the screwdriver from the case, check the alien body and use the screwdriver on the pocket in order to reveal a card, take the card. Exit the room and quickly make your way towards the alien corpse on the floor, once you get the close-up screen grab the card next to him. Walker will automatically return to his "prison". Use the latter card on the RED controls on the left to turn it to GREEN. Exit the room and pick up the gun from the floor, go down to reveal another alien body on the floor. Take a closer look and remove the BLUE ring from his finger. Exit the screen and use the card from the alien's pocket on the door to open it, enter the room.
Use the card from the alien's pocket on the RED sensor (just right from the door you just entered), click on the controls that now came alive. There are a set of 6 buttons arranged in pairs. From left to right (1 being the button on the far left) click on the following buttons, 1, 3, 6, click on the blades to pick one up. Use med card on door to exit the room, and click on the alien corpse for a close-up, use the blade on the ring to get the CYAN ring, use the med card on the door to open it once more and enter the room. On the right of the upper door is an open cabinet, click on it 3 times to get all 3 blood samples, exit the room via the upper door. Click on the microscope right next to the door on the right, press the lower right button 4 times, press the upper right button 3 times, press the middle button, take the sample, click the middle button once more to rebuild the sphere, use blood sample #3 on light sample (the sphere), click on the touch screen, press the button farthest to the right, exit the touch screen close-up, click on the microscope's upper right button, press the middle button, get the sample, take the light object. Pick up the pulsating matter from the table (it is possible to return to this room later on, in case you need to use the microscope again). Exit the room using the door on the left (you guessed it, use the med card on the door). SAVE your game. Go to the left, pick up the GREEN ring from the alien corpse. Click on panel, use glowing lens on panel, use screwdriver on upper left cover 10 times to open it, click on the blue switch. Welcome to the ring puzzle.
What you need to do here is place the 3 rings in a certain
position in order to open the door. Each ring is used only once and the
combination is randomly chosen for each game you play. After using the 3 rings
on the sensors you will receive indication lights: 3 red lights mean all of
your rings are in the wrong position, 1 green light means you have 1 ring in
the right position, 2 green lights mean you have 2 rings in the right position,
3 green lights means... err.. the door opens =).
Keep experimenting with the rings till you get 2 green lights, after that look
on the floor, the alien threw a red ring at you, pick it up and SAVE your game,
replace ONE of the rings you used earlier with the RED ring (since you only
have 1 bad located ring anyway, in most cases you need to replace the CYAN
ring), when you get 3 green lights the door opens, quickly hit the switch on
the left to close the door and escape the flying security drone. REMEMBER the
sequence you used to open the door since it'll be crucial for later on.
Go to the lower part of the screen and click on the button, get the memorizer, exit through the glass door, click on the red switch to open the door, then go down the corridor until you enter yet another door. Go to the circle and click on the floating stone, it will morph to a plate, click on plate with symbols, wait a bit and another floating plate will appear, click on the floating plate AND KEEP THE MOUSE BUTTON PRESSED until it morphs in order to get tiles. Click on the engraving, use plate and tiles on the engraving. Welcome to the color puzzle.
There are a lot of hints for this puzzle (press F1 to receive them), since it's quite hard. Your objective is to get a color scheme identical to the one on the plate. Use the following picture to guide you, in case you have all the colors correct except the CYAN in the middle, change the GREEN circle to CYAN and the CYAN circle to GREEN (both triangles and both circles act DIFFERENTLY when used upon other colors, this puzzle does NOT follow any RGB or CMYK codes, so forget it).
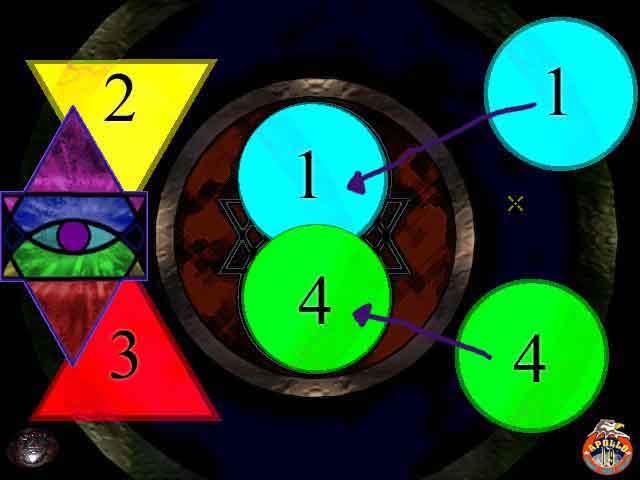
The order is as follows: CYAN circle, YELLOW triangle, RED triangle, GREEN circle. After getting the correct color combination SAVE your game (you'll thank me later), use the crystal cone in your inventory (yes, it's there) on the tiles (creating the bulls-eye).
After the cut-scene, exhaust all dialog options with the aliens, you automatically exit the room, now HURRY, go down the corridor and click on the panel, use the same ring sequence as before (you DID remember it, right?) in order to open the door, quickly enter the room, click on the green switch on the left to lock the door.
Go through the glass door and use any ring on the console to the right, on the upper menu click Life Support, you'll get a map of the ventilation corridors along with a few force fields (displayed as red spheres) and maintenance bots (displayed in green), see those orange moving things? Those are bad for your health. Click on any sphere to turn it to blue (thus allowing access through it), and trap BOTH security drones (the orange dots) in the upper portion of the ventilation corridor. Make sure you turn the force field to RED in order to trap them there, and turn all the other force fields to BLUE. Click on the moving green square on the left (the maintenance bot, don't be alarmed if it's not there, just wait a bit and it'll appear) and from the options choose Checkpoint exh. 2. Exit the screen. In inventory use the gun load on the gun, use gun on grate, go forward 7 times, then turn right and go forward till you reach the damaged maintenance robot, use the blade on the left robot hand, in inventory click on the memorizer, use the arrows on the memorizer to choose "comm.link to maint.robot" then press transmit, use the arrows to highlight ROUTE 102, then click receive, use the arrows to highlight ROUTE 103, then click receive. Turn around, go forward 5 times, take a left, then forward till you get out of the grate. Use the ring on the console again, choose Life Support and this time trap the security drones on the right part of the ventilation corridor (along with the green damaged robot you just visited). Turn the right force field RED, all the rest BLUE. Exit the screen and return to the grate. Go forward till you reach a grate cover, use the robot hand on the left and right screws, click on the handle to open the grate. Go down and then through the top door to return to the game's starting screen. Click on the memorizer and choose "comm.link to sec.sphere", click on transmit, choose SEC.LEVEL 6 then click receive. Leave the room and use the med card on the door to the left. Go a screen to the right, and use the med card on the RED sensor, from the close-up screen choose Obductees (yeah, I know, spelling error) then choose "security/beacon necklace removal", click on the medical robot (while close-up screen is still open) in order to remove the necklace. Go left then use the med card on the left door, exit the room, go down then click on the ventilation shaft to enter it. Turn around, go forward 3 times, take a right and keep going till a dead end, take a left to get to the second maintenance robot. Use the necklace on the robot, then click on the memorizer. Choose "comm.link to maint.robot", some of the data is corrupt, click transmit then select ROUTE 102, click on transmit, then choose ROUTE 103 and click on transmit to repair the robot (in some odd occasions, a bug in the game "fixes" the robot for you before you get the chance). Turn around and take a right, go forward 6 times then take another right, go all the way and exit the ventilation corridor. Use a ring on the console and choose Life Support, click on the left green square and select ROUTE 103 to send the Reptoids and the security drones in a wild goose chase. Click on the RED switch to unlock the upper door and exit the room. SAVE your game (NOTE: those of you who need to get back to the microscope room, can now use the med card on the door to access it). Go towards the door in the end of the corridor, once you enter the room you have a VERY short amount of time so be quick, choose the memorizer and select SEC.LEVEL 6 then press transmit to disable the security sphere. In inventory use the crystal cone on the biocontainer to hide it inside it, choose the memorizer then click on generate to generate a random code then choose "comm.link to biocontainer", click on transmit then select the generated code, click transmit again then click on generate to abort the comm. link, choose the random code and transmit it to insert the biocontainer in Walker's body, REMEMBER THE CODE YOU JUST USED AS IT IS VITAL FOR EXTRACTING THE BIOCONTAINER OUT OF WALKER'S BODY, click on scramble a few times (remember how many times) in order to hide the code from prying eyes (in case the biocontainer does not insert itself in the body, go back to the microscope and make sure you use blood sample #3 in it, see details above). Click on the memorizer and choose "comm.link to container", click on receive then exit the memorizer screen. Pick up an oxygen tank and an oxygen mask then enter the container, once inside click on the memorizer and choose the code you received from the container in order to shut the container doors. In inventory combine the oxygen mask with the oxygen tank. Enjoy the ride.
The Human Colony
Welcome to the human colony, the man who's currently talking to you is Ripper, learn to hate him, choose any option and meet his boss, hate him too, choose any option and then "All right", Ripper will give you the tour, feel free to ask annoying questions as you walk with him, when you stop use your personal keycard on the left door in order to open it, after that Ripper shows you your new job, toilet cleaning.
A few notes about this part of the walkthrough:
Since the people here are ALWAYS on the move, make sure you know where the
following locations are: the gambling room, Rita's room (within the gambling
room, usually locked if she's not in the room), the church, Walker's room, the
toilets, the preacher's room (near the second entrance of the church, usually
locked). Familiarize yourself with your new surroundings and start socializing
(and reading).
I will only tell you who you need to talk to from now on, which basically means you exhaust all options (except the show items), leave a person only after you have discussed all topics with them, in case the person doesn't feel like chatting on a certain subject, choose another and then return to the subject the person didn't want to discuss, odds are the person changes his (or her) mind. First impressions are MOST important, so when initiating a conversation for the first time with someone make sure you choose the right thing to say (or locate the person later and apologize). Most conversations take place within the gambling room (or sometimes other rooms), some people will NOT agree to talk to you elsewhere. If you want to talk to a certain someone, either go to their room and wait, or ask them to meet you there.
Talk to the Brazilian and choose "Do I look that bad?", exhaust all topics (one cannot be discussed), show him the secret sign, he tells you to talk to Hacker (he's the guy wearing black clothes, a black hat (backward of course) & sunglasses).
The bells ring and you go to church (and get some beating). Now you need to explore and talk to everyone and a LOT, this is probably not the most efficient way to do the talking but it works, so if you want a step by step talking guide go ahead:
Locate Hacker (description above), and choose "As
charming as a rattler".
Locate the man wearing a matching pair of cyan shirt and pants and talk to him
(usually located in the gambling room), meet Jake the radioman. Exhaust all
options.
Go to Rita's room (if it's locked, then take a stroll and come back a bit
later), talk to her get a card reading, and exhaust all options.
Talk to Hacker, exhaust all options, show him the secret sign.
Go to the church and talk to Jessica, choose "You don't like the
suit?", exhaust all options.
Go outside (where you first started on CD2), and talk to the doctor.
Go to the gambling room.
Talk to the doctor, exhaust all options.
Talk to Jessica, exhaust all options, some of the subjects she will not talk
about, ask to hear her story and tell her you are a good listener, after that
tell her your story, she will then talk to you about everything.
Talk to Jake, exhaust all new options.
Talk to Prof. Webber (he's the blonde guy with the white shirt and sunglasses,
he wouldn't talk to you earlier), exhaust all options.
Talk to Jeffrey, exhaust all options.
Go to Rita's room, talk to Rita, exhaust all options.
Talk to the woman wearing a white shirt and blue jeans (Rosa), exhaust all options.
Go to the church, talk to the preacher, after the talk, Ripper will call you.
Talk to the bald man with the sunglasses (Mike), after he leaves follow him and
talk to him again, exhaust all options.
Talk to Prof. Webber, exhaust new option.
Take a stroll and find Jeffrey (the doctor), he has a message for you…
Go to the preacher's room, talk to him, exhaust all options.
Talk to Hacker, exhaust all options.
Talk to Jessica, exhaust all options.
Talk to Jeffrey, exhaust all options.
Go to Rita's room and talk to her, exhaust all options.
Talk to Webber, exhaust new option.
Talk to Jake, exhaust new option.
Talk to the preacher (he'll usually appear in the gambling room), he'll tell
you to talk to Rita, go to Rita's room.
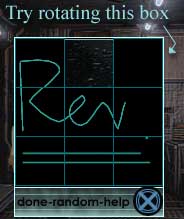
Oh dear… Rita isn't here… grab the cards from her table and click on the
cabinet for your first slider puzzle (that's right, I said FIRST). Use the card
with the 8 handed alien in order to solve it or just take a look at the
picture:
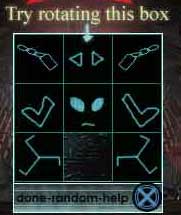
If everything is in place and the cabinet won't open rotate the upper box with
two arrows twice (it will look the same but unlock the cabinet).
Click on the book to move it and reveal a sensor, use
"King of Pentacles" card on sensor, enter the secret door, open the
door on the right, enter, click on the book to reveal another sensor, click on
the sensor, exit the room, go to the upper room, take the notebook, leave the
secret room. As you leave the room you will stop Ripper from hurting Rosa,
after the incident head for the toilets.
Talk to Sebastian and exhaust all options.
Talk to Jessica, exhaust new options.
Talk to Hacker, exhaust new options.
Talk to Jeffrey, exhaust new options.
Go to Rita's room and talk to her exhausting all options.
Go to Walker's room and click on the bed for the dream sequence.
Go to the gambling room, there should be a person sitting on the table (if
there isn't one, take a stroll and come back), talk to him in order to play a
little Blackjack. Move the mouse over Walker's turned card to reveal what
number lies underneath.
Welcome to your nightmare, your objective here is to get
what is known as Pager's card (or more correctly half of Pager's card), but
first you need to clean the gambler out of almost everything (especially his
gambler card). Don't worry about loosing all your betting items, once the
gambler chooses the C.S.M. model you AUTOMATICALLY win (same goes to the
gambler if he is left with one object as far as I know), make sure you DON'T
bet the screwdriver (or at least get it back if you do) since it's needed for
later use. Some guidance rules for non-blackjack players, don't ask for a hit
if you have 16 or more (since you'll probably get more than 21 and
automatically lose). You can also use the SAVE/LOAD tactic to help you win
(meaning, each time you win, you save the game, and each time you lose you load
the last game you saved and try again, thus not loosing). According to another
theory of mine, the first time the gambler shows you the half card you will not
be able to win it, lose once, then go for it again (this has not been proven).
My method of winning is to keep on playing (since I can't loose it all anyway),
till I get my winning streak and get the card,
That said, go on a winning streak and win half of Pager's
card AND the gambler's card.
Go to the toilets and talk to Sebastian, show him the card and exhaust all
options.
Go to Rita's room, talk to her, exhaust new option (are we having fun yet?)
Talk to Hacker, exhaust all new options.
Take a stroll then go near the gambling room, Jack will call you and give you a
message. Go to the church and talk to Rosa, she will give you a piece of paper,
use the gambler's card in the middle room in order to gain access there (it's
right next to your own room).
Click on the cabinet for yet another fun slider puzzle (and yes there's more of
them coming).
Use the paper to help you solve this one, or consult the following screenshot:

Click on the cabinet, you are now in possession of BOTH halves, find Hacker and
talk to him.
Take another stroll around, then go back near the gambling room, Jack will give
you a note.
Go to the preacher's room, BUT before you enter, make sure to SAVE your game.
As soon as you enter the preacher's room, the door shuts behind you, and the
air starts leaving.
Look at the picture, on the right side is a hidden switch, use it to open the
picture, use the screwdriver on the metal cover to open it, click on the
disconnected wires twice to connect them in = shape. Click on the fuse cap to
open it then take the fuse, use the C.S.M. model on the fuse cap then click on
the fuse cap to return it to its place. Click on the button on the right of the
door to burn the fuse (?), click on the picture again, connect the wires in X
shape. Then click on the button to ring the mass bell.
Go outside and Hacker will give you a fixed Pager's card. Go to the gambling
room just to learn that Ripper is looking for trouble. Go back to the preachers
room and use Pager's card to unlock his door, push the button to ring the bell
again. The preacher will cover for you, so quickly head to Rita's room (open
her door with Pager's card) and open the secret door (you can use Pager's card
to activate the sensor in the cabinet), go to the room on the right, use
Pager's card on the red sensor, then go through the liquid wall, look at the
notebook, and use notebook in inventory on the first page (with the starmap) to
make yourself a copy. When you finish reading the notebook, Jessica will show
talk to her and she will take you to the Nexus, as always, exhaust all options.
After the cut-scene use Pager's card on the red sensor to open the door, exit
the room. Go to the left entrance, close to the end of the massive walls is a
red arrow indicating "RIGHT" choose it, use Pager's card on the
sparkling sensor, go through the wall. After a short cut scene you gain control
again, go to the door on the right. A few more dialogs take place, so you know
what to do, exhaust all options.
Back home at last… and apparently things have changed.
Talk to Webber, exhaust all options.
Talk to Mike, exhaust all options.
Talk to Rosa, exhaust new option.
Talk to Jeffrey, exhaust all options.
Talk to Hacker, exhaust all options.
Go to Rita's secret room (open her door with Pager's card), go inside the wall
(use Pager's card), and talk to Rita, exhaust all options.
SAVE your game.
As you leave the room, Ripper comes to you with some very bad news.
You now have 15 minutes to save Jessica. Look at Ripper's body and take his
pager and his freezer, exit the room and go to the area just outside the
gambling room. SAVE your game. In inventory choose the pager and click on the
leftmost button, after a few seconds Marshal will show up, while his back is
turned, and he is facing the door, use the freezer on him to disable him, loot
at him ant take his freezer, click on the left inner pocket to get his card and
on the right inner pocket to get a piece of paper. Enter the gambling room and
talk to Hacker, after he leaves go to Marshal's room, talk to Slash and ask for
his help, he'll open Marshal's door for you. In Marshal's room, use the freezer
on the map then take the gun from inside.
Click on the safe for your Third (but not last) slider puzzle, use the piece of
paper from Marshal's pocket to help you, or consult the screenshot:

When the safe is opened get the data reader from inside, then head back to the
rightmost room where Jessica is held, use Marshal's card to open it, give the
data reader to Hacker. SAVE as soon as you gain control.
Be quick since this is once again a times sequence, go outside, use Marshal's
card on data reader, use the arrows on the data reader to select BRIDGE ON,
then click transmit, move Walker towards the control room (painstakingly slow),
as soon as you cross the room, click the data reader in inventory and select
BRIDGE OFF then transmit. Enter the control room.
Use Pager's card on left red sensor take back your memorizer and some implants.
Use the memorizer and unscramble the code you used to activate the biocontainer
(just unscramble the number of times you scrambled the code in the first place
till you reach the code you used… what's that? You forgot the code you used?
Well in that case, keep on pressing unscramble then transmit on and on till you
get it, the scrambled codes run in a loop so eventually you'll find it),
transmit the code to get the biocontainer out of Walker's body, then leave the
room. Choose BRIDGE ON to reactivate the bridge and head for Walker's room.
Click the cabinet and use the notebook to help you solve the fourth (but still
not the last) slider puzzle, or consult the screenshot:
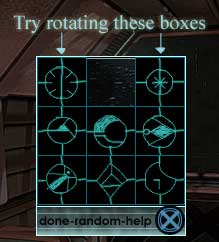
If the cabinet won't open, rotate the upper boxes (they will look the same but
unlock the cabinet, try different rotation combinations). After you open the
cabinet, get the tiles from inside.
Go to Rita, and talk to her (she's still hiding in that wall), exhaust all
options.
If you haven't done so already, go to the screen right of the gambling room,
you will be told of the preacher's bad condition, also notice that the middle
door is no longer locked.
Talk to Webber, exhaust all options.
Use the tracking implant on the implant gun and head for the guards room (the
middle door one screen right from the gambling room), go one screen up and use
the gun on the preacher.
Go to Rita (she's still there), she will talk to you and leave.
Use the tiles from Walker's locker on the diagram. Solve the puzzle on your own
or look at the screenshot:
Use the crystal cone on the green circle on the tiles, click on the object to
take it.
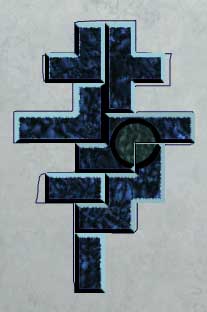
Go to the preachers room and look at the picture, click on the ornament for a
close-up, click on his cabinet for yet another (but finally last) slider
puzzle, use the ornament to help you out or consult the screenshot:
If the cabinet doesn't open try rotating the upper right black box.
Once you open the cabinet go through all the books until you find a card. Go to
the guard room where the preacher is lying. In inventory click on the data
reader, eject Marshal's card then use the preacher's card with the data reader.
Scroll down until you find a combination starting with tt5…. and select it,
then click on transmit, the preacher's hand will glow, click on the preacher to
get the psi comm. Use the psi comm and click on the exclamation mark in order
to contact the alien.
After a short conversation select the holomask control, choose Reptoid maintenance
then on the exclamation mark, leave the room via the upper exit. Go to the
right exit, when you arrive at the docks take a left on the smaller exit (which
has a red arrow pointing left, not right), you will hear a conversation. In
inventory, use the implant on the gun and then use the gun on the unsuspecting
Grey (who will now be known as Bloom), talk to him then use the holomask
control, choose off then press the exclamation mark. In inventory combine the
special implant with the implant gun, then use the gun on the biocontainer,
choose the memorizer and select the biocontainer code, then transmit it (you
still remember it right?), this time there is no need to scramble the code.
Talk to Bloom in order to board the ship.
The Alien Ship
Talk to Bloom, and select "Bloom, I need…"
You can now play as either Bloom or Walker (later on an icon just above the inventory icon on the bottom right will appear, use it to switch between Bloom and Walker). Also while Bloom is talking to Walker (or vice versa) you can open the inventory and exchange items between the two. I will assume that you played around a bit and know how to switch between Bloom and Walker and how to swap inventory items.
Playing as Bloom, go to the console, click on all the levels
and highlight all the areas, then go back to Walker and talk about everything
in order to gain more knowledge. After the conversation go to the door, use the
STD.CARD to open it, go to the right door and use the STD.CARD to open it as
well. Look at the maintenance equipment for a close-up, press the red button
and pick up a maintenance key, above that are hardware/tools, click them for a
close-up, click on the red button and pick up a wire cutter, to the left there
are electronic devices, click on it, press the red button and take TWO
communicators, exit the room. Go down then click on the elevator, press the
button in order to call it, when it arrives enter it then choose LEVEL C, click
on the panel on the left cryo-booth and use the maintenance key on the lock,
take the full gas tank and disconnect both wires, take an empty gas tank from
the bottom slots. Go to LEVEL D, walk down and enter the right room again,
click on the electronic parts then press the red button and take a Y-microjack
(you couldn't do this before). Return to LEVEL C and click on the panel, use
the Y-microjack on the left microslot, connect the blue and red wire to the
microjack, insert the empty gas tank and close the cover. Go back to LEVEL D
and return to Walker, talk to him and choose "Well, I think there is
nothing left to be done", and afterwards choose "Let's just sit and
wait…".
After the call for hibernation, talk to Walker then give the STD.CARD, the
memorizer, a communicator and the full gas tank to Walker. With Walker, open
the door, then switch to Bloom and let him enter, then walk towards the
elevator. Bloom will be taken to LEVEL C, click on the left cryo-booth's
screen, choose "open booth" on the bottom menu and
"sphereblend" on the top menu, lie in the booth and then switch to
Walker.
As Walker you're going to have to be VERY quick, so SAVE your game.
Use the memorizer and choose "comm.link to container" then click on
receive to get the container code. Enter the container and then click on behind
crates, use the full gas tank on the floor, use the container and transmit the
biocontainer to take it out of Walker's body, use the biocontainer on the floor
and then click on the valve to start releasing gas, use the memorizer and
transmit the container's code in order to close the container. Use the card to
open the door and make your way to the elevator, press LEVEL E and enter the
first door on the right, click on the scanner to get access into the security
room. You're safe, for the time being.
Click on the console and deny the early awakening of the crew, also ALWAYS deny
the elevator request from LEVEL E.
Switch to Bloom and click on the EXIT button, click on the elevator, switch to
Walker and approve the elevator call to LEVEL C, go to LEVEL D, outside lies
the unconscious Reptoid body, click on it and take his card, use the SEC.CARD
on the door, walk down then use the SEC.CARD to enter the door on the left.
Click on the console, click on abort, switch to Walker and approve the abort,
switch back to Bloom and choose "set grav gen. shutdown", choose
"affirmed", select "3 minutes", select "until we
arrive at Draco system", click on "affirmed" then switch to
Walker to approve the request. Use the maintenance key on the bottom left lock,
use the wire cutter to cut all the wires EXCEPT the wire coming out of the SEC
box (12 wires in total, each box has a red wire and a blue wire except the SEC
box). Exit the room and call the elevator, switch to Walker and approve the
elevator for LEVEL D, go to LEVEL C, click on the left cryo-booth's screen, choose
"open booth" on the bottom menu, then choose "hybernation"
on the upper menu, lie in booth, choose "yes" for both questions
asked afterwards, switch to Walker and approve the hybernation, then as Walker,
click on the Vitrifax, select "10 minutes" and enjoy the ride.
Click on the console, then choose "disengage security lock", exit the
room and go to the elevator, go to LEVEL D, walk down and then open the room to
the left, click on the scanner then enter the room.
You have no inventory here, so no problem, just follow the
path.
After a short ride in the elevator, click on the portal, then click on the
flow.
The last puzzle (to the best of my knowledge) is to turn all the white crystals into color crystals, each time you click a crystal, you get transported to a different place with more crystals, one click gives them color, the next takes it away. It's not a hard puzzle and a few minutes of clicking everything white should solve this one.
After that enjoy the end game sequence, you deserved it (especially after all those sliders).
-
For any comments or corrections regarding this walkthrough, you may contact me at [email protected], please note I will not answer questions regarding controls that can be solved by reading the manual or pressing the F1 key.
You may put this solution on any website provided you give me someone to contact if I update it, and naturally not change its contents (which means both the text and the screenshots MUST stay).
Happy Adventuring!
</div>