
Beyond Time
An Adventure Game by DreamCatcher Interactive
Walkthrough by Karen July
Abydos - West Bank
The game begins in the Ruins of Abydos. Turn around, go forward three, take left, and the statue of Osiris will flash and take you back in time to present-day Abydos.
Navigation:
F=Forward, R=Right, L=Left, U=Up, D=Down, LA=Angle Left, RA= Angle Right, T=Turn Around
During this first part of the walkthrough, follow these directional abbreviations to guide you to the necessary locations/items.
At different locations throughout the game, visions of Isis, Osiris, and the Priestess will appear. Listen to what they say as they will give clues. You can rehear their clues by pushing the Play button that appears on the screen after the first time you hear it. This Play button will always appear anytime you are in the exact location/direction of when you first heard the message.
You are in Osiris Court. Go F,L Priestess appears with message to find Horus’ Amulet and restore it to him. Go F, F and you are standing in front of the door to the Great Court of Horus. Open it. Go F, F, F and you will be standing in front of the Statue of Horus. Go F, L, F, R, D and pick up Horus’ Amulet (to pick up, click the "hand" on it; automatically it will be transferred to your inventory). Note there is a video-tape machine next to the Amulet. You can’t do anything with this until you have put the Amulet in Horus’ chest. Go U, R, R, R, F, L, F, L, L to again stand in front of the statue of Horus. Click on the Amulet in your inventory and drag it to the light spot in Horus’ chest. The Priestess will appear and say you can now pass.
Go R, F, RA, F, D and read the ragged parchment paper. Go U, L, F, F, L and note the three symbols on the pillar. This is one of the four combinations to enter the Isis Chamber. Go F, R, F, L, F and open the wooden chest to find another of the four combinations to enter the Isis Chamber. Go U, U, L, L, F, L, F, LA, F to find the third of four combinations to enter the Isis Chamber. Click hand to back away from wall. Go L, F, R, F, F, R and click on table. Read ragged parchment paper on top of table. Open drawer in table and find fourth combination to Isis Chamber. You now have the four combination codes to enter the Isis Chamber across the courtyard:


Go U, L, F and open the chest and read the ragged parchment paper.
Go U, T, F, R, F and read ragged parchment paper on the desk. Next, click on the scroll on the desk and the scroll will open. If you move the cursor over the right side of the opened scroll, to the right-pointing finger, and click, you will read more of the scroll. Keep clicking on the side until the entire scroll is read. Note one scroll page with symbols of the four elements (air, fire, water and earth) and another page with symbols for the four directions (North, East, South and West) -- these eight symbols are needed to solve the Obelisk Puzzle. Note other pages talk about the offerings needed to take a boat ride across the river to the east bank (Anubis, Horus, and Urn of Wheat).
Go U, R, F, R, F, L and move cursor around till it turns into a hand. Click the hand to open the scroll titled The Book of the Dead. Read this scroll all the way through. It has clues to the four gates later in the Labyrinth.
Go L, F, F, R and click hand on scroll to open the Book of Gates. Note specifically the following four pages which are clues/solutions to rooms in the Labyrinth (pages about the First, Second, Third, and Fourth chambers):
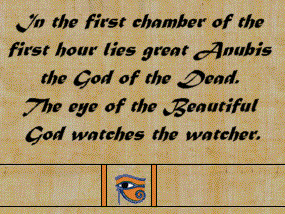 1st Chamber: Hint for the Labyrinth Jackal Room
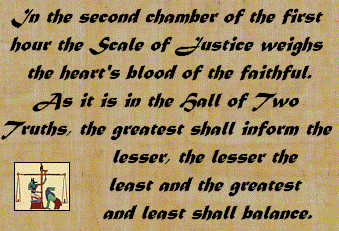 2nd Chamber: Hint for the Labyrinth Hall of Scales
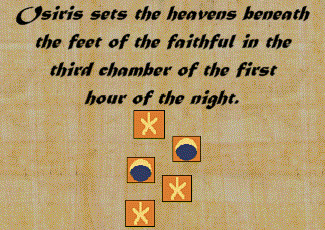 3rd Chamber: Hint for the Labyrinth Crystal Orb Room
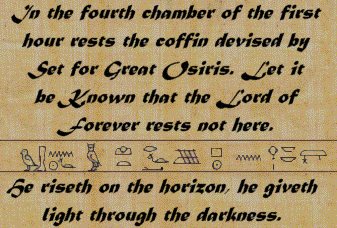 4th Chamber: Hint for the Labyrinth Mummy Room
Go L, RA, and click hand to read scroll about Akhenaten.
Go T, F, F,F,F,F,F,F,U,U,RA,F into the Priestess’ Room. Go F,F,D and read the letter from Menet on the desk. Read the scroll titled the Betrayal of Osiris. Read the scroll titled The Serpents of Sakkara, which is the solution to the snake puzzle. Go U,T,F,R, and click hand on the snake puzzle. (Right click your mouse and push the Help Button to see the Egyptian number equivalents.)
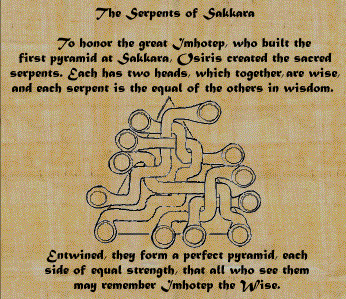 The Snake Puzzle Scroll Hints
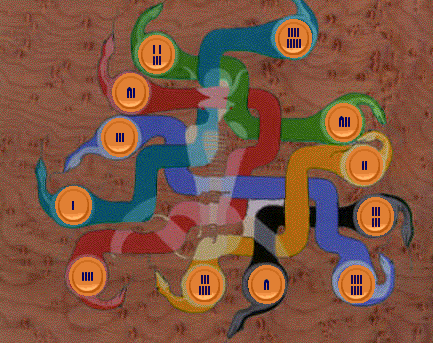 The Snake Puzzle
Note that the Snake Puzzle abstractly looks like a pyramid with four number disks on each of the three sides (4 on left, 4 on right, 4 on bottom). Note that there are six snakes, each with two heads, a number disk in each head. Disks numbered 10, 11, and 12 are fixed. To solve this puzzle, the sums of the 4 disks on each side of the pyramid must total 26, and at the same time, the sum of the two heads of each snake must total 13. Once you have done this correctly, the drawer will open and you can pick up the Eye of Horus.
Now, we want to go back and look at the video tape that was next to the Amulet of Horus we found on the floor below. We also have to find the four Element Keys.
Before we leave the Priestess’ Room, go back to the desk across the room. Don’t look Down. Move the cursor over the wall above the desk until it turns into a hand Click the hand to open the secret cache. Click on the Element Key for Air and it transfers to your inventory.
Go back downstairs to the Great Court of Horus to find the video tape on the floor. Push the blue button to activate the video and listen to it. When you come Up from the tape, Priestess appears with message about the Travelers.
Go into the Great Hall to the side of the Altar facing the Library. Move the cursor around the base of the altar until it turns into a hand. Click the hand to open the secret cache. Click on the Element Key for Fire and it transfers to your inventory.
Leave the interior of the Great Court of Horus back out into Osiris Court. (Before you leave, you might want to wander around to see if you can trigger any more appearances of the Priestess with messages and clues.)
Two steps out the door, turn left to the water pool. Move the cursor till it becomes a hand and click to retrieve the Element Key for Water and transfer it to your inventory.
Go U, R, F,F,F to the door of the Isis Chamber. Move the cursor till it becomes a hand and click to focus on the door combination. Enter any one of the four combinations (noted earlier) to open the door. Enter the Isis Chamber. Once inside, Isis will appear with a message (you might have to turn left once to trigger the appearance). Her message will be a clue to getting past one of the Isis Gates in the Labyrinth. After her message, an item will appear on the floor. Click on the item to transfer it to your inventory. Leave the Isis Chamber, turn around. Repeat these instructions for all four of the combinations, hearing four total messages with clues to the four gates in the Labyrinth, and receiving four total items: a golden Ankh, a golden Urn of Wheat Offering, a golden statue of Anubis Offering, and a Golden statue of Horus Offering.
Back in the Osiris Court, head towards the Boat Dock. Notice the two clay pots on either side of the Dock. Facing the dock, the left-hand pot contains the fourth Element Key of Earth. Find it, click on it to transfer it to your inventory.
Go to the Obelisk in the Courtyard. Right click your mouse and push the Help Button; turn the pages of the help book until you come to the glyphs for the four directions. Note which one is East. At the Obelisk, walk around it (there are four sides, one for each direction) until you find the glyph for East on the Obelisk. Go forward for a closeup of that direction. On the top of the Obelisk your cursor turns to a hand. Click until the Ankh glyph appears, that back away. You have just set one of the four Obelisks to East.
Wander around the Osiris Court to see if you can trigger any more visions.
Go to the front of the statue of Osiris. Move the Eye of Horus from your inventory to the indentation on the base of the statue in the shape of the eye. This opens the stairway down into The Dark Way. Go down the stairway and forward to the room with the orb above the four-sided pedestal, with four doors other than the one you came in. Drag the four Element Keys in your inventory onto the corresponding side of the pedestal. When you have all four in place, push the Earth Element Key on the pedestal to open the doorway. Go down the open door tunnel and pick up the bucket of dirt which transfers to your inventory. A gap appears in the wall before you, but you can’t do anything with it yet.
Go back to the Orb Room and push the Element Key for Water. Go down the open door tunnel and pick up the bucket of water which transfers to your inventory. Move the cursor around until a hand appears over a "scale". Drag the bucket of dirt from your inventory onto the "scale" to trigger a bridge over the moat surrounding the Obelisk. Go to the Obelisk and set this Obelisk to East as well. (Same as you did to the Obelisk in the Courtyard.)
Go back to the Orb Room and push the Element Key for Fire. Go down the open door tunnel and click on the torch on the wall which transfers to your inventory. Go the rest of the way down the tunnel and drag the bucket of water from your inventory onto the fire to put it out. Go further down the tunnel to the Obelisk, and again set this one to East.
Go back to the Orb Room and push the Element Key for Earth again. Go to the end of the tunnel and drag the torch from your inventory onto the gap in the wall before you to open the door. Go further until you find the Obelisk. Set this one, too, to East.
Go back to the Orb Room and push the Element Key for Air. Go to the end of the tunnel into the organ room. The door shuts behind you. The only way to open the door to get out is to solve the organ puzzle. Listen to the sounds being played. You must make the pipes in the puzzle sound the same tune. The solution looks as below. When the hand appears, click it to play the pipes in order from right to left as they appear in the rack. You have to move the pipes around in the rack until they look like this and play the same song. When successful, the door will open again. There is no Obelisk. here.
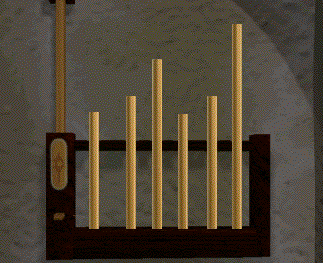
When you’ve solved the Organ puzzle and set all four Obelisks to East, the Boat from across the river will be waiting for you at the dock. Leave the Dark Way back to the surface. When you step back into the courtyard and the statue of Osiris moves back to cover the stairway to the Dark Way, turn around and click on the Eye of Horus you put in the Osiris statue’s base, to put the Eye of Horus back in your inventory. You will need the Eye later in the game, and if you don’t pick it up now, you’ll have to come back for it.
Go to the Boat Dock. Go forward to the end of the dock, turn left and forward to the boat. Turn left and face the altar. This is where you place the three offerings you received from Isis: The Golden Urn, the Golden Anubis, and the Golden Horus. Drag each item into it’s cubbyhole in the altar. From left to right: Urn, Anubis, Horus. To get successfully across the river to the East Bank, you must get all three offerings across without them eating each other. You can only carry one offering at a time, so:
You have successfully solved the Boat puzzle.
Abydos - East Bank
Click on the three offerings in the East Bank altar to put them back in your inventory. Leave the Boat Dock and head for the doors straight ahead. Enter the chamber and go forward to the foot of the statue of Osiris. Drag each of the three offerings onto its corresponding spot at the feet of Osiris. The door will unlock behind Osiris into the Labyrinth. Enter the door into the Vestibule (first room in the Labyrinth). Use the map provided in the Strategic Clues Booklet provided with the game.
Go to each of the crew’s living quarters. Look around and observe things. Each room will have a video player with five crystals in front. Each crystal, when placed, shows chronological videos made of the room’s inhabitant. Look at all the videos on each crystal in each room to get clues and understanding of what is going on. These are the Travelers. Take special note in Lantis’ quarters of the torn paper on the desk. The numbers on the paper are the solution to the end-game crystal puzzle.
Go to each of the Rooms: Crystal Orb Room, Scale Room, Jackal Room, and Mummy Room. Each has a puzzle you must solve. Earlier in this walkthrough are pictures of the hints from the scrolls in the Library back on the West Bank corresponding to each room. In each room, after you solve the puzzle, find the crystal and click on it to get coordinates needed to open the various time gates:
Jackal Room: Use the Eye of Horus on the statue. Click on the cube for coordinates to Lhasa 85:80:40.
Mummy Room: Use the sequence provided in the Hint Picture (above) for this room to solve the puzzle. Click on the obelisk for coordinates to the Space Station 14:25:50.
Crystal Orb Room: Hands appear over tiles in front of you on the floor. Use the map provided in the Hint Picture (above) for this room. Step on tiles according to the map picture: Star, Star, Moon, Moon, Star. This will get you across the room. Click on the orb for coordinates to Atlantis 19:60:30.
Hall of Scales: The scroll page to solve this puzzle is provided above in the Hint Picture for this room. The solution is to pour blood from the biggest pitcher into the middle pitcher; then pour blood from the middle pitcher into the smallest pitcher; then compare the biggest with the smallest and they should be equal. Once solved, click on the crystal pyramid for coordinates to Tikal 64:90:20.
After you’ve visited all living quarters and solved the four room puzzles, you can go on to solve the four Isis Gate puzzles. When you get to each gate door, a pillar will rise from the floor. When you click on the pillar, Isis will ask a question – the same ones she told you about back in the Isis Chamber on the West Bank. You need to answer by clicking the correct number on the pillar:
Isis Gate 1 = 074 Isis Gate 2 = 018 Isis Gate 3 = 004 Isis Gate 4 = 014
After you’ve opened the fourth gate, before you go through the Guardian Doors, go investigate Howard’s Living Quarters (between the third and fourth gates). As you did in each of the other living quarters, listen to all the crystal video tapes and look around. On the desk in Howard’s room is a box with a key inside. You must pick this up and put it in your inventory for future use.
Now you can go to the Guardian Doors. Drag the Golden Ankh from your inventory onto the doors to open them. Go through the doors to the elevator. Take the elevator up one level to the Time Gate room. Stepping into the room, you face the Time Gate Console. Walk around the room to find the planet for Earth and click the red button on it’s pedestal to activate. Go to the Time Gate Console. On the console are a red and green button and a triangle to the right. Click on the red button to activate the triangle. Click on the triangle until the word Lhasa appears below the green button. Click the green button to select the location, and the screen changes to a grid with number input buttons for coordinates. Enter the coordinates given above for Lhasa and be transported in time to Lhasa, Tibet.
Lhasa
Go into the Buddha chamber and click the hand on the Buddha’s head to open the stairway down. Go down the stairway. Wander around until you find the Monk’s Room. You can open the door and hear the chant, but nothing else to do. Wander some more until you find the room with the open door. Enter. Go forward and read the book on the low coffee table -- this is the solution to the Mandala puzzle on the wall. Go to the Mandala puzzle. The solution to this puzzle is like the snake puzzle. There are six Lobes (clusters of three numbers). There are nine "snakes" each with two heads. The top lobe, from left to right, should be 8, 18, 4. After you’ve set this first, make each of the six lobes total 30, and at the same time the sum of the two heads of each "snake" must equal 20. Once you accomplish this, the puzzle is solved and the "key" transferred to your inventory.
Go back to the TimeGate Console. Click the Red button to activate the triangle, click the triangle until the word Tikal shows below the Green button; click the green button to select Tikal; and at the grid screen, enter the coordinates to Tikal (noted earlier). You will be transported to Tikal.
Tikal
Find the Ballcourt Puzzle. This is the tilework on the ground that looks like dice. It doesn’t matter from which direction you approach it. On the pillar in front of you as you face the ballcourt are the dice sequence you must follow to safely cross the ballcourt from one yellowed tile to the yellowed tile on the other side. The sequence is different depending upon which side you approach from. Once you are safely across, the highest temple is accessible. Climb the stairs and click on the power crystal to transfer it to your inventory.
Find the temple with the well (blue pillars). Go down into the well. Use the key from the Mandala puzzle on the door to open it. Go forward seven steps down the hall into the Sarcophagus room. Turn left twice and click the hand on the post to get close. Click the hand on the post and hear a click. Go around the room opening the four panels with Hawks on them to see glowing globes. Step once back into the hallway, turn right, and click on the skull that was behind the hawk panel – your focus is now on the post again. Click the post again and the lights from the glowing globes will center and beam on the Sarcophagus to open it. Look in the Sarcophagus and take the power crystal from the skeleton’s hand. Go back to the Time Gate Console.
Atlantis
At the Time Gate Console, go to the Atlantis coordinates. When you arrive, go forward from the timegate in Atlantis till you find the elevator to the underwater pod. Take the elevator down to the pod. Note that it’s easy to get lost in the underwater city. Again, your quest is to find another of the power crystals hidden by Howard.
Navigation: R= Right crystal, L=Left crystal, U = top crystal, D = Bottom crystal. Of course, Left means left, Right means right, Up means forward, and Down means turn around.
Go F,F,F,R,F,R,F,L,F,L,F. Use the "arm" control in the pod to retrieve the crystal and transfer it to your inventory. Reverse this sequence to get back to the pod dock. DON’T FORGET: THE DOWN CRYSTAL MEANS TURN AROUND, NOT BACK UP!! When you are back at the dock, the only way you know you are there is if you can "finger up". Go back to the Time Gate Console.
Space Station
Back at the Time Gate Console room. Walk around to find the planet for Traveler I and click on it’s red button to activate. Return to the Time Gate Console. Again, you want to go to the Traveler I coordinates. However, when you try to do so, it indicates you don’t have sufficient power. That’s what the POWER crystals are for that you’ve been gathering in the other Times. You must go to the Power Room and insert these crystals in their places. To get to the Power room, go back into the Lift and go up one more level. Step out and drag the three power crystals in your inventory into different power receptacles – it doesn’t matter which. Go back down to the Time Gate Console and go to the Space Station.
When you arrive at the Space Station, go out the door, take a right and go back into the other door. This is the elevator. Go to the second level – the garden. Find the access keycard as you walk around the garden. In the garden there is also a lounge area. Click on the game center with the arms and note the three digit code on the pyramid crystal. This is the entry code into Howard’s cabin on the station. Go back to the elevator and put your access keycard into the elevator pad. Go to level three. There are two stairways. At the top of one is the keypad access to Howard’s cabin. Enter the access code to his cabin to unlock the door (the one you got in the Garden). Go back down and then up to Howard’s cabin. There are two levels in his cabin. Upstairs you can view a couple videos. Downstairs find the cabinet. Use the key (from the box in Howard’s living quarters in the Labyrinth) on the cabinet to get the last power crystal (blue).
Go back to the Time Gate Console. Turn around and go into the lift. Go up to the crystal power station. Place the blue power crystal in the only empty receptacle. This triggers the end-game crystal sequence. Remember the torn paper in Lantis’ room? Enter the numbers from that paper here to solve the end game.
VOILA! That’s It! Th-th-th-that’s all folks!!!