| ||||
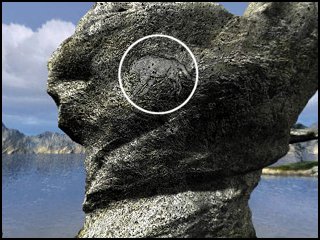
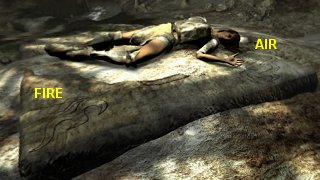
| After falling down a hole (while venturing into the caves) the archaeologist's body rests on a large stone slab. For this part of the game you control her spirit. Take note of the strange symbol on each of the four corners of the slab, they are relevant later. | ||||
FIGHTING WOLVES | ||||
| Enter the cave in the direction of the archaeologist's right shoulder. Insert the stick in the wooden block lying in the ashes to start a fire. The flames cast shadows of five wolves onto the wall, grey and black on the left - green, red and white on the right. All but the strongest must be eliminated by pitting the wolves against one another in a series of fights. | ||||
| Begin with the black wolf (left) and pit the green wolf against him. After the black wolf wins, pit the red wolf against him. The red wolf wins and his next opponent is the grey wolf. In the final combat the white wolf is victorious and is transformed into a real wolf. Follow the white wolf through the wall. | ||||
SABRE-TOOTH TIGER | ||||
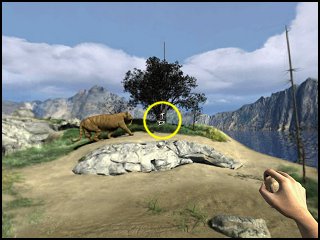
| Walk along the water's edge and pick up the tree stump lying in the grass. To get to the sabre-tooth tiger, place the stump in front of the tree, climb along the tree which bends, allowing you to cross. Once across the water, check the ground carefully and pick up the stone. | ||||
| To find a way past the tiger you need to 'die' a couple of times. If you try going past on the left, he kills you. If you try passing on the right you sink into the quicksand. You must lure the tiger into the quicksand by throwing the stone at him. To do this, both the cursor hotspot (where the stone is thrown) and the tiger have to be in the right positions. The graphic below indicates these positions. | ||||
| ||||
| Before continuing pick up the branch lying on the ground. Also, remember to walk left (past the rocks) to avoid the quicksand. | ||||
BLACK WOLF | ||||
| Make your way to the next island. Use the branch to tip the large rock into the water, creating a stepping stone for you to get across. | ||||
| Take note that the white wolf is sitting on the grass patch to the right. To cross to the island with a bear you need to find a long wood stick, which is lying on the ground in the area through the hole in the rocks. When confronted by the black wolf, immediately turn round and head towards the white wolf. The black wolf will follow and be defeated in a real fight with the white wolf. Return through the hole in the rocks to get the long wood stick. | ||||
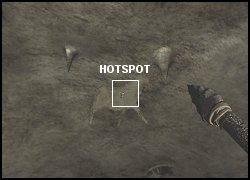
| Look for the hotspot near the water's edge and pole vault (using the long wood stick) across to the island with the bear. | ||||
GIANT POD | ||||
| Continue past the bear and float across (on the log) to the large rock below the giant pod. Make your way to the top along the circular path. Study the rock face as you go, noting the painting of a white wolf near the bottom. Remember where else there were wolves on a wall? The painting is used to return to the cave near the archaeologist's body. From there, going through the wall now brings you back to this point. | ||||
| ||||
| From the top of the rock enter the giant pod by moving upwards. Take note that you enter the pod through the round membrane in the centre. Pick up the skull in the alcove to get transported into the skull maze. In the same way as before (heading towards the main pod), find the dolphin who tells you: | ||||
| ||||
| Unlike your first visit, there's no need to go to the corridor bubble and follow the dolphin's instructions. However, her instructions are needed later in the game. For now, leave the skull through the exit bubble, which again can be found in the same location as the dolphin. | ||||
| Take the spear-thrower and the skull, then exit via the round membrane. Use the wolf painting to go back to the cave near the archaeologist's body. | ||||
TARGET GALLERY | ||||
| Enter the cave situated in the direction of the archaeologist's right leg. Take note of the stone slab lying on the ground, which depicts a body with four symbols at the corners. | ||||
| The four animals running across the wall are the targets and the spear on the ground is used as a weapon. It may take a bit of practice, but it's not too difficult to hit the targets. | ||||
| ||||
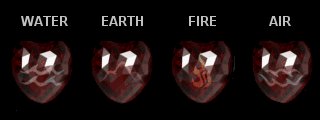
| First, ensure that the cursor hotspot is positioned on the animal as it passes. This should be done towards the right side of the screen. Keeping the cursor in the exact same position, throw the spear as soon as the animal appears on the left side. There's no audible nor visible indication that you've hit the target except that the animal will no longer run across the wall. However, check your inventory to see if it now contains the heart you get for a direct hit. Also note that you may score a hit even if the spear doesn't actually hit the target. The four hearts (Water, Earth, Fire and Air) are identified by their symbols. The symbols are not very clear, so you need to look very closely to see them. | ||||
| ||||
| These symbols are identical to those on the slab where the archaeologist's body is. Similarly, the symbols on the actual slab are not easy to see, but three of them can be identified. By process of elimination, you can work out what the fourth symbol is. | ||||
SYMBOLS ON THE RIGHT OF THE BODY | ||||
| ||||
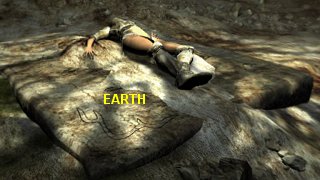
SYMBOL ON THE LEFT OF THE BODY | ||||
| ||||
| Place the correct hearts onto the four corners to revive the archaeologist. | ||||
| ||||
| Return to where you entered by going through the cave nearest the waterfall. After the rather unpleasant experience of killing a mammoth, you return to the skull chamber. | ||||
NOTE: Only follow the SHAMBHALA walkthrough if you've completed the BAGHDAD journey. | ||||
| ||||
| ||||