| ||||
| For this section of the game you switch characters and become the Thief of Baghdad. | ||||
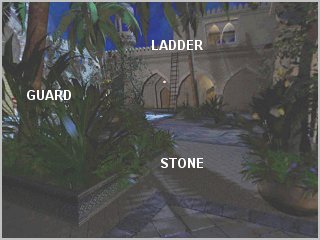
AVOIDING THE GUARD | ||||
| There are a few timed sequences in this puzzle but they're not particularly difficult. While in the jar pan to the right to find a pot filled with rotten fish. Open the pot to allow the cat to take a fish, then scamper off. The cat distracts the guard long enough for you to climb out the jar and hide behind the bushes. The guard cannot see you behind the bushes, so you can stay there indefinitely. Pan to your right and upward to see a balcony. Also note the ladder against the far wall. Pick up the stone and pan to the left until you see a hotspot on the palm leaves. Throw the stone at the leaves and the guard goes to investigate. Quickly fetch the ladder, then return to your hiding place. Put the ladder below the balcony and climb up to enter the merchant's house. | ||||
| ||||
| As soon as the cat knocks over the vase, enter the door directly ahead. The merchant's daughter tells you to hide under the bed. You now head off to the Wizard's Garden in search of a black rose. | ||||
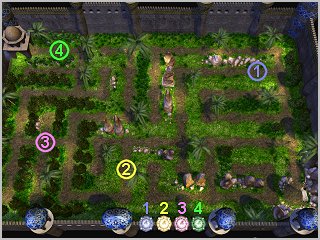
Click the icon below to view a MAP of the Wizard's Garden. | ||||
| ||||
TOY MONKEY | ||||
| Begin by taking the long wood stick from the corridor to the right of where you arrived. Next, make your way to the pool in the far left corner of the garden. Against the perimeter wall is a banana tree with a bunch of bananas hanging from it. Use the long wood stick to knock one of the bananas down, then pick it up. Give the banana to the toy monkey (on the other side of the pool) and he drops three coloured sticks. This must be done while the toy monkey is facing you. Pick up the three sticks - red, green and blue. | ||||
GARGOYLE MONSTER | ||||
| Next to the gargoyle monster in the far right corner you find an orb. Also note there's a small box hidden in a hole in the wall behind the gargoyle and a cage suspended above. | ||||
| Insert the orb into the fountain-type device inside the gazebo to activate the unicorn maze. The object of the maze puzzle is to guide the unicorn to safety in the top left corner. The four coloured pagodas at the bottom must be placed in the maze to steer the unicorn onto the correct path. | ||||
UNICORN MAZE SOLUTION | ||||
| ||||
| When the unicorn is safely through the maze you get a unicorn's horn. Insert the horn into the slot on the lantern (on the path between the gazebo and the gargoyle) to drop the suspended cage over the gargoyle. | ||||
| Remove the small box from the hole in the wall and get three gemstones - an emerald, ruby and sapphire. | ||||
THREE PAGODAS | ||||
| Next go to each of three pagodas in the garden. Note that each pagoda has a different coloured interior. As you approach the pagodas, a soldier jumps out to prevent you entering. To get past the soldier hold the stick (dropped by the toy monkey) with the same colour as the pagoda's interior and enter. The women in the pagodas all give you something in return for the gemstones they want. | ||||
| ||||
| Hold the gold key (from the Red Pagoda) to enter the gate into the Serpent Tower. You must beat the imp at a game of 'Snakes and Stars' (a version of Snakes and Ladders) to reach the top. | ||||
Click the icon below to view a detailed solution on winning the game. | ||||
| ||||
| After beating the imp to the top, hold the silver key (from the Blue Pagoda) and go through the door. From the Serpent Tower take a magic carpet ride to the Wizard's Tower. | ||||
CONSTELLATION CHAMBER | ||||
| Enter the Wizard's Tower and climb the staircase behind the magical cobras. Listen very carefully to this part of Scheherazade's tale to get the solution to solving the constellations puzzle. She says: | ||||
"He simply had to determine whereabouts in the stars the cobras had sent him and where our world was... Then chart a course through the heavens!" | ||||
| The constellations visible through the four windows must be reproduced on the giant galaxy on the floor. The fifth constellation, the painting with the serpent in the centre, must similarly be reproduced. When a particular constellation has been correctly plotted on the floor galaxy its stars are joined by a solid gold line. Note that the five constellations must be completed one at a time. | ||||
| ||||
| The remaining star (on the floor galaxy) is where 'the cobras had sent him'. To complete Scheherazade's tale you must 'chart a course through the heavens' to 'where our world was, i.e. back to the constellation with the large serpent in the centre. | ||||
| ||||
| After connecting the stars in the final constellation, you'll be back at the foot of the staircase - this time sans any cobras. Climb the staircase and enter the Wizard's Room. | ||||
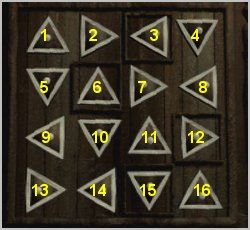
TRIANGLES AND BOXES | ||||
| The four drawers at the bottom of the wooden cabinet are each marked with a triangular symbol pointing up, down, left and right respectively. The same symbols appear on the 4X4 grid of buttons above. When a particular button is clicked either nothing happens or one or more of the buttons (having the same symbol) will protrude and/or retract. Exactly what happens depends on which other buttons were clicked before. | ||||
| ||||
| Note that four of the buttons (3, 6, 12 and 15) have a wooden frame around them. To open the drawers at the bottom, only the four 'framed' buttons must protrude and all the others must be retracted. There are no clues as to the sequence in which to click the buttons, so you have to resort to 'trial and error'. All you know is that clicking a particular button only affects buttons having the same symbol. Also, the order that buttons are clicked in changes the affect of clicking a particular button. | ||||
| There are a number of possible sequences, but the simplest is 1, 5, 8 and then 12. After correctly setting the triangle buttons, you hear the drawers unlocking. Open the drawers and take the parchments inside. | ||||
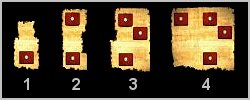
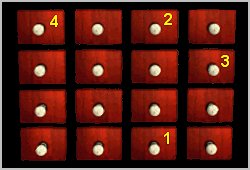
| The cabinet should rotate, and reveal a 4X4 grid of red boxes. The four parchments provide the solution to opening the correct boxes. | ||||
| ||||
| The complete parchment (4) shows which four boxes must be opened. The smallest (1) shows which box to open first, the parchment with two boxes on it (2) indicates the second box to open, and so on. | ||||
| Open the boxes in the order indicated by the parchments. | ||||
| ||||
| The top of the cabinet opens, revealing a magic lamp and duster. Take the duster and wipe the magic lamp with it to summon a genie. After your wish for a black rose is granted the skull appears on the shelf. Pick up the skull and get transported into the skull maze. In the same way as before (heading towards the main pod), find the dolphin who tells you: | ||||
| ||||
| Unlike your first visit, there's no need to go to the corridor bubble and follow the dolphin's instructions. However, her instructions are needed later in the game. For now, leave the skull through the exit bubble, which again can be found in the same location as the dolphin. | ||||
LEAVING BAGHDAD | ||||
| Leave the Wizard's Room through the door and enjoy the conclusion of Scheherazade's tale. You are then returned to the skull chamber. | ||||
NOTE: Only follow the SHAMBHALA walkthrough if you've completed the SIBERIA journey. | ||||
| ||||
| ||||