 |
 |
Martin Mystere: Operation Dorian Gray
by Artematica Entertainment
Walkthrough by MaGtRo July 2005
Gameplay: The main menu has the new game, load game, options and exit. The options menu has dialogue subtitles, extra and back to main menu. The extra option has artworks and sequences. When artworks and sequences-cutscenes are selected, they are activated to be reviewed at leisure.
During gameplay, press F1 to get the in game menu: back, save, load and exit. To save the game, left click on a space in the save menu screen and then press save. There are only 8 saved game spaces. You can overwrite the saved games by clicking on the picture to be overwritten and then press save. To load a game, click on a picture and then click load. Click on exit to go back to the main menu.
The game control is point and click. Moving the cursor over the screen labels active objects, character and area. Left click identifies the object. Right click of the mouse allows the selection of an action on that highlighted area and a following left mouse click does the selected action.
To open the inventory, click on the 'i' at bottom left of the screen or I of the keyboard. Do the I click again to remove the inventory bar. There are 2 arrows on either side of the inventory bar to see all items. Items can be combined by clicking on one item and then the other item to combine with when the appropriate cursor is seen. Items from inventory can be clicked on highlighted items or character on the screen. Right click to return the item in inventory. The cell phone can be used by selecting it from inventory - a close view is seen, use the up-down arrow to find a name, click on a name on the phone list and then press the green button.
Left click skips the intro and also speeds up the dialogue Double click on an exit icon to skip the 'exit to' scene. The CD has to be on the CD drive to check the software protection and gameplay.
Note: Left click items in an area and then right click to see if there's anything important to take.
Act 1
Martin wakes up from a nightmare. The phone is ringing. Place cursor over the cell phone on the table. Right click to select the action (hand cursor) and then left click to do that action - pick the home telephone up.
Travis calls and informs Martin that Professor Eulemberg was killed. He wants Martin to meet him at the Professor's Villa at 4 Purple Rose St. Martin's car is under repair. He needs the mechanic's number. Look at the note taped on the closet. Diana, Martin's wife has taken the keys to the wardrobe.
Exit the room. Across is Java's room and beside the bedroom is the bathroom.
Wardrobe key and mechanic's phone number:
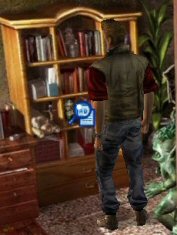
Living room - Go downstairs and see Java, the prehistoric assistant of Martin. Talk to Java. He might want something in return for the wardrobe key. Hmm...Look around. Check the door left of Java and learn that the basement is flooded. Go left of screen. Look at the table between 2 doors and see the base of the cordless phone and various papers beside it. Take the New York map. Look close at the map in inventory and see 3 places that are accessible - the professor's villa, Martin's home and Barney's bookshop.
Kitchen - Enter the room on the left. It is the kitchen. Look around. Look close at the notes on the fridge door. Take the white paper on the right. It is Diana's notes and has part of the mechanic's number. Look close at it in inventory.
Study - Exit the kitchen and enter the room left of the armchair. Look around. Look-click at the green troglodyte head at the miscellaneous book case left of the door. Martin will mention that Java is hypnotized by this head. Take the head paperweight. Look and right click the magazine rack under the computer table. Take the pen. Take the part of the mechanic's number left of the computer. It is the other half of the torn mechanic's number. In inventory, right and then left click the part of mechanic's number and then click on Diana's notes to get the mechanic's number. Look close at the number and see that the paper is now pasted together. Left click the mechanic's number and automatically, Martin will call the mechanic.
Foyer - When the doorbell rings, go to bottom left of the screen. Go to the foyer and pick up the car keys off the floor.
Living room - Give the head paperweight to Java and the wardrobe key will now be in inventory.
Bedroom - Use the wardrobe key on the keyhole of the wardrobe door with a piece of paper taped on it. Right click the key on the keyhole to give Martin some privacy. Now, he's dressed. Look close at the block notes in inventory and see notes to do - look for mobile phone, get car and find the villa. You already have the map for the villa and the car keys. Now, where is the cell phone?
Cell Phone search:
Living room - Use the home telephone and select Martin. The ringing is coming from the sofa. Click on sofa and take the mobile phone. Right click the cordless base on the table beside the door to the kitchen to place the home telephone on the base.
Exit the house via the foyer door. Note that Martin's house is mislabeled as neighbor's house. Click on the red sports car. Inside the car, click on the ticket. Look close at the calling card stained in ink in inventory and note that it is from D. Dog, a friend from London. Exit the inside of the car screen. Right click the car and the map will appear. Select the Professor's villa.
Look at block notes and see that act 1 'to do' is now crossed out.
Act 2
Villa: Jenna Hate, a journalist interviews Martin. Select any-all dialogue and Malcom will intervene. Enter the villa.
Foyer - Travis talks to Martin about possible motive for the murder. Talk to Travis and learn about research and clues. A new location Donovan S. C. museum appears in the map. Answer the cell phone when it rings. A serviceman asks to see if anybody is at home for basement flood repair.
Go to lower right of screen and talk to the forensic man. Learn about Eleanor and the text in the professor's computer.
Library - Enter the double glass doors at back of the area. Go to bottom of screen and look around. Look at the desk by the globe. See an insert screen of the desk. Check everything. Take the paper knife under the envelopes. Talk to the policeman and he won't let you in the study. Exit the library.
Second floor - Once outside the library, click on the second floor exit cursor to go there automatically. Enter the door left of the glass windows.
Housekeeper's room - Look around. Check the package behind the chest. It is marked Urgent for the Professor. The locked chest is too heavy to move. Look at the blanket draped over the bed. Right click the blanket to note something is under the bed. See a box. Take the key and use it on the chest. The key breaks. Need something sharp, eh. Use the paper knife on chest keyhole. Now the paper knife breaks. See the mess Martin made of the contents of the chest. Look at the painting-package now opened - Here behooves us use a little art, Purgatorio 10:10.
Exit the room and click on the door guarded by the policeman. Talk to the policeman. He won't let you in unless you have an ID. Go back home by clicking on Martin's home in the map.
Get an ID:
Martin's home: Enter the house and see if you can have a coherent talk with Java in the living room.
Basement - Enter the basement through the door left of the bookcase. Look around. Take latex glove from the GloveUp box on the left shelf. Look at the purple can on top of the washer. Look at the washing machine door - dirt has jammed the window. Uhm...
Kitchen - Go to the kitchen. Take grease remover - a powerful substance from the detergents on the shelf under the table.
Basement - Use the powerful substance on the washing machine door. Right click to open the washer door. Look at the damp clothes inside and note Martin's documents in trouser. Right click to take the documents - NYPD ID.
Villa:
Right click map and go back to the villa. Go upstairs to the room guarded by the policeman. Talk to the policeman and Martin will show him the ID. Enter the professor's bedroom.
Professor's bedroom - Look around. Look at the handkerchief clasped by the professor's hand - it is embroidered and has a name Alexander Uben. Use the gloves in inventory. Look at the top of the dresser left of the window and Martin will comment on the picture of Uben and Eulemberg with a jungle backdrop. Take the Uben picture. Look close at the picture and get an envelope. Look at all the pictures. Go to the side table left of the bed and read professor's notes about fear especially the last page. Click on the right page to turn the page. Check the desk drawers left of the side table. There's police seal on the drawer. We can't open it now. Look on the desk top and note a label for a suitcase - A695 American Airlines. Use the map to go home.
Open the envelope:
Martin's home, Kitchen - Take the teapot from the pullout table and click it on the cooker-stove using the single gear icon. Then take the envelope taken from the Uben picture and use it on the now steaming teapot using the single gear icon. Look at the note taken from the open envelope - 555-6279287, CN 459-478-320-S, Plaza Da Nat 328, Mexico, Vallar (Veracruz). Right click the code-address in inventory and automatically dial that number. An answer is heard that the delivery will now be done. A new location is added to the map - airport. Click on airport. See a cutscene of Diana, Java and Martin in discussion and subsequent the flight to Mexico.
Act 3
Mexico:
Plaza Da Nat: Try the door behind the truck-van. Then talk to the Rosalita, lady at the veranda on the second floor of the house. Learn about Professor Alexander Uben, his problems and help from Professor Eulemberg. Talk to the sleeping man - Pedro Rama sitting on a chair at right. He is thinking of a solution for a music problem. Click on the mule and Martin is worried that it might kick him.
Solution to Pedro's problem and getting in at Prof. Uben's house:
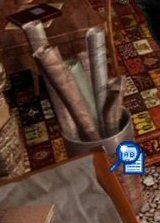
Go to the cupboard gate left of the truck-van. See that it is chained. Click the hook right of the gate to open the cupboard. Look at the insert screen of the cupboard content. Take the Tango and Salsa Mix sleeves from the albums at third from top shelf. Check and take the wooden box with the lid nailed down at bottom shelf.
Give the Tango and Salsa Mix sleeves to Pedro as a solution to his problem. Uh Oh! There's no record inside.
Look at the wooden box inventory and it is noted that it must be full of records. How do we open it? Click the wooden box on the mule. Then right click to touch the mule. See, he kicked and opened the wooden box.
Take the only unscratched record from the box. In inventory combine the vinyl record and the Tango and Salsa Mix sleeve to make a complete album of Tango and Salsa Mix. Give the complete album to Pedro. Pedro gives the key to the Professor Alexander's home.
Find the archeological dig site:
Prof. Alexander Uben's house: Use the key on the door. Look around Professor Alexander's home. Look at the framed handkerchief. It is similar to what Prof. Eulemberg was holding in his hand when he was shot. Look at the photo portrait of Prof. Andrew Robertson that disappeared in Chile.
Click on desk or move to bottom of screen to get to another part of the room. Click on lemur and see it is sitting on something. Check the bookcase and at the middle third shelf from top there is a map between the books. Take the map. Look close at the map in inventory and marks on it are noted.
|
|
Click the bin that has roll of maps beside the desk and note the shiny papers. Take the shiny papers and look at it in inventory. The piece of paper has a route marked on it. Those 2 look similar. Combine the map and the piece of paper in inventory to make a complete dig map.
Go to the other side of the room by the stove. Take the yellow strange plug hanging above the stove.
Use the van-truck:
Exit the house and go to the truck-van. Click on the tube right of the running board of the truck-van and get a close up of the van.
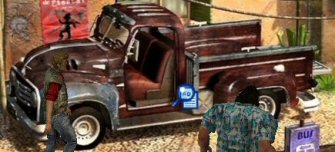
Note the valve and tank. The valve is too tight to turn. Click the strange plug on the valve to connect it to the valve. Click the valve with the plug and it will turn to open it. Exit the close up of the van. Now, click on van to use it. Java and Martin goes for a ride.
Aztec archeological site:
Martin and Java are now in front of an Aztec temple. Exit left and Martin calls for Prof. Alexander Uben. Listen to the talk between Uben and Martin. Martin needs proof to convince the professor who he is - not Inspector Labacos. The ID in inventory does not work. Exit at bottom of screen and then exit right in front of the temple. See Martin and Java fly back to New York.
Act 4
After relating the trip to Diana, check the block note in inventory and see the next plan to work on.
Learn about a secret door:
Villa: Go to the villa and talk to Travis inside. The professor's room was ransacked last night.
Enter the double doors of the library behind Martin. Enter the study on the left that was previously guarded.
Study - Look around. Look at the telephone on the desk close to the biscuits. Some keys are worn out and there are scratches. Take the telephone. Look at the telephone in inventory and see that 1 3 4 keys-buttons are worn out. Check the laptop and it can not be switched on - the battery must have run out. Check the box right of the lap top and take the Professor's magnetic pass card for the Museum - Donovan Culture and Science. Look at the pass card in inventory.
Look at the large painting of Caron on the wall - Now let us descend in to the blind world. Inferno 4, 13. Look up at the ceiling's fresco representing paradise - Our charity doth never shut the doors. Paradiso 3, 43. Look at the painting (labeled telephone) on the floor-rug: It depicts Hell. Martin makes comments about the afterlife depicted in the Study - Life after death. Hmm... Dante Alighieri's Divine Comedy
Look at the central bookcase (middle shelf) right of the painting. Martin noted that there is an antique edition of Dante Alighieri's Divine Comedy. After seeing the ceiling fresco and the floor painting, Martin will ask about a connection between the book and the painting. Martin pulls out the gold book and sees a telephone jack.
Use the telephone on the phone socket. At the dial close up, press (after trial and error on the 3 worn out dials) 4 1 3 and see a metal door behind the Caron painting. The secret passage is a secret door with a hole. The hole is on a gold disk at the center of the door. We can come back here later.
Exit the library and go up to the professor's bedroom.
Learn about Erika:
Professor's bedroom - See that the room was ransacked. Note the slash on the mattress. Pick up the block notes on the rug left of the bed. Look at the block notes-piece of paper in inventory. There are some marks on it. Combine the pencil and the piece of paper in inventory and see - Erika Wallas, Donovan Culture & Science Museum 2nd Floor, Sector C. Look at the open drawer at the desk by the window. Take the letter and look at it in inventory. It is an unfinished letter to Erika Wallas of the Museum. Read the letter.
Museum - Use the map to go to the Donovan S.C. Museum. See that the main door is closed. Go to the metal door left of the steps. The door closes electronically. Look at the switchboard right of the metal door. Use the magnetic pass on the switchboard. Enter the museum. Look around. Use the elevator and be at the first floor Display room. Use the elevator on the left to go up one more floor to the second floor.
Erika - Go to the wooden door right of the room. Enter the door. Talk to Erika Wallas. Note the words the professor said to Erika during an MIT dinner. Learn about the necklace-antique amulet given by Prof. Eulemberg and the quarrel between Uben and Eulemberg. Look at the Purple Rose poster and take note of Eulemberg's inscription. Exit at bottom of screen and see the great library-archives and a photocopier. Look at the photocopier and Martin says good for making forgeries - is that a clue? Now where to go next? Select Barney's bookshop in the map.
Get a purple rose for a medallion:
Barney's Shop - Look around at the items for sale. Talk to Barney and he talks about ticket to the Blue Rose. A new destination is added to the map. Barney wants a loaned book back, a short stories book.
Martin's home - Go to the study and take book right of the globe at foreground of the screen. This must be Barney's old dog-eared book. Return to Barney's bookshop.
Barney's shop - Give the old book to Barney and he gives a Blue Rose free ticket. Go to Blue Rose.
Blue Rose - Try to enter and talk to the bouncer. You need a ticket to get in. Give the ticket to the bouncer. Barney gave you a woman's ticket and is not allowed in. Look at the Blue Rose poster left of the door. There's blue rose stamp - sample entry for men and women at the bottom of the poster. Take a sample entry pass. Go back to the museum and the library at Erika's office.
Museum - Enter through the side metal door. Use the elevator, take the other elevator on the left and enter Erika's office at right of the room. In inventory, combine the Blue Rose ticket and the blue stamp from the poster to make a false Blue Rose ticket. Use the false Blue Rose ticket on the photocopier to get a perfect reproduction of Blue Rose ticket.
Blue Rose - Go to Blue Rose and talk to the bouncer. Inside the club, Martin talks to Jenna Hate. Look around and talk to Jody the bartender. Look at blue rose on the table and Martin will say it looks purple in this light. Try to take a blue rose from the table. Uh Oh, Jody stops you. Talk to Angie, the dancer and ask her to distract Jody. Take the blue rose from the table.
Act 5
Martin's home - Go downstairs and try to talk to Diana. Go down the basement via the door behind the couch. Take the purple spray from top of washer. In inventory, combine the purple spray and the fake blue rose to make purple rose.
Museum - Go to Erika at her office at the second floor library. In inventory, combine the purple rose and the unfinished letter of Professor Eulemberg to Erica to get a bunch of roses and a letter. Give the roses-letter to Erica. Erica gives the medallion to Martin. Look at the medallion in inventory. So we have to go to Mexico to talk to Professor Alexander Uben - he can explain about the medallion.
Mexico - Go left and then up the stairs of the temple. Meet the professor and learn about their project - fear of death, Aztec ritual called Aidou, columns and their writing. These findings lead to 3 precious boxes, Boat and eternal life. Uben gives one of the 3 precious boxes to Martin - sealed casket. It is the parcel that was sent by dialing the number on the code from the sealed envelope. He wants Martin to find a way to open the door.
Open the inner door of the temple:
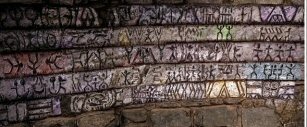
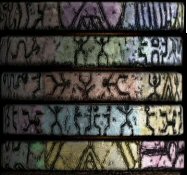
Look at the hieroglyphic writing on the wall. Note that each line of the hieroglyphs has glyphs that are highlighted by different color: from top to bottom - purple, green, red, blue and yellow. Exit and look close at the left column on the foreground. The active cursor here is on the left side of the column. Arrange the column rings to be similar to the different colored glyphs on the wall.
The inner door opens but the entrance to the temple closed. They are trapped.
A soul calls for help:
Martin and the professor entered the chamber the writings have spoken about - the boat room. Look around especially the column on the left of the faces or middle of the screen - Earth, War, Eternal life and a journey.
There several stones here: the pointed stone on the right steps, small stone right of the entrance, the deformed stone on the left steps and a round stone at mouth of the face left of the entrance. Pick up the round stone.
Look at the boats by the water. Only one is not broken, destroyed or damage. Place the correct stone - the round stone picked up from the mouth of the face left of the entrance, on the boat.
Martin will separate his soul to fly away. The professor guides him to get his soul to fly away.
Martin's soul-ghost is now in his bedroom. Talk to a sleeping Diana.
Act 6
Is it a dream?
Diana is not sure about dream-nightmare and wants to look for the paper Martin wrote the address on. In inventory is her ???journal, lipstick and mirror.
Go to the window at right of the screen and open it. Look down at the blue dust on the carpet. But it was just a dream.
Go down to the kitchen and look at the white board right of the refrigerator and find the address in Mexico.
Diana and Java travels to Vallar.
Get the archeological map:
Prof. Alexander Uben's house - Move the cursor to the lemur and see that she is sitting on the map of the dig. Go to the kitchen side of the room and take the jar of nuts from the lower shelf. Place the peanuts on the armchair. Take the map of the digs.
Hear the bus outside. Go outside and automatically ride the bus.
Archeological site - Go left to the campsite and check the turf covered dig site. Take the machete. Climb up the stairs of the temple. Diana talks to Martin.
Open the door to the temple:
Diana needs to look for the emergency exit. There's a column on each side of the entrance that has a low and high hole.
Go to the left side of the entrance. See a structure covered in vegetation. Use machete on structure covered in vegetation to uncover an Aztec rock head. Look at it and note that it is separate and sitting on a platform that is level to the ground.
Go back to right side of entrance where Java is standing. Use machete on climbing plants at right side of the alligator rock head and expose a platform.
Look at rock head on the floor. Talk to Java. Java places the head on platform. Not enough weight to lower the platform. Talk to Java again to sit on the stand.
After Martin talks about his predicament with eagle sized vampire bats, look at the columns. They now have buttons.
Press the buttons in correct order. If the wrong order of buttons is pressed, they all pop out again.
The correct order is: top button at column by Java, bottom button at column at other side, bottom button at column by Java and top button on column at other side. The door is lifting.
Martin and the professor come out. Decisions and work are needed to be made. Martin leaves the stone with the professor. When Java leaves with Martin and Diana, the entrance to the temple is sealed again.
Act 7
3 precious boxes:
After the talk between Martin and Diana, enter the study left of the living room. Look at the parcel on the floor. Open the parcel and see the second box labeled parcel.
Villa - Go to the library at bottom screen from the foyer. Go to the red sofa and take the third parcel.
Open the precious boxes:
Use the medallion on the sealed casket and it opens. There is a big cylindrical stone with rings and golden symbol; it is emanating a strange kind of heat.
Use the medallion on the parcel from Martin's study and it opens. There's a small cylindrical stone with rings and golden symbol; it is very bright.
Use the medallion on the parcel from Professor Eulemberg's library and it opens. The seal states - A trusted person has the key. The code is in the box behind the cover. Professor Eulemberg.
The clue and very imaginative too is in the paper inserted between the plastic and box of the game CD. So you are the trusted person with the key.
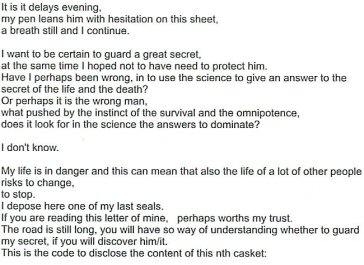
Press the glyphs above the Roman numbers - 2 3 1 3 3 1. There's a medium cylindrical stone with rings and golden symbol; it is hot and luminous.
Take the big cylindrical stone and click it on the medium one. Then click the combined stone on the small one to form an Aztec sceptre.
Use the sceptre on the hole on the metal door. Enter the secret laboratory. Look at the eagle boat. Look around. The bed is connected to the boat. Go close to the computer at rear of boat. Look at notes on chair.
Watch and listen to Jenna inform Martin of the trap. They were the ones that sent the 2 stones but needed the third which you got from Mexico. Martin is hit on the head.
When he is lucid, Jenna aka Lorelei explains what happened to him. Martin, who is now Alfie is in the body of an old dying tramp. He has only a few hours.
Act 8
Let's get out of here:
There's a nearly empty B & W Scotch whiskey in inventory.
Go to the bottom of the screen. The metal door is locked. Pull the lever left of door to get light. Take the iron bar in front of the metal door on the left.
Go to the truck at the bottom screen. The truck door is rusted but unlocked. Use the iron bar on door of truck. Take the rusty key from the truck's seat. Look at everything here. Use the whiskey on the rusty key to get clean keys.
Pull back and go down to the bottom screen. Use the clean keys on the metal door by the lever.
Get what Terry lost and the 'key':
Outside talk to Terry, the other tramp. You are at DEG & Co warehouse. His medal was taken by a truck driver. He knows where Lorelei and the bad man went to but he wants something in exchange for the information.
Go to the junk car behind Alfie. Look inside the car and take the map of the port from the car seat. Look at the car's hood-bonnet and take the wire - a small electric cable.
Go to the residuals - garbage pile left of metal door where you came out from. Take screw.
Exit left of residuals. Climb the stairs and take the boots at bottom right corner of the roof. Look at ventilator on the left. Look at the dirt at left side of the roof.
Go back down and enter the metal door. Talk to Malocchio, the 'shop' owner. He gives in exchange for the boot, a small gold chain. He mentions a 'key' but you can get it in exchange for something more valuable.
Exit the shop and look at the switches left of door. One is the switch to some kind of fan (ventilator) but it has no juice. Use the wire on the switches and hear a short turn of the ventilator on the roof before it short-circuited.
Climb the stairs again. See that the dirt has been removed from the left corner of the roof. Look at scrap yard remains. Take the pocket watch.
Go back to the 'shop' and Malocchio. Hmm. He doesn't want the watch. Combine the watch with the gold chain to get watch. Give the new watch to Malocchio and get the 'key'.
Go back to the truck in the warehouse through the metal door right of the garbage-residuals. Click on the door to see inside the truck. Use the key on the glove compartment. Take Terry's Medal of Valor.
Go back outside and give Terry the Medal of Valor.
Terry states that the baddies went to Dock 9. Look at the map and see dock 9 is circled in red. Click the exit icon on the red circle.
At Dock 9, listen to Jinxs and Feng. Feng says the code is safe in the van. Nick Gaines, Prof. Eulemberg's assistant is here.
Look at Artematica's advertisement about DRU above the basement window behind Alfie. Enter the basement window.
See Martin's body and the boat here at the basement. Look at Martin, the machine and the boat.
Climb the steps and exit. Talk to Nick. He needs the medallion that is in a safe.
Take care of Feng:
Look around the warehouse. Check the metal door and note that Feng is just outside.
Take the sexy image poster right of the dartboard at top right of the room.
Click the poster on the metal door. See Alfie slip the poster under the door.
After the talk with Feng, open the door.
Exit and see Feng is sorted now. Click on Feng and take the keys to the van. Use the key on the backdoor of the van. Look at the contents of the van. Take the last page of Jinxs journal, it has phone numbers. Look close at the page and take note of Jinxs number.
Get the medallion:
Exit to bottom right and see Lorelei and Jinxs waiting for the ship to arrive.
See a green safe on top of the crates. Left click on safe to get a close up view of the safe.
What code to enter? Enter 001857890 - Jinxs number in the paper taken from the van. Then press enter.
Take the contents of the safe - the professor's stone.
Exit at bottom of the screen and enter the warehouse. Give the stone to Nick.
Watch the ending as well as the end of the credits.
I promise you my revenge will be slow but sure.
This document may not be distributed without express written permission of the author and the content may not be altered in any way.
For Questions or Comments on
this Walkthrough,
Please write to: MaGtRo
Copyright © 7/2005 MaGtRo