 Level 9 - Slave Gallery

"A grim surprise awaits Lara in this oppressive cellar: the overpowering stench of stale blood and sweat."
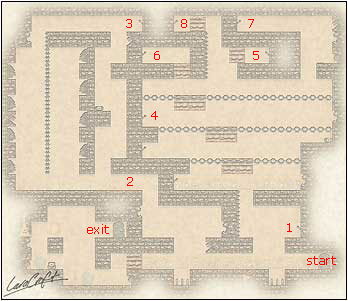
Be careful not to walk straight in to the pit with spears. Jump up to the ledge, turn around and jump to the other side. Pull the lever (1) (cut scene: a brick rises). Jump back to the other side and drop down. Walk left and be careful not to walk straight in to the other pit. Jump up and climb on the new brick a jump up. Kill the snake (2). Continue left. Climb up the ladder on its left side. Try to avoid the flying arrows. When on top, walk right. You have to drop down to the ledge underneath and haul up to the other side. Pull the lever (3) (cut scene: a brick moves revealing one of the four levers in the room with the moving platforms). It´s too risky to climb down the ladder past the flying arrows, so drop down and pick up the Medi-Pack on the way. Get back almost all the way to the start. Jump up and climb the ladder. According to the Glyphed Parchment (found in level 5) you should start with the lever on top (4). You can see half of the soon moving platform. Pull the lever twice. Every time you pull one of these three levers a cut scene will show you the platforms move. Climb down two levels and haul yourself up on to the first platform. Make your way up to the highest platform.
Jump up and pull the lever (5) (cut scene: a brick will move revealing the lever on the left). Go back the same way you came and the climb back to the third lever (4). Pull it 12 times. You should now see half of the platform from where you are standing. Climb down one level and pull the middle lever 4 times. Climb down one levels and haul yourself up on to the first platform. Make your way up to the highest platform. Jump up and pull the lever (6) (cut scene: a ledge will appear in the upper right corner of this map). Go back the same way you came and the climb back to the third lever (4). Pull it 7 times to move the highest platform all the way to the right until you can´t see it anymore in the cut scene. Climb down one level and pull the middle lever 2 times. Climb down one levels and haul yourself up on to the first platform. Make your way up to the highest platform. Jump up and haul yourself up to the ledge in the upper right corner of this map. You will trigger a button that moves the platforms. Jump up and grab the new ledge. Pull the lever (7) (cut scene: a brick will move revealing the fourth last lever).
Go back and stand on the button you triggered on your way. Every time you stand on it the platforms will move. You have to jump on it (about 13 times) until the highest platform is underneath you. I suggest that instead of jumping on the button you press DOWN to grab the edge and then haul back up again. This way you will see when the platform is underneath you. When it is, drop down on it. Go to the right side and drop down. Pick up the Medi-Pack. Drop down once more and get back to the third lever (4). Pull it 5 times. Climb down two levels and haul yourself up on to the first platform. Make your way up to the highest platform for the last time. Jump up and grab the ladder. Climb up and pull the lever (8) (cut scene: a brick will move revealing the passage to the exit). Climb back down all the way to the lowest floor with the pits with spears. Walk to the left. Be careful not to walk straight in to the pit with spears. Instead jump over it. Continue left and enter the new passage. Pick up the Medi-Pack, climb up, jump to the right and go through the door and end this level.
No new items found in this level